

If your Dometic refrigerator’s check light comes on, it signals a problem with the LP gas ignition or electrical system. This is often due to low propane, blocked lines, faulty igniters, or wiring issues.
Start by ensuring gas valves are open and cycling power to reset the system. Use a multimeter to verify voltage and continuity at igniters and control boards.
Understanding operational modes and troubleshooting steps will help you address this issue effectively and maintain reliable cooling performance.
Key Takeaways
- The check light signals LP gas ignition failures or gas supply issues in Dometic refrigerators operating on propane.
- Reset the unit by cycling the main power ON/OFF 3-4 times after refilling propane tanks to purge trapped air.
- Confirm all LP gas shutoff valves are fully open and check for proper 12V power supply to the gas valve.
- Persistent check light indicates lockout mode, preventing LP ignition until power is cycled to clear faults.
- Regularly inspect and clean burners, igniters, and wiring to prevent ignition failures causing the check light activation.
Causes of the Check Light Activation
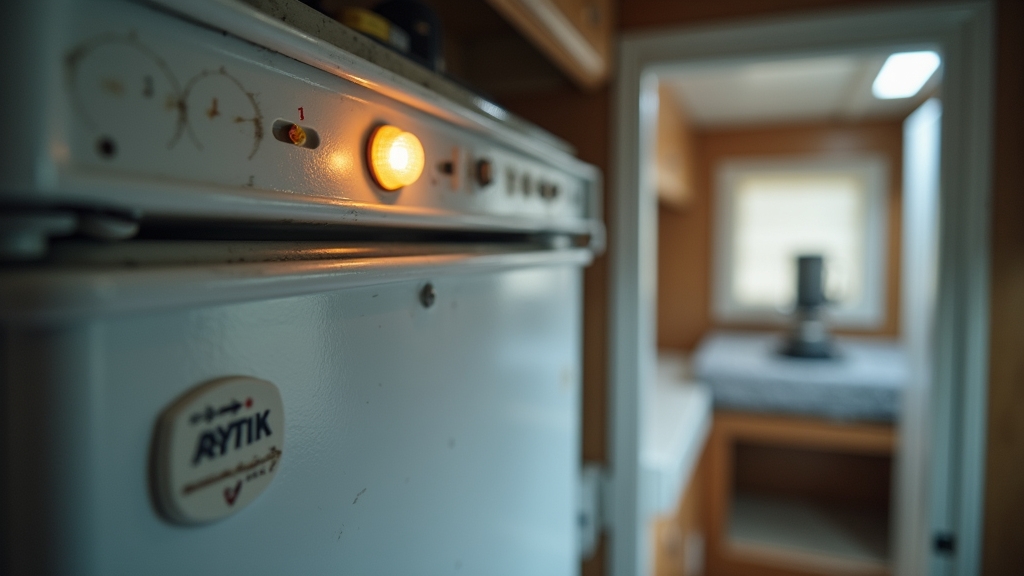
Although the check light on your Dometic refrigerator signals a problem, it doesn’t specify the exact cause. Common triggers include LP gas supply issues such as low propane pressure, empty tanks, gas line blockages, faulty regulators, or gas valve malfunctions.
Proper maintenance is essential to prevent these issues, similar to how regular maintenance is crucial for trailer hitch components. Electrical problems like low DC voltage (below 10.5V), tripped breakers, loose wiring, blown fuses, or insufficient battery charge also activate the light.
Ignition and flame sensor failures occur due to dirty burners, faulty spark igniters, contaminated sensors, or clogged burner orifices. The check light indicates a “hard lockout,” meaning the system prevents the refrigerator from attempting LP startup again until power is cycled lockout condition.
Control board malfunctions, including faulty panels, damaged wiring, thermal fuse failures, or defective internal components, can falsely trigger the check light.
Troubleshooting Procedures for Check Light Issues
When the check light on your Dometic refrigerator activates, start troubleshooting by performing a reset using the main power ON/OFF button.
Switch it OFF, wait a few seconds, then turn it back ON to clear the indicator. If the fridge was idle or you recently refilled LP tanks, cycle power OFF and ON 3-4 times to purge trapped air from gas lines. Using hoses that meet safety standards can prevent gas flow issues related to contamination.
Turn the fridge off, wait briefly, then on again; repeat 3-4 times if LP tanks were recently refilled. Before deeper checks, verify these critical steps:
- Confirm all LP gas shutoff valves are fully open.
- Use resets to rule out transient faults or air blockages.
- Observe if repeated resets fail to restore operation.
- Note if check light persists despite resets.
- Prepare for detailed electrical and ignition system tests next.
- Additionally, ensure you measure 12V on the gas valve to confirm proper gas power supply.
Following this helps you isolate basic faults and decide on further diagnostics efficiently.
Electrical and Ignition System Checks
Let’s kick things off by testing the igniter function. It’s really important to ensure that it generates a steady spark for propane ignition.
To do this, grab a multimeter and check the voltage and resistance across the igniter terminals and the wiring connected to it. Getting accurate readings here will help you figure out if the ignition system components are working as they should or if they need to be replaced.
Using OEM parts for replacements ensures proper fit and reliable operation. For consistent performance, confirm that the generator provides clean power output to avoid ignition issues.
Igniter Function Testing
Since reliable ignition depends on the igniter module producing high-voltage pulses, you’ll need to verify its output voltage and spark generation first.
Start by checking for a visible spark near the gas burner and listen for the “tick tick tick” noise indicating proper ignition pulses. Confirm the presence of 12 volts at the igniter input terminal to ensure it’s powered correctly.
Inspect the igniter electrode for damage or corrosion that may block spark generation. If sparks are absent, test wiring continuity and ensure the control board sends ignition signals.
- Detect the audible click of the gas valve solenoid.
- Observe sparks in a dark environment for clarity.
- Verify clean, secure wiring and reliable grounding.
- Use a multimeter to check voltage at key points.
- Reset the control system to clear glitches before replacing parts.
Proper securing and protection of ignition components from environmental factors can prevent failures similar to how caravan awnings are stabilized in windy conditions. If the module fails to produce sparks during ignition attempts, it likely needs replacement due to its inability to generate the necessary high-voltage pulses.
Voltage and Resistance
Although the Dometic refrigerator’s electronic control system primarily relies on a stable 12V DC supply, you must verify voltage and resistance across key components to diagnose electrical and ignition issues effectively.
Start by measuring the house battery voltage; it must remain above 9.6V DC under load for reliable operation. Inspect all 12V connections, house battery, element DC, and D+ wire for corrosion or looseness.
Check the 1A fuse protecting the 12V circuit and replace if blown. Measure voltage drop at control points, especially across the burner control device pins 6 and 7 and the X108 connector. For ignition, test electrode resistance; high resistance triggers sparking, low resistance indicates flame presence.
Monitor voltage continuity during engine start/stop and AC source cycling to verify mode switching and control system responsiveness. Ensuring proper electrical connections and regular maintenance is essential for the longevity and safety of the refrigerator’s control system.
Operational Modes and Their Impact on the Check Light
When you operate your Dometic refrigerator, its mode AC, LP gas, or Auto directly influences the behavior of the check light.
The check light only signals issues in LP gas mode, including Auto mode when the system switches to gas. It won’t activate for any AC-related problems. Choosing power sources with deep cycle batteries can ensure longer operational times in off-grid scenarios.
Keep these points in mind:
- Check light means LP gas ignition failure, not electric faults.
- In Auto mode, the fridge tries AC first; check light signals LP gas issues only.
- LP gas mode triggers the check light after three failed ignition attempts.
- The check light locks out further LP ignition until reset.
Resolving check light issues involves verifying gas supply and resetting power carefully. Regular cleaning and inspection of the burner and gas jet can help prevent ignition failures and subsequent check light activation common causes.
Common User Symptoms Related to the Check Light
You might’ve noticed that the check light can display different patterns—like being steady, flashing, or even dim. Each of these patterns signals a specific fault condition. Using a diagnostic guide can help interpret these signals accurately to prevent further damage.
For example, if the light is on steady, it could mean there’s a cooling failure, and the fridge may struggle to reach or maintain the set temperatures. In some cases, a faint check light suggests a potential electrical or sensor malfunction within the refrigerator’s control system.
If you see the check light flashing, that could indicate a more urgent issue, perhaps related to gas supply. It often happens when the system detects inconsistent or insufficient propane flow, which may require checking the propane connection or supply system.
Check Light Patterns
Since the check light serves as a diagnostic indicator, understanding its blinking patterns and steady states can help you quickly identify issues like gas ignition failures, power source problems, or ignition lockouts.
The check light blinks differently to signal modes or faults. Steady, rapid, or intermittent flashes each convey distinct meanings. Watch for these common patterns:
- Faint, persistent light signals gas ignition failure or faulty coil.
- Intermittent blinking during ignition suggests trapped air in propane lines.
- Steady light with no cooling hints at power source or ignition errors. Proper maintenance and ensuring secure connections can prevent power source problems.
- Rapid ON/OFF cycling indicates interrupted ignition attempts causing lockout.
- Continuous light outside diagnostic mode signals control board or electrical faults. During diagnostics, a blinking check light indicates that the refrigerator is in diagnostics mode and ready for mode selection.
Recognizing these patterns lets you isolate problems efficiently and take appropriate corrective action.
Cooling Failure Signs
Although the check light alerts you to issues, recognizing cooling failure signs helps diagnose the root problem. If your fridge fails to maintain cold temperatures, warms progressively, or the freezer won’t freeze, these indicate cooling unit failure or blockage. Proper maintenance, such as regular inspections and cleaning, can prevent many common cooling issues.
Notice if the interior temperature stays stable without cycling; this suggests evaporative cooling has stopped. Check for yellowish residue, corrosion, or ammonia odors near the cooling unit, signaling refrigerant leaks. Removing the RV exterior access panel allows inspection for these signs.
Visible cracks or discoloration on boiler tubing also point to refrigerant loss. Electrical problems like burner flame instability or circuit breaker trips can impair cooling. Understanding the impact of load capacity on system performance is crucial to avoid electrical overload.
Mechanical issues such as poor ventilation, the unit not being level, or clogged condenser coils reduce efficiency. Identifying these symptoms early aids precise troubleshooting before severe damage or spoilage occurs.
Gas Supply Indicators
How can you tell if your Dometic refrigerator’s gas supply is functioning properly? The gas supply indicator monitors propane flow and flame presence, powered by the thermocouple.
If the needle doesn’t move into the green zone or the electronic display is inconsistent, it signals a problem. Watch for these common symptoms:
- Needle stays far left or doesn’t enter the green zone.
- Flickering or erratic indicator readings.
- No response when switching to gas mode.
- Intermittent operation after vehicle movement.
- Indicator unresponsive despite visible flame.
These signs often point to a faulty thermocouple, flame meter, wiring issues, or gas flow problems. Regularly check wiring, thermocouple voltage, and flame stability to maintain proper indicator function.
Always ensure to follow safety precautions such as wearing safety glasses and confirming the gas system is secure before inspecting components. Using weather-resistant materials in your RV setup can help prevent related electrical issues caused by outdoor exposure.
Maintenance Tips to Prevent Check Light Problems
When you maintain your Dometic refrigerator’s electrical and gas systems regularly, you reduce the chances of the check light activating unexpectedly.
Start by inspecting electrical components: test thermal fuse continuity, verify 12V power at the circuit board, and check wiring integrity between the main board and control panel.
Examine igniter and solenoid terminals for proper voltage during ignition trials. For gas systems, purge air trapped in lines after refilling propane tanks by toggling power on and off several times.
Always ensure manual shutoff valves are fully open and check propane levels frequently. Use leak detection methods to identify compromised gas lines, replacing damaged sections proactively.
Keep circuit boards and wiring clean and secure. Avoid frequent power cycling in gas mode and operate the refrigerator in stable environmental conditions to prevent ignition faults and check light issues.
Frequently Asked Questions
Can the Check Light Cause Permanent Damage to the Refrigerator?
No, the check light itself can’t cause permanent damage to your refrigerator. It’s a diagnostic tool that alerts you to issues like low propane or sensor faults.
However, if you ignore the underlying problem the light signals, your fridge may stop cooling or enter lockout mode. To prevent operational failure, promptly troubleshoot by checking propane levels, power supply, and sensor function, then reset the system as needed.
Does the Check Light Affect Refrigerator Warranty Coverage?
The check light itself doesn’t affect your refrigerator’s warranty coverage. What matters is the underlying issue triggering the light. If it indicates a manufacturing defect covered by warranty, your claim stays valid.
However, if the light results from improper use, installation errors, or lack of maintenance, your warranty claim can be denied. Always provide diagnostic records and required documentation to support your warranty request effectively.
Is It Safe to Continue Using the Fridge With the Check Light On?
You can usually keep using the fridge with the check light on, but it’s not ideal. The main risk is food spoilage due to poor cooling. If the issue involves gas leaks or electrical faults, stop use and inspect immediately.
Power cycle the unit, check propane levels, and clean burner areas. If the light stays on, get professional service to avoid damage or safety hazards.
Can Extreme Weather Conditions Trigger the Check Light?
Extreme weather can definitely flick that check light on, like a warning flag in a storm. When temperatures plunge or soar, your fridge’s components, thermal fuses, sensors, and propane systems may struggle to perform.
Cold can freeze ignition; heat can stress circuits. You should inspect electrical connections, test fuses, and check propane lines for frost or damage. Addressing these areas helps you pinpoint why the check light blinks during harsh weather.
Are There Any Smartphone Apps to Diagnose Check Light Issues Remotely?
No, you can’t use any smartphone apps to diagnose check light issues remotely. Dometic’s apps don’t support remote diagnostics or reading error codes for check lights.
You’ll need to activate diagnostic mode manually on the refrigerator by pressing specific buttons. All troubleshooting requires on-site, physical inspection and testing of components.
Remote diagnosis or error code reading via app isn’t available from Dometic or third-party developers.
Don’t Ignore the Check Light: Your Fridge Is Sending an SOS
When your Dometic refrigerator’s check light comes on, don’t ignore it. Think of it as your fridge’s way of sending an SOS. By promptly troubleshooting electrical and ignition systems, checking operational modes, and maintaining your unit regularly, you’ll keep problems at bay.
Remember, a little preventive care goes a long way in avoiding costly repairs. Stay proactive, follow the steps, and guarantee your refrigerator runs smoothly every time you power it up.

