
If your RV roller shade won’t stay down, the spring tension is likely too weak or the internal mechanism is damaged.
You can fix this by fully extending the shade, then adjusting the spring tension by turning the tension spring 10–20 times counterclockwise.
Check for broken plastic teeth or warped springs and replace damaged parts as needed.
After adjustment, snap the shade back into place and test. For a detailed step-by-step, keep exploring the repair process.
Key Takeaways
- Check if the spring tension is loose or stretched, causing the shade to retract immediately after release.
- Fully extend the shade to inspect for debris, fabric misalignment, or jamming inside the roller.
- Adjust spring tension by turning the spring-loaded end counter-clockwise 10–20 rotations to increase holding power.
- Inspect plastic components and the auto-stop mechanism for cracks or damage that prevent the shade from staying down.
- Remove the shade carefully to examine the spring and fabric for damage, replacing any broken parts as needed.
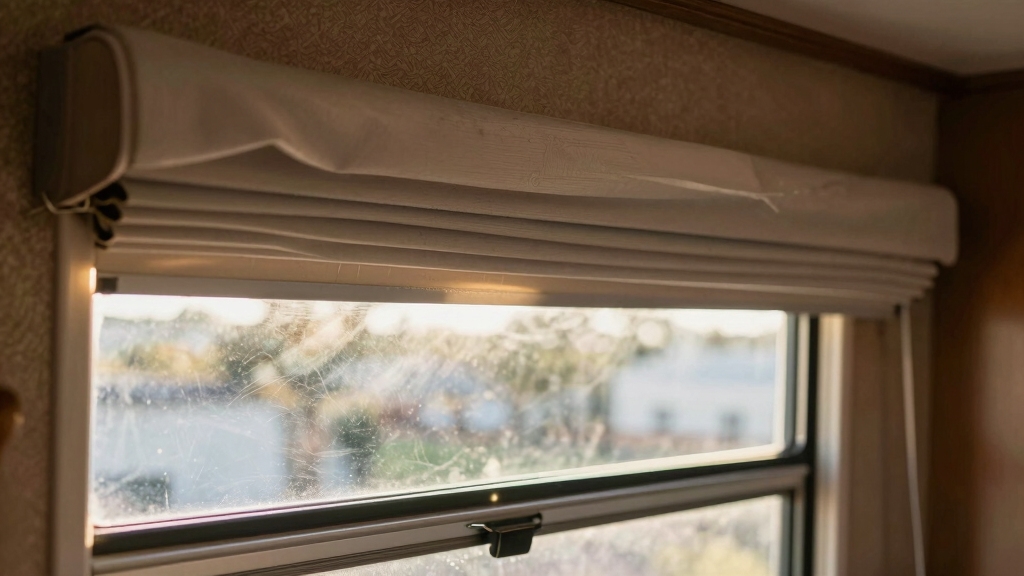
Diagnose Why Your RV Roller Shade Won’t Stay Down?

Start by inspecting the spring tension inside your RV roller shade, as a loose or weakened spring is often the main reason it won’t stay down.
If the shade retracts immediately after release, the spring tension is likely too loose or stretched out.
Next, check for any jamming by fully extending the shade; debris or misaligned fabric can prevent it from releasing properly.
Examine the auto-stop mechanism for damage. If broken, it won’t hold the shade in place.
Also, inspect the plastic teeth and internal components for cracks or breaks, which can compromise holding power.
Identifying these issues precisely helps you address the root cause effectively without unnecessary disassembly or part replacement.
For maintenance, regularly cleaning and gently dusting your RV shades can prevent debris buildup that might cause jamming or damage and extend the shade’s functional life.
Adjust Spring Tension on Your RV Roller Shade
After pinpointing a loose or stretched spring as the cause, you can adjust the spring tension to restore proper shade function.
First, remove the valance using a square drive bit and unclip the roller shade from its mounting tracks. Fully unroll the fabric to release any tension.
Begin by removing the valance with a square drive bit and fully unroll the fabric to release tension.
Locate the spring-loaded end, identifiable by a flat metal arm or tab. To increase tension, turn the spring counter-clockwise 10 to 20 rotations.
Avoid over-tightening, which can damage the spring. Test the shade by rolling the fabric back onto the roller slowly, ensuring it holds at the desired position.
Once satisfied, snap the shade back into the valance clips and reattach the valance securely. Proper spring tension will prevent the shade from retracting prematurely.
Using energy-efficient LED lighting in your RV can also help reduce heat and improve overall comfort.
Remove and Inspect Your RV Roller Shade for Damage
Before addressing potential damage, you’ll need to remove the roller shade carefully to avoid causing further issues.
Start by unscrewing the end brackets using a Phillips or square drive screwdriver. Unclip the shade gently from the mounting hardware, avoiding removal of both end caps simultaneously.
Lay the shade flat on a table for inspection. Check the roller fabric for tears or warping, and examine the metal roller tube for bends or corrosion.
Inspect the spring-loaded end for signs of weakness or damage, such as stretched or broken springs. Look closely at the plastic components, including teeth and cord retainers, for cracks or breaks.
Identifying these issues early helps you decide whether repair or replacement is necessary before reinstalling or adjusting tension. Applying a protective wax barrier to the metal roller tube can help prevent corrosion and extend the shade’s lifespan.
Fix or Replace Broken Parts on Your RV Roller Shade
Identify and replace any cracked or broken components such as cord retainers, plastic teeth, or the auto-stop mechanism to restore proper function. Inspect the roller shade thoroughly for damage and order manufacturer-specific parts if needed.
Replace worn springs or weakened parts to guarantee reliable operation. Use repair kits when available to avoid full replacement.
| Component | Issue |
|---|---|
| Cord Retainer | Cracked or loose, causing slack |
| Plastic Teeth | Broken, leading to jamming |
| Auto-Stop Mechanism | Faulty, prevents shade locking |
| Internal Spring | Stretched, loses tension |
| Springs & Clips | Warped or damaged, unstable hold |
Promptly addressing these parts prevents further damage and malfunction. This guarantees your shade stays down as intended. For quick fixes and to extend the life of your RV shade, consider using durable repair tapes designed to withstand outdoor conditions.
Reinstall and Test Your RV Roller Shade for Proper Function
Once you’ve repaired or replaced the necessary parts, you’ll want to reinstall your RV roller shade carefully to ensure smooth operation.
Begin by snapping the roller shade into the valance clips with an audible click, ensuring it’s centered to avoid misalignment.
Secure the end caps without over-tightening to prevent damage. Finally, reattach the valance using the original screws.
Test the shade by slowly rolling the fabric back onto the roller to check spring tension and smooth movement.
If it retracts too quickly or won’t stay down, adjust the tension or recheck your installation.
Visualize the process:
- Aligning the roller evenly within the valance clips
- Hearing the satisfying snap when clips engage
- Tightening screws just enough to hold firmly
- Slowly extending and retracting the shade to confirm function
For best durability and weather resistance in your RV, consider sealing any gaps or edges around the shade with flexible caulking sealant to prevent moisture infiltration.
Frequently Asked Questions
Can RV Roller Shades Be Motorized for Easier Operation?
Yes, you can motorize RV roller shades for easier operation.
Motorized kits are available that fit standard roller tubes, allowing you to control shades remotely or via wall switches.
When upgrading, verify your shades’ dimensions and spring tension compatibility.
Installation typically involves replacing the manual roller with a motorized tube and connecting a power source.
This upgrade enhances convenience and can solve issues with manual tension adjustments or wear.
What Materials Are Best for Durable RV Roller Shade Fabric?
You’ll want to choose materials like vinyl-coated polyester or solution-dyed acrylic for durable RV roller shade fabric.
These fabrics resist UV rays, moisture, and mildew, critical for RV environments. Vinyl coatings add toughness and easy cleaning, while acrylic provides good color retention and breathability.
Avoid delicate fabrics that stretch or fade quickly. Opting for these materials guarantees longevity, minimal maintenance, and consistent shade performance on the road.
How Do I Clean and Maintain RV Roller Shades Effectively?
Think of your RV roller shades as delicate machinery needing gentle care.
To clean, dust regularly with a microfiber cloth or vacuum using a brush attachment. For stains, use a mild soap solution and a soft sponge; avoid harsh chemicals that damage fabric or springs.
Maintain by checking spring tension and mechanisms quarterly, adjusting if needed. Lubricate moving parts sparingly with silicone spray, ensuring smooth operation and extending your shade’s lifespan.
Are There Custom RV Roller Shades Available for Irregular Window Sizes?
Yes, you can find custom RV roller shades tailored to irregular window sizes. Many manufacturers offer made-to-measure options where you provide exact dimensions.
This guarantees a perfect fit, eliminating gaps and improving shade functionality. When ordering, measure your windows precisely and specify features like fabric type, opacity, and mounting style.
Custom shades also accommodate unique shapes, so you get a seamless, professional look that standard sizes can’t deliver.
Can Roller Shades Improve Insulation and Energy Efficiency in an RV?
Think of roller shades as a shield, guarding your RV like a fortress wall against heat loss or gain.
Yes, they improve insulation by creating an extra barrier that reduces heat transfer through windows.
You’ll see better energy efficiency since shades trap air and block sunlight, cutting cooling and heating demands.
Choose shades with reflective or thermal-backed fabrics to maximize this effect and keep your RV comfortable while saving power.
Fix Your RV Roller Shade Before It Gets Worse
Now that you’ve pinpointed the issue and made necessary adjustments or repairs, don’t rush to call it fixed just yet.
The real test comes when you fully reinstall and operate your RV roller shade. Will it hold steady, or slip back down?
Your careful inspection and tweaks are only the beginning. This final step reveals if your effort truly restored smooth, reliable function.

