
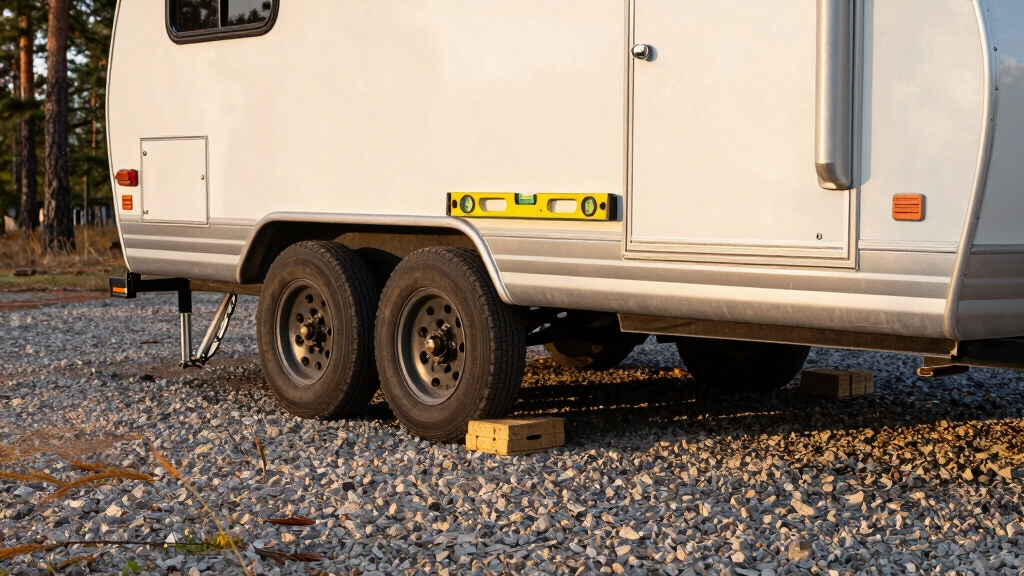
To level your travel trailer effectively, start by securing wheel chocks on firm ground to prevent rolling. Use bubble levels placed side-to-side and front-to-back, then incrementally drive onto stable leveling blocks or ramps under the low tires.
Adjust the tongue jack slowly to achieve front-to-back balance without lifting tires off the ground. Deploy stabilizer jacks only after leveling to support, not lift, the trailer.
Mastering these steps guarantees a safe, stable setup; exploring further reveals tailored tips for different trailer types and gear maintenance.
Key Takeaways
- Use bubble levels on trailer sides for side-to-side and front-to-back alignment to ensure precise leveling.
- Place wheel chocks securely on both sides of tires before unhitching to prevent rolling.
- Drive slowly onto leveling blocks or ramps under low-side tires, stacking blocks carefully for stability.
- Adjust the tongue jack gradually to balance front-to-back level, monitoring bubble levels throughout.
- Deploy stabilizer jacks only after leveling, placing jack pads beneath and avoiding lifting the trailer off wheels.
Choose the Right Leveling Tools for Your Travel Trailer

When preparing to level your travel trailer, selecting the right tools is essential for accuracy and safety.
You’ll need bubble levels mounted on the trailer’s side to check side-to-side and front-to-back alignment precisely.
Leveling blocks or ramps, stacked in one-inch increments or curved shapes like Andersen levelers, help you elevate tires effectively.
Electronic levels or smartphone apps provide exact height adjustments, improving precision beyond visual checks.
Don’t forget industrial-grade wheel chocks to secure tires firmly and prevent rolling during the process.
Avoid relying on stabilizer jacks for lifting; use them only for support after leveling.
Using a jack with appropriate load capacity ensures safe lifting when adjustments beyond leveling are necessary.
Prepare Your Camping Site and Trailer for Leveling
Before leveling your travel trailer, thoroughly assess the campsite’s terrain to identify uneven areas and potential obstacles.
Carefully inspect the campsite terrain to spot uneven ground and obstacles before leveling your travel trailer.
Position bubble levels on the trailer’s passenger side (left-to-right) and driver side (front-to-back) to monitor leveling accuracy.
Evaluate where you’ll place leveling blocks: behind tires if backing in, or in front if pulling through.
Drive slowly onto blocks, ensuring the trailer doesn’t roll by chocking wheels on both sides, using industrial-grade chocks for security.
Avoid relying on stabilizer jacks for lifting. Side-to-side leveling happens first while still hitched.
Use a second person to guide positioning and monitor bubble levels continuously.
Confirm clear space around the trailer to allow safe maneuvering and block stacking.
This preparation sets a precise baseline for effective, safe leveling without damaging your rig or campsite.
For best results, use a high-precision circular bubble level to achieve the most accurate readings during the leveling process.
Level Your Trailer Side-to-Side Accurately
With your trailer properly positioned and bubble levels set, focus on achieving side-to-side balance first while the trailer remains hitched.
Slowly drive the trailer onto leveling blocks or ramps placed under the low side tires, following the height increments indicated by your bubble level or electronic app.
Stack blocks carefully, guaranteeing stable, secure placement to prevent shifting. Use wedge locks for dual-axle trailers or cut Andersen ramps for precise adjustments.
After positioning, chock the wheels on the opposite side to prevent movement. Recheck the bubble level on the driver’s side to confirm accuracy.
Adjust block heights as needed until the bubble centers perfectly. This method guarantees your trailer is horizontally balanced before unhitching, reducing reliance on stabilizer jacks and enhancing safety and comfort during your stay.
Properly inflated tires with adequate load capacity also help maintain stability during the leveling process.
Level Your Trailer Front-to-Back Safely
Once you’ve leveled your trailer from side to side, it’s time to tackle the front-to-back height. Grab your tongue jack and make those adjustments carefully. Just make sure to follow your owner’s manual for guidance—this will help you avoid any mishaps like overextending the stabilizer jacks.
Oh, and here’s an important tip: never use those stabilizers to lift your trailer. They’re not meant for that; they’re designed to support it once it’s properly balanced. Keep an eye on the pressure of all the jacks too. You want them to be equal to maintain stability and prevent any uneven stress on the frame.
That way, you’ll keep everything safe and sound! Always ensure your jack’s load capacity matches or exceeds your trailer’s weight to maintain safety during adjustments.
Use Tongue Jack Properly
Lower the tongue jack carefully once you’ve achieved side-to-side leveling to adjust your trailer’s front-to-back balance.
Use the jack’s power or hand crank according to the owner’s manual, avoiding sudden or excessive movements. Focus on maintaining stability and gradual lifting to prevent shifting.
Follow these steps for effective front-to-back leveling:
- Make sure side-to-side leveling is complete before adjusting the tongue jack.
- Lower or raise the tongue jack slowly, monitoring the front-to-back bubble level.
- Stop once the trailer reads level front-to-back; avoid lifting with stabilizer jacks.
- Confirm equal pressure on all tires after adjustment to prevent uneven weight distribution.
This approach guarantees a safe, accurate front-to-back level without stressing components. For enhanced towing safety, it is also important to verify your tongue weight measurements to ensure balanced load distribution.
Avoid Overlifting Stabilizers
Once you’ve adjusted the tongue jack to achieve front-to-back level, it’s important not to rely on stabilizer jacks for lifting the trailer.
Stabilizers are designed solely to minimize trailer sway and provide support, not to bear the trailer’s weight or raise it off the tires.
Overlifting stabilizers risks bending or damaging their mechanisms and compromises safety.
Use the tongue jack exclusively for vertical adjustments.
After achieving proper front-to-back level, deploy stabilizer jacks only until they contact the ground firmly without applying upward force.
Always place jack pads beneath stabilizers to distribute load evenly and prevent sinking.
This approach guarantees safe, stable positioning and protects your equipment from undue stress while maintaining the trailer’s structural integrity during your stay.
For additional security, consider using heavy-duty coupler locks to prevent trailer theft while parked.
Confirm Equal Jack Pressure
Make sure that the stabilizer jacks apply equal pressure on all corners to maintain a balanced and secure front-to-back level.
After side-to-side leveling and lowering the tongue jack, check each stabilizer jack’s contact and load. Unequal pressure can cause uneven stress and destabilize your trailer.
Follow these steps:
- Lower stabilizer jacks slowly until they contact the ground without lifting the trailer.
- Use a bubble level on the trailer frame to verify front-to-back alignment.
- Adjust each jack incrementally to equalize pressure, ensuring no jack bears excessive load.
- Confirm equal pressure by observing minimal deflection or movement when gently rocking the trailer.
Equal jack pressure prolongs jack integrity and stabilizes your trailer safely during use. For enhanced protection, consider using heavy-duty materials in your stabilizer jack components to resist wear and environmental damage.
Use Stabilizing Jacks Correctly After Leveling
Once you’ve leveled your trailer, it’s time to set up those stabilizing jacks. Start by placing them firmly at each corner of the trailer. Oh, and don’t forget to use proper jack pads! They’re super important for preventing any sinking into the ground.
Now, when you’re tightening those jacks, make sure to apply equal pressure on all of them. This helps keep everything balanced and prevents any stress on the frame. Trust me, a little attention here goes a long way.
And remember, the goal is to achieve stability without lifting the trailer off its wheels. That way, you can enjoy a worry-free experience wherever you park! Using stabilizers with the right load capacity is essential to minimize movement and ensure safety.
Proper Jack Placement
Position stabilizing jacks at each corner of your travel trailer only after you’ve achieved proper wheel leveling. This guarantees the trailer remains stable without bearing the weight of lifting.
Follow these steps for correct jack placement:
- Place jack pads beneath each stabilizer to distribute pressure evenly and prevent ground sinking.
- Extend jacks slowly until they make firm contact with the ground without lifting the trailer.
- Adjust each jack equally to maintain trailer balance and avoid twisting the frame.
- Double-check that all jacks rest securely on solid, level surfaces to maximize stability and safety.
Proper jack placement minimizes trailer sway and reduces wear on suspension components while parked. Avoid using stabilizing jacks for primary leveling; rely on wheel blocks and ramps instead. Using electric RV jacks can make the initial leveling process easier and more precise before stabilizing jacks are engaged.
Equal Pressure Importance
When you’ve completed leveling your travel trailer’s wheels, applying equal pressure with stabilizing jacks is essential to maintain balance and prevent frame stress.
Position the jacks at each corner, then extend them gradually, monitoring pressure to guarantee uniform contact without lifting the trailer off its wheels.
Unequal pressure can warp the frame or cause uneven load distribution, compromising structural integrity.
Use jack pads to protect surfaces and prevent sinking.
Avoid using stabilizing jacks for primary leveling; their role is support after wheel leveling is complete.
Check manufacturer guidelines to confirm equal jack extension.
By maintaining balanced pressure, you reduce sway, minimize vibration, and enhance safety during stationary periods.
This ensures your trailer remains stable and secure throughout your stay.
For enhanced safety, consider the weight capacity of your trailer’s components to avoid overloading during leveling.
Secure Your Trailer With Wheel Chocks Properly

Always secure your trailer with wheel chocks before unhitching to prevent any unintended movement. Proper chocking is critical for safety and stability.
Use industrial-grade chocks, not cheap plastic ones, for reliable grip on various surfaces.
Follow these steps to chock correctly:
- Place chocks snugly against both sides of at least one tire, ideally on the downhill side if parked on a slope.
- Make sure the ground is firm and level where you set the chocks to prevent shifting.
- Use wedge-shaped or block-style chocks designed for your tire size to maximize contact and resistance.
- Double-check that chocks are tight before unhitching and avoid relying solely on stabilizer jacks for immobilization.
This method guarantees your trailer stays securely in place during setup and use.
Overcome Common Travel Trailer Leveling Challenges
Although leveling a travel trailer can seem straightforward, you’ll encounter challenges like uneven terrain, limited space, and varying weight distribution that require careful handling.
Leveling a travel trailer involves navigating uneven ground, tight spaces, and shifting weight with careful attention.
To tackle uneven terrain, use stackable leveling blocks or ramps in precise increments, measuring with bubble levels or electronic apps. When space is tight, opt for ramp wedges that allow fine adjustments without repositioning.
Weight distribution shifts as you level, so recheck your side-to-side and front-to-back levels after each adjustment to maintain balance. Always place wheel chocks on both sides of tires to prevent rolling on slopes before unhitching.
Practicing these techniques in different conditions sharpens your ability to level quickly and safely. This minimizes strain on stabilizing jacks and ensures a secure, stable setup every time.
Leveling Tips for Dual-Axle vs. Single-Axle Trailers
Because dual-axle and single-axle trailers have distinct weight distributions and support points, you’ll need to adjust your leveling approach accordingly.
Dual-axle trailers spread weight across two axles, requiring balanced block stacking on both sets of tires, while single-axle trailers focus on a single contact point. Here’s how to tailor your leveling:
- For dual-axle trailers, use wedge-style ramps like Beech Lane wedges that lock securely between tires for stability.
- On single-axle trailers, Andersen levelers provide precise height increments; cut them carefully if adapting for dual-axle use.
- Always check side-to-side level first, then front-to-back, adjusting blocks under the lower tires accordingly.
- Chock both sides of tires before unhitching, especially on uneven terrain, to prevent rolling.
This method guarantees stability and accurate leveling for each trailer type.
Maintain Your Travel Trailer Leveling Gear for Long-Term Use
Regularly inspecting and maintaining your travel trailer leveling gear guarantees accurate performance and extends its lifespan.
Consistent care and inspection of your travel trailer leveling gear ensure reliable accuracy and longer durability.
Start by cleaning bubble levels, ramps, and blocks after each use to remove dirt and debris that can affect accuracy.
Check for cracks, warping, or wear on plastic and rubber parts, especially on ramps and chocks, replacing damaged items promptly.
Lubricate moving components, such as power jack mechanisms, according to manufacturer guidelines to prevent corrosion and assure smooth operation.
Store gear in a dry, organized space to avoid exposure to moisture and UV damage.
Calibrate electronic levels and smartphone apps periodically to maintain precision.
Frequently Asked Questions
How Often Should I Check My Travel Trailer’s Level During a Long Trip?
You should check your travel trailer’s level every time you set up camp or move to a new site.
It’s critical after parking to guarantee side-to-side and front-to-back balance using bubble levels or an app.
If you’re on uneven terrain or slopes, recheck frequently to maintain stability and prevent stress on your trailer frame.
Regular checks help avoid damage and guarantee your slide-outs and stabilizers work correctly throughout your trip.
Can Weather Conditions Affect the Accuracy of My Leveling Tools?
Yes, weather conditions can affect your leveling tools’ accuracy.
Temperature fluctuations may cause bubble levels or electronic sensors to expand or contract, slightly shifting readings.
Moisture, such as rain or condensation, can fog bubble levels or interfere with electronic components.
To maintain precision, keep your tools dry, store them properly, and recalibrate or verify readings frequently, especially after extreme weather changes.
This guarantees your leveling remains reliable and safe during your travels.
What Are the Signs That My Stabilizing Jacks Need Maintenance?
If your stabilizing jacks start sounding like a rusty hinge, that’s a clear sign they need maintenance.
You’ll notice difficulty extending or retracting them, unusual noises, or instability when deployed.
Check for bent or cracked components, corrosion, and make sure the jack pads sit evenly.
Regularly lubricate moving parts and tighten loose bolts.
Neglecting these issues can compromise your trailer’s stability and safety during use.
Is It Safe to Level My Travel Trailer on Gravel or Soft Ground?
You can level your travel trailer on gravel or soft ground, but take precautions.
Use sturdy leveling blocks or curved ramps to prevent tires from sinking.
Place heavy-duty wheel chocks firmly on both sides to avoid rolling.
Avoid relying solely on stabilizing jacks for lifting; they’re for support only.
Consider using jack pads under stabilizers to distribute weight evenly and prevent sinking.
Always double-check level readings after adjustments to assure safety and stability.
Can I Use Alternative Tools if I Forget My Bubble Level or Ramps?
Yes, you can use alternative tools if you forget your bubble level or ramps.
Smartphone apps with electronic leveling features provide precise measurements and can guide your adjustments.
You might also use a carpenter’s level or even a makeshift plumb line for rough checks.
For elevation, sturdy, stackable blocks or wooden boards can substitute ramps.
Make certain they’re stable and rated for your trailer’s weight to maintain safety during leveling.
The Overlooked Step That Keeps Your Trailer Steady
Now that you’ve mastered choosing tools, prepping your site, and leveling side-to-side and front-to-back, you might think you’re done.
But here’s the twist: the real secret lies in how you stabilize and secure your trailer afterward. Neglect this step, and all your careful leveling could unravel.
So, don’t just stop at leveling; use those jacks and wheel chocks precisely. That’s how you guarantee a steady, safe, and comfortable stay every time.

