
First, park on level ground, engage the parking brake, and chock opposite tires to stabilize the trailer. Use a properly rated jack placed under a solid frame point to lift the tire just off the ground and secure the trailer with jack stands.
Loosen lug nuts in a star pattern before lifting, then fully remove the tire. Mount the spare, hand-tighten lug nuts, then torque them correctly in stages.
Follow steps for detailed safety and tool guidelines ahead.
Key Takeaways
- Park on level ground, engage parking brake, turn on hazard lights, and place wheel chocks to secure the trailer before starting.
- Use a properly rated jack under the trailer frame, lift until tire clears ground, and secure with jack stands before removing the tire.
- Loosen lug nuts in a star pattern while the tire is on the ground, then fully remove them after lifting the trailer.
- Inspect the wheel hub and studs for damage before mounting the spare tire, ensuring proper alignment and flush seating.
- Hand-tighten lug nuts, then torque them in a star pattern progressively to manufacturer specifications, and recheck torque after driving.
Prepare Your Travel Trailer Safely for a Tire Change
Before you begin changing a travel trailer tire, make sure you’ve parked on level ground and engaged the parking brake to prevent any movement.
Always park on level ground and set the parking brake before changing a travel trailer tire.
Next, turn on your hazard lights to alert others. Place wheel chocks securely on the tires opposite the flat to block any unintended rolling.
Keep your tow vehicle connected to the trailer; this adds stability during the tire change. Always wear gloves to protect your hands from sharp edges or dirt.
If it’s dark, use a flashlight to illuminate your workspace clearly. These steps guarantee your safety and prevent the trailer from shifting unexpectedly while you work, reducing risks of injury or damage.
Only proceed with loosening lug nuts once your trailer is fully stabilized following these precautions.
For best results, choose wheel chocks with non-slip traction features to ensure maximum stability on varied terrain.
Gather Essential Tools for Changing a Travel Trailer Tire
Once your travel trailer is securely stabilized and ready for the tire change, gather the necessary tools to ensure the job proceeds smoothly.
Start with a lug wrench or breaker bar to loosen and tighten lug nuts efficiently.
Have a properly rated jack and jack stands ready to lift and support the trailer safely.
Make certain your spare tire is fully inflated and suitable for replacement.
Use a torque wrench to accurately tighten lug nuts to the manufacturer’s specified torque, preventing wheel damage or loosening.
Keep penetrating oil like WD-40 on hand for any seized lug nuts.
Additionally, wear protective gloves to maintain grip and protect your hands during the process.
Organizing these tools beforehand streamlines the tire change and enhances safety throughout the procedure.
It’s also important to regularly check tire pressure and tread depth to ensure safe towing conditions.
How to Loosen Lug Nuts Without Removing the Tire?
Start by breaking loose the lug nuts while the tire is still on the ground to maintain stability and prevent the wheel from spinning. Use a lug wrench or breaker bar, applying counterclockwise force. If nuts are stuck, spray penetrating oil and wait several minutes.
Loosen lug nuts in a star or crisscross pattern to avoid binding.
| Step | Action |
|---|---|
| 1 | Park on level ground |
| 2 | Engage parking brake & chock tires |
| 3 | Apply penetrating oil if needed |
| 4 | Loosen lug nuts counterclockwise |
Keep slight pressure on the tire during loosening for leverage. Do not fully remove lug nuts until the trailer is lifted. It is important to use a jack with an appropriate load capacity to safely lift your trailer once the lug nuts are loosened.
Position the Jack to Safely Lift Your Travel Trailer
Position the jack securely under a solid part of the trailer frame rather than the axle to guarantee stable lifting.
Place the jack firmly under a sturdy trailer frame section, avoiding the axle for safe, stable lifting.
Inspect the frame carefully and select a reinforced crossmember or designated jack point specified in your trailer’s manual.
Avoid placing the jack on suspension components or the axle, as they can bend or fail under load.
Make certain the jack base sits flat on firm, level ground; use a sturdy board under the jack if necessary to prevent sinking.
Align the jack vertically to maintain balance during lifting.
Double-check that the jack handle can operate without obstruction.
Keep your tow vehicle connected to prevent trailer movement.
Confirm wheel chocks are properly positioned on the opposite side to stabilize the trailer before you begin lifting.
For added safety and stability, consider using camper leveling blocks to distribute the jack’s weight evenly and prevent sinking on soft or uneven ground.
Lift the Trailer and Secure It With Jack Stands
Sure! Here’s a more conversational version of the text:
First, make sure you place the jack securely under the solid frame of the trailer. Just a heads up—steer clear of the axle when you do this! Once you’ve got it in the right spot, lift until the tire is about 2-3 inches off the ground.
Now that you’ve got it lifted, it’s time to position those jack stands. Place them under the frame to safely support the weight of the trailer. And remember, it’s super important to never work under the trailer until you’ve double-checked that it’s stable on both the jack and the stands. Safety first!
Also, be sure to use a jack with appropriate load capacity to ensure safe lifting during the tire change.
Proper Jack Placement
Lift the trailer by setting the jack firmly under a solid part of the frame rather than the axle to guarantee stability and avoid damage.
Position the jack on a flat, sturdy section of the frame close to the tire you’re changing. Avoid placing it on suspension components or weak spots that could bend or break under load.
Once positioned, pump or crank the jack to raise the trailer until the flat tire clears the ground by 2 to 3 inches.
Immediately place jack stands under reinforced frame sections near the jack to support the trailer’s weight securely.
Never rely solely on the jack for support. Adjust the jack stands to the correct height, ensuring the trailer remains level and stable before removing the tire.
This precise placement prevents accidents and structural damage.
For enhanced safety, always choose a jack with a suitable load capacity that matches or exceeds your trailer’s weight.
Safe Lifting Techniques
Always make sure you raise the trailer gradually and steadily to maintain control throughout the lifting process.
Position the jack securely under the trailer’s solid frame, never under the axle, to prevent damage.
Pump the jack handle smoothly, lifting the trailer until the flat tire clears the ground by 2 to 3 inches.
Avoid sudden movements or rapid lifting to keep the trailer stable.
Once lifted, pause to verify the trailer remains level and stable.
Never place any part of your body under the trailer during lifting.
After achieving proper height, prepare to secure the trailer using jack stands.
Keep the tow vehicle connected and wheel chocks in place to prevent rolling.
These steps guarantee a safe and controlled lifting environment before proceeding.
Use jack stands rated for the load capacity of your trailer to ensure maximum safety during the repair.
Using Jack Stands
Once the trailer is raised to the proper height and confirmed stable, position the jack stands directly under the solid frame near the jack placement points.
Make certain each stand contacts a sturdy, flat section of the frame to prevent slipping or damage.
Gradually lower the trailer onto the jack stands, transferring weight from the jack to the stands.
Avoid sudden movements or shifts during this process.
Verify the trailer’s stability by gently rocking it; it should remain firm without any wobble.
Use at least two jack stands for balanced support on a single axle.
Never rely solely on the jack to hold the trailer’s weight while working.
Once secured, proceed with tire removal confidently, knowing the trailer is safely supported throughout the repair.
For added safety and stability during repairs, consider using a tripod stabilizer designed to minimize trailer movement.
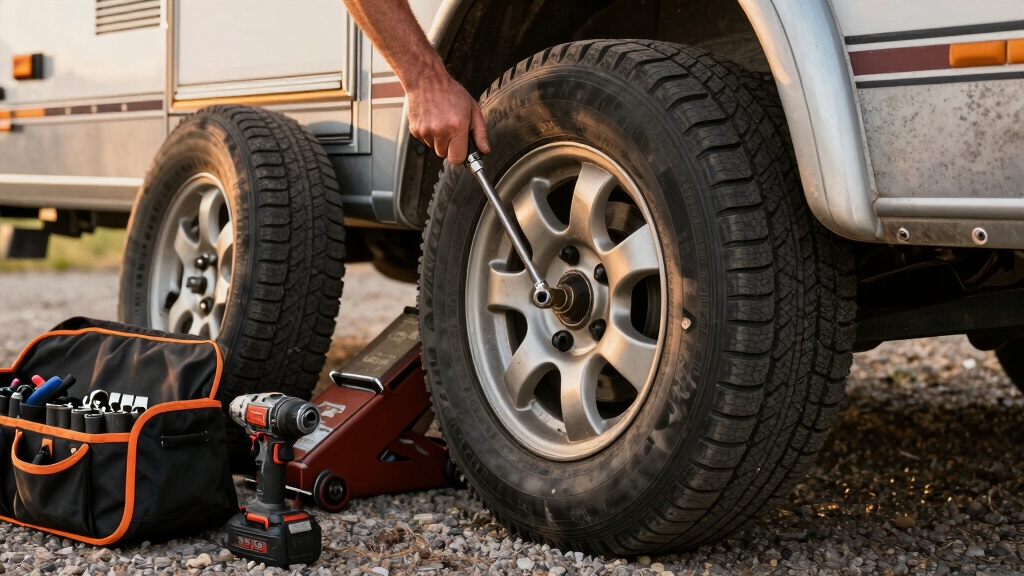
Remove the Flat Tire and Inspect the Wheel Hub
Carefully remove the lug nuts and take the flat tire off the wheel hub. Ensure you keep the nuts in a safe place for reinstallation.
Once the tire is off, thoroughly inspect the wheel hub for any signs of damage or wear. Focus on these key areas:
Check the hub surface for rust, cracks, or debris that could affect mounting.
Inspect wheel studs for bends, breaks, or stripped threads.
Verify the brake drum or rotor condition for scoring or excessive wear.
Make certain the hub rotates freely without unusual noise or resistance.
If you notice any abnormalities, address them before proceeding. Proper inspection helps guarantee safe and secure tire installation, preventing future issues while on the road.
Also, ensure the tire rim width and inflation meet proper towing requirements to avoid uneven wear and sway.
Install and Align Your Spare Tire Correctly
After confirming the wheel hub is free of damage and debris, position your spare tire by aligning its holes with the wheel studs.
Carefully slide the spare tire onto the hub, ensuring it sits flush against the mounting surface without gaps.
If the holes don’t line up immediately, rotate the tire slightly until you achieve proper alignment.
Once aligned, hand-tighten the lug nuts to secure the tire temporarily.
This initial fit prevents the tire from shifting during the final tightening process.
Avoid forcing the tire or misaligning studs, as this can cause damage or unsafe mounting.
Maintain control of the tire as you work to prevent it from falling or causing injury.
Proper alignment is critical for safe operation and effective wheel balancing.
For enhanced safety and security during travel, consider using mounts with locking mechanisms to prevent theft and ensure the spare tire stays firmly in place.
How to Tighten Lug Nuts Properly Using the Star Pattern?
Tightening lug nuts using the star pattern guarantees even pressure distribution and secure mounting of your spare tire. This method prevents warping the brake rotor and uneven stress on the wheel.
After hand-tightening the lug nuts, follow these steps:
Use a lug wrench or breaker bar to tighten the nuts in a star or crisscross sequence.
Apply gradual torque in stages: start with 20-30 ft-lbs, then 50-60 ft-lbs.
Make sure each nut is snug before moving to the next in the pattern to maintain balance.
Finish with a torque wrench applying the manufacturer’s recommended torque, typically 90-120 ft-lbs.
This approach guarantees your spare is securely fastened and ready for safe travel.
Perform Final Safety Checks and When to Retorque Your Spare
Always double-check your work once the spare tire is mounted and lug nuts are torqued.
Begin by visually inspecting lug nuts for tightness and verify the torque with a calibrated torque wrench, using the star pattern.
Make sure the spare tire pressure matches manufacturer specifications. Confirm the jack and tools are removed and the trailer is stable on level ground.
Retorque your spare tire according to the following schedule to maintain safety and prevent loosening:
| Distance Traveled (miles) | Action |
|---|---|
| 10 | Retorque lug nuts |
| 50 | Retorque lug nuts |
| 100 | Retorque lug nuts |
| Regular Maintenance | Inspect tire pressure |
Adhering to these checks guarantees safe travel and tire reliability.
Frequently Asked Questions
How Often Should I Replace My Travel Trailer Tires?
You know what they say: “An ounce of prevention is worth a pound of cure.”
You should replace your travel trailer tires every 5 to 7 years, regardless of tread wear, due to rubber degradation.
Also, inspect tires regularly for cracks, bulges, or excessive wear.
Check the manufacturer’s recommendations and consider usage conditions. Frequent travel or heavy loads might require earlier replacement to guarantee safety and performance.
Can I Use a Car Tire as a Spare for My Travel Trailer?
You shouldn’t use a car tire as a spare for your travel trailer.
Trailer tires have different load ratings, sizes, and construction designed for towing stresses.
Using a car tire risks uneven wear, poor handling, and potential tire failure.
Always use a spare tire matching your trailer’s specifications, including load range and size, to guarantee safety and proper performance during travel and emergencies.
What Causes Frequent Tire Blowouts on Travel Trailers?
Imagine your trailer tires overheating under the blazing sun, rubber melting and weakening.
Frequent blowouts happen because you’re overloading the trailer, underinflating tires, or driving at high speeds for long distances.
Worn-out tires or improper maintenance, like failing to check pressure and alignment, also cause damage.
Keep tires properly inflated, don’t exceed weight limits, and inspect regularly to prevent sudden tire failures and guarantee safer travels.
How Do Temperature Changes Affect Travel Trailer Tire Pressure?
Temperature changes directly affect your travel trailer tire pressure by causing air inside the tires to expand or contract.
For every 10°F drop, expect about a 1-2 psi decrease in pressure, risking underinflation.
Conversely, rising temperatures increase pressure, possibly leading to overinflation.
You should check and adjust tire pressure regularly, especially during seasonal shifts, to maintain peak performance and avoid blowouts or uneven wear.
Use a reliable gauge for accurate readings.
Are There Specific Tires Recommended for Different Trailer Weights?
Yes, you should select tires rated for your trailer’s specific weight.
Look for tires with a Load Range matching or exceeding your trailer’s Gross Vehicle Weight Rating (GVWR). Light trailers often use Load Range C or D tires, while heavier trailers require Load Range E or higher.
Always check the tire’s maximum load capacity on the sidewall. Make certain it supports your trailer’s weight per axle to maintain safety and performance.
Safe Travels Start with the Right Tire Change
Changing a tire on your travel trailer might seem intimidating, but with the right steps, it’s manageable and safe. Remember, “measure twice, cut once.” Taking your time to follow each step carefully guarantees a secure tire change and prevents future issues.
After installing the spare, always double-check lug nut tightness and retorque as needed. Staying precise and cautious keeps your trailer road-ready and protects your journey ahead.

