
To check your trailer bearings, first safely lift and secure the trailer by jacking under the frame, not the axle, and using jack stands while chocking opposite wheels.
Loosen lug nuts on the ground, then remove the wheel and hub carefully to expose bearings. Clean bearings and inspect for wear, corrosion, or damage.
Assess endplay by moving the hub and adjust the axle nut to proper preload. Grease pack bearings before reassembly for smooth operation.
Continue for detailed maintenance steps to extend bearing life.
Key Takeaways
- Safely lift and secure the trailer using a hydraulic jack under the frame and place jack stands before checking bearings.
- Remove the wheel by loosening lug nuts on the ground, then lift the trailer and fully remove the tire and hub assembly.
- Clean bearings and hubs with a solvent, then inspect rollers and raceways for wear, corrosion, or damage.
- Check for excessive play by grabbing the tire and rocking it side-to-side and top-to-bottom to detect looseness.
- Repack bearings with fresh grease, reinstall properly, and ensure smooth hub rotation without binding or excessive play.
Safely Lift and Secure Your Trailer for Bearing Checks
Before inspecting your trailer bearings, you need to lift and secure the trailer properly to guarantee safety and stability.
Position a hydraulic jack under the trailer frame, never on the axle, to prevent bending. Raise the trailer until the wheel is off the ground, then place jack stands firmly beneath the frame at stable points.
Make certain the trailer sits level and won’t shift. Chock the wheels opposite the side you’re working on to prevent rolling. Avoid using ramps or unstable surfaces.
Once secured, grab the tire at the sides and top to check for play, confirming the trailer is stable. Proper lifting and securing prevent accidents and allow you to inspect bearings accurately without risking equipment damage or personal injury.
For best results, ensure you have the correct bearing size and compatibility before starting your inspection.
Remove Trailer Hubs and Access Trailer Bearings
Alright, let’s get started! First things first, you want to make sure the trailer is securely lifted and chocked. Safety first, right?
Once you’ve done that, you can begin the process of removing the hub and cap.
Now, when it comes to prying off the dust cap, just grab a small screwdriver. Be gentle with it; you don’t want to damage any of the components.
After you’ve got that off, it’s time to extract the bearings. Just be careful and handle them gently to avoid any contamination or damage while you’re inspecting them.
For the best results, consider using a corrosion-resistant trailer jack to securely lift your trailer and prevent damage from saltwater environments.
Prepare Trailer For Removal
With the trailer securely supported on jack stands and the wheels chocked, you can begin removing the tire and wheel assembly to access the hubs.
First, loosen the lug nuts while the wheel is still on the ground to prevent rotation.
Then, lift the trailer frame using a jack positioned under a solid frame member, avoiding the axle to prevent bending.
Secure the trailer on jack stands and chock the opposite wheels to prevent movement.
Remove the lug nuts completely and take off the tire and wheel assembly carefully.
This exposes the hub assembly for inspection.
Before proceeding, make certain the trailer is stable and won’t shift during hub removal.
Proper preparation here prevents injury and damage to components during bearing access.
Using a jack with adequate load capacity ensures safety and stability throughout this process.
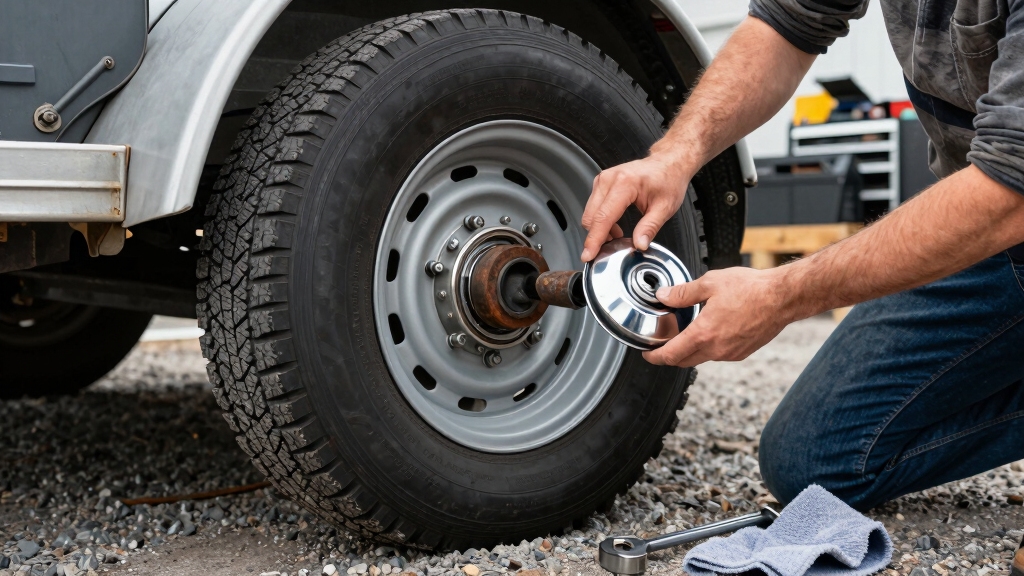
Remove Hub And Cap
Start by carefully removing the hub cap to expose the bearings and grease seals.
Use a small screwdriver or pry tool to gently tap off the dust cap if it’s firmly seated, especially on easy-lube hubs.
Avoid damaging the cap or seal during removal.
Once the hub cap is off, inspect the grease fill plug for pliability and clear ventilation.
Next, remove the wheel and tire assembly by loosening and removing the lug nuts, then pulling the assembly straight off the spindle.
Support the hub as you slide it off the spindle to prevent bearing damage.
Take care not to lose or damage the grease seal during this process.
With the hub removed, you’ll have full access to the inner and outer trailer bearings for inspection or servicing.
For optimal protection and longevity, ensure to use a water-resistant marine grease when repacking the bearings.
Extract Bearings Carefully
Once the hub is removed, you’ll need to carefully extract the inner and outer bearings to prevent damage to the rollers or races. Follow these steps to ensure proper removal:
- Gently pry out the outer bearing with a suitable bearing puller or carefully use a screwdriver, avoiding contact with the rollers.
- Remove the inner bearing by pulling it straight off the spindle after the hub is lifted clear.
- Inspect both bearings for signs of damage or contamination immediately after extraction.
- Place bearings on a clean, lint-free surface to prevent debris contamination before cleaning.
Handle each bearing with care to maintain integrity. Avoid forcing parts or dropping bearings, as this can compromise their function and safety during reassembly. Proper maintenance and inspection of bearings are crucial for safe towing performance and to prevent issues during travel.
Clean and Inspect Trailer Bearings for Wear and Damage
Begin by thoroughly cleaning the trailer bearings, hubs, and spindles using kerosene or mineral spirits to remove all old lubricant and contaminants.
Use a brush to dislodge grease and dirt, then rinse in solvent to guarantee all residues are eliminated.
After drying components completely, inspect each bearing roller and raceway for pitting, scoring, corrosion, or spalling.
Check for signs of metal-on-metal wear and blackened grease, which indicate overheating or contamination.
Examine the spindle threads and surfaces for damage or discoloration, and verify that bearing cups fit securely in the hub without looseness.
Inspect seals for cracks or stiffness; replace them if compromised.
Any visible damage or wear mandates bearing or component replacement to maintain trailer safety and performance.
For optimal trailer operation, consider using winches with appropriate weight capacity requirements to handle dynamic loads safely.
Adjust Trailer Bearings for Proper Endplay
Although cleaning and inspecting the bearings is essential, adjusting them for proper endplay secures smooth operation and prevents premature wear.
To do this, first measure the endplay using a dial indicator, aiming for 0.001” to 0.005” total movement. Next, push and pull the rotor at 3 and 9 o’clock positions while oscillating it to detect play.
Then, tighten the axle nut carefully to eliminate lash without over-tightening, maintaining the zero lash position. Finally, rotate the cone assembly during adjustment to secure even bearing seating and consistent preload.
- Measure endplay precisely with a dial indicator.
- Detect play by rocking rotor at specified positions.
- Adjust axle nut to remove play without binding.
- Rotate bearings to seat them evenly during adjustment.
Using the correct plywood grades and materials when redecking trailer floors can help maintain overall trailer integrity and performance.
How to Repack Trailer Bearings With Fresh Grease?
Alright, let’s dive into the process of repacking your trailer bearings with fresh grease.
First things first, grab a golf-ball sized amount of grease and put it right in the palm of your hand.
Now, take the bearing and press its large end into the grease. This is where the magic happens—you want to push that grease inside the bearing. Give it a good rotation until you see fresh grease oozing out of the small end.
This step is super important to make sure everything is well-coated before you put it back on the spindle.
Once you’ve got that done, it’s time to reinstall the bearing. Just make sure to follow the proper steps and pay attention to the torque specifications.
Don’t forget about placing the dust cap back on too!
This will help keep everything secure and protected.
Using a jack with the correct load capacity will ensure safe and efficient maintenance during this process.
Happy greasing!
Grease Packing Techniques
Applying fresh grease to your trailer bearings guarantees smooth rotation and prevents premature wear or failure. To repack bearings effectively, follow these grease packing techniques:
1. Take a golf-ball sized amount of high-quality wheel bearing grease and place it in your palm.
Press the bearing’s large end into the grease, forcing lubricant through the rollers until fresh grease appears on the small end.
2. Rotate the bearing while pressing it into the grease to ensure even distribution across all rollers and cages.
3. Smear a light coating of grease on the bearing’s outer surfaces to protect against contaminants.
4. Alternatively, use a grease gun with a universal bearing packer for efficient, consistent packing.
These steps guarantee thorough lubrication, extending bearing life and enhancing trailer safety. For best results, choose grease with water resistance to withstand harsh conditions and prevent corrosion.
Bearing Reinstallation Steps
Slide the freshly greased bearings carefully back onto the spindle, ensuring they seat properly without forcing.
Next, install the inner bearing cone and secure it with the spindle washer and nut.
Tighten the nut while rotating the hub to evenly distribute the bearings and eliminate play, aiming for minimal endplay within 0.001” to 0.005”.
Lock the nut in place using the cotter pin or locking mechanism specified by the manufacturer.
Then, install the outer bearing cone into the hub, followed by the seal, pressing it firmly to prevent grease leakage.
Replace the dust cap or hub cap, ensuring a snug fit to protect bearings from contaminants.
Finally, torque all fasteners to manufacturer specifications and spin the hub to verify smooth operation without binding or excessive play.
Using case-hardened steel screws with proper torque specifications can help maintain the integrity of the hub assembly during bearing reinstallation.
Routine Maintenance to Prevent Trailer Bearing Failures
Although trailer bearings are designed to endure heavy loads and harsh conditions, regular routine maintenance is essential to prevent premature failures and costly repairs.
You need to stay proactive to guarantee bearing longevity and safe trailer operation. Follow these key maintenance steps:
- Inspect bearings and seals every 12 months or 12,000 miles, whichever comes first, to detect wear, corrosion, or contamination early.
- Clean and repack bearings with high-quality grease, guaranteeing even distribution to avoid heat buildup and metal fatigue.
- Adjust bearing endplay precisely using a dial indicator, maintaining the manufacturer’s specified tolerance (0.001”–0.005”) to prevent excessive lash or binding.
- Replace damaged bearings, races, or seals immediately to prevent catastrophic failures and axle damage.
Consistent adherence to these practices will greatly reduce bearing-related breakdowns.
Frequently Asked Questions
What Type of Grease Is Best for Trailer Bearings?
You should use a high-quality, marine-grade or lithium-based grease specifically designed for wheel bearings.
This type of grease resists water, heat, and pressure, ensuring proper lubrication and protection against corrosion.
Avoid general-purpose grease, as it lacks the additives needed for bearing longevity.
When repacking, apply enough grease to force through the bearing, ensuring complete coverage.
Regularly inspect and replace grease to maintain peak trailer bearing performance and prevent failure.
How Often Should Trailer Bearings Be Professionally Inspected?
An ounce of prevention is worth a pound of cure.
You should have your trailer bearings professionally inspected at least once a year or every 12,000 miles, whichever comes first.
If you’re using oil-bath bearings, replace or thoroughly check them every 50,000 miles or annually.
For heavy use or harsh conditions, increase inspection frequency to every 90 days, like BIT inspections in California recommend, to catch wear before failure.
Can I Drive With a Slightly Noisy Trailer Bearing?
You shouldn’t drive with a slightly noisy trailer bearing.
Noise often signals wear, pitting, or lubrication failure that can quickly worsen, risking bearing seizure or hub damage.
Stop immediately, inspect bearings for play, temperature, and condition.
Address any signs of corrosion, scoring, or looseness by cleaning, repacking, or replacing components as needed.
Continuing to drive risks catastrophic failure, unsafe towing, and expensive repairs.
Prompt maintenance guarantees safe, reliable operation.
What Are Signs of a Failing Trailer Bearing While Driving?
When a trailer bearing’s failing, you’ll hear a growling or humming noise that grows louder with speed.
It’s like a freight train rolling closer.
You might feel vibration or wobbling in the trailer wheel, especially during turns.
Heat buildup is another sign; if the hub feels hotter than usual, pull over and check.
Loose or rough wheel movement when you grab and wiggle the tire also signals bearing trouble.
Don’t ignore these warning signs.
Are Trailer Bearing Kits Universal or Trailer-Specific?
Trailer bearing kits aren’t universal; they’re trailer-specific. You’ll need to match the kit to your trailer’s axle size, spindle dimensions, and bearing types.
Using the wrong kit risks improper fit, bearing failure, or damage. Always consult your trailer’s specifications or manufacturer’s manual to identify the correct bearing kit.
Ensuring compatibility guarantees proper function, safety, and longevity of your trailer’s wheel assembly. Don’t guess; measure and verify before ordering.
Don’t Skip Bearing Maintenance – Your Trailer Depends on It
Now that you know how to safely lift your trailer, remove hubs, inspect, adjust, and repack bearings, you’re halfway to preventing costly failures.
It’s no coincidence that trailers with well-maintained bearings run smoother and last longer. By routinely following these precise steps, you’ll guarantee your trailer stays reliable and safe on the road.
Don’t wait for a problem; make bearing maintenance a regular part of your trailer care routine.

