
To fix your camper blinds, start by carefully removing the blinds using the right tools, protecting surfaces to avoid damage. Inspect and remove any frayed or broken cords, then thread new high-tensile nylon cords through the pulleys and springs, ensuring proper tension and alignment.
Reinstall the blinds securely, test smooth operation, and adjust tension knots if needed. Proper cleaning and maintenance will extend their lifespan. Keep following for detailed steps on restringing and troubleshooting your camper blinds.
Key Takeaways
- Inspect camper blind strings for fraying or breakage and replace damaged cords using high-tensile nylon cords and proper threading tools.
- Carefully remove blinds by detaching mounting brackets, end caps, and valances while protecting surfaces and organizing hardware.
- Thread new cords through the spring mechanism and pulleys, ensuring correct routing and tension for smooth blind operation.
- Adjust cord tension by untying and retying knots on tensioners, testing blind movement multiple times for balance.
- Reinstall blinds by snapping the headrail into brackets, securing hold-downs, routing cords properly, and verifying smooth raising and lowering.
Tools and Materials Needed for Repair
Before you begin repairing your camper blinds, gather all the necessary tools and materials to guarantee a smooth process.
Essential cords like high-tensile nylon (130 lbs HTFP) ensure durability and flexibility. Purchase replacement cords in 20 ft segments or kits for multiple repairs. Selecting cords with appropriate load capacity is crucial to prevent breakage during use.
Use cord tensioners and plastic nylon bushings to maintain alignment and restore function. Include springs for roller or pleated blinds if needed.
Employ cord threading tools such as large darning needles or specialized re-stringing tools to guide cords efficiently. Patience and gumption are essential for successfully threading the cords through the pleats.
Basic hand tools must include flathead and Phillips screwdrivers, scissors, and prying tools for hardware removal.
Work on a clean, flat surface with adequate lighting. Consider repair kits with customized cords, tensioners, end caps, and detailed instructions for effective, precise repairs. Proper maintenance and care extend the life of your repair and prevent future damage.
Removing and Preparing Camper Blinds
Before you dive into removing your camper blinds, let’s make sure you have all the essential tools at your fingertips. Grab some screwdrivers with various bits and a putty knife to keep your surfaces safe. Using durable materials in your camper setup can help ensure long-lasting results.
Now, when you’re ready to start, take your time and carefully free any latches or clips. You want to detach those shades without causing any damage. It’s definitely worth it to be gentle here! Remember to remove window coverings like blinds or shades first to access the valance brackets easily.
And hey, don’t forget to shield the surrounding areas. This will help prevent any scratches or dents while you’re in the process of removal and preparation. It’s all about keeping your camper in great shape!
Tools and Materials Needed
Although removing camper blinds can seem straightforward, having the right tools and materials on hand guarantees efficiency and safety throughout the process.
You’ll need precision tools to handle screws, brackets, and adhesives, as well as safety gear to protect yourself from debris and accidents. Prepare the following essential items:
- Tools: Phillips-head and flathead screwdrivers, pliers (including needle-nose), utility knife, and step ladder for safe access. It’s also helpful to have durable repair tape on hand for any quick fixes during the removal process.
- Materials: Tape for securing, adhesive remover for residue cleanup, replacement screws, wall anchors, and bracket covers if originals are damaged.
- Safety Gear: Safety glasses, gloves, dust mask, work light, and a non-slip mat to maintain stability and visibility.
It is also important to keep small parts organized during removal to avoid losing screws and hardware. Having these ready guarantees a smooth removal and prepares you for the next steps in blind repair or replacement.
Shade Detachment Steps
How do you safely detach camper blinds without causing damage? First, identify the mounting brackets, usually on each blind end. Release locking tabs or latches carefully; roller shades require lifting curved locks, while pleated shades need strings detached from standoffs. Most window treatments come with retaining clips that help stabilize the blinds or shades, so be sure to remove these if present.
Fully retract roller shades before bracket release to avoid stress. Use appropriate screwdrivers for bracket screws and gently pry plastic end caps if present. Document string routing and spring tension, especially for pleated blinds, to ease reinstallation. Proper maintenance and regular inspection are key to ensuring longevity and compliance with vehicle regulations.
Remove valances if they obstruct bracket access. Work gradually to prevent breaking plastic components. After detaching blinds, unscrew safety clips or chain devices if applicable. Store all screws and brackets safely.
Retract shades fully for compact handling during removal and transport. This method ensures damage-free detachment and prepares blinds for repair or replacement.
Surface Protection Tips
Once you’ve safely detached the camper blinds, focus on protecting their surfaces during removal and preparation.
Start by cleaning them with mild, non-abrasive cleaners applied via a soft cloth to avoid scratches. Insulating materials used in camper windows, like Reflectix, can benefit from similar gentle handling to maintain their reflective properties. Using tools with a soft protective coating can further minimize damage during handling.
Lay a soft cloth or protective sheet on your workspace to prevent dents.
Use plastic or rubber-coated tools to detach hardware gently, minimizing surface damage.
- Clean and dry blinds thoroughly to prevent mold and damage during storage or repair.
- Mark blind orientation before removal to ensure accurate reassembly.
- Use painter’s tape on vulnerable areas during repairs to avoid accidental scratches.
Handle blinds with gloves to avoid transferring oils.
Store them flat or suspended to maintain shape and surface integrity.
Identifying and Removing Damaged Blind Strings
Before you can fix camper blinds, you need to carefully identify which strings are damaged by checking for fraying, breakage, or improper tension that affects blind movement.
Look for strings cutting through fabric or those detached from pull mechanisms. To remove damaged strings, first fully raise the blinds on a flat surface with a protective layer. Using tools with ergonomic design can make this process easier and prevent damage.
Use a Philips screwdriver or power driver to remove screws securing the valance or headrail. Gently pry off plastic end caps using a flat-head screwdriver, avoiding breakage.
Unscrew or unclip cord retainers at the bottom rail to access strings. Cut frayed or broken strings with scissors and carefully release any spring-loaded tension strings by untying knots or cutting near the spring.
Proper diagnosis helps decide whether to repair or replace components by identifying the exact nature of the cord damage diagnosing problems.
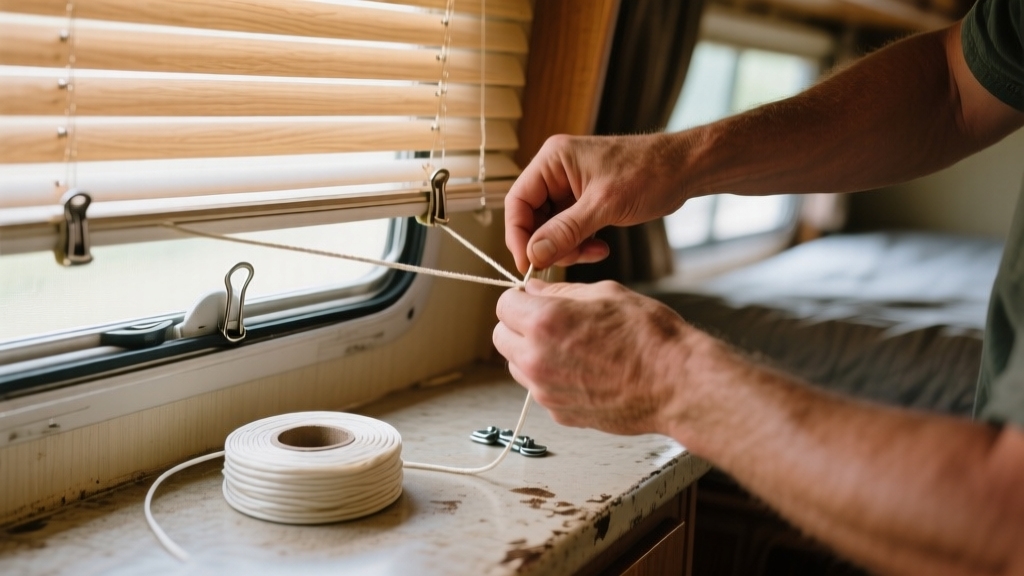
Step-by-Step Restringing Procedure
First things first, let’s get rid of those old strings! Gently take them off from the springs, retainers, and header rail. This will clear the way for the new cords you’re about to install. It’s important to create a diagram of the cord pattern before removing the old cords to ensure proper reassembly. Regular maintenance like this helps in preserving the overall functionality of camper components.
Once you’ve done that, it’s time to thread those new cords through the same path. Just make sure they’re properly secured and knotted at the springs. And don’t forget about the cord tension! You’ll want to adjust that just right to ensure your camper blind operates smoothly and evenly.
Removing Old Strings
Although removing old strings can seem tedious, following a systematic approach guarantees you avoid damage and streamline the restringing process.
Start by fully detaching the shade from its mounting, including removing decorative treatments, cord anchors, knobs, and end caps. This exposes the internal components and relieves tension on the strings. It is important to draw a diagram of the cord pattern during disassembly to ensure accurate reassembly later. Proper maintenance, including lubrication with the best grease for trailer hitch balls, can help prevent wear on moving parts.
Focus on carefully cutting and extracting the old cords from springs, crimps, bottom retainers, and header rails. Pull strings gently from one side, stabilizing the shade to prevent shifting.
Finally, thoroughly inspect and clear pulleys, guides, and channels of any remnants.
Key steps to remove old strings:
- Detach all mounting hardware to access the shade’s internal system.
- Cut cords near tension points and extract from rails and retainers.
- Inspect and clear all internal pathways before proceeding.
Threading New Cords
With the old strings removed and the internal pathways cleared, you can proceed to thread the new cords through the shade’s upper section.
Start by compressing the upper section to ease threading. Guide each cord down through the entire upper track, ensuring it seats properly along the top rail. It is important to inspect the spring for any damage before attaching the cords to ensure smooth operation. Keeping a well-organized workspace with basic first aid supplies nearby is recommended during any repair work.
Attach one end of each cord securely to the spring at the top, using double knots to prevent slipping. Keep cords evenly spaced and aligned before moving to the lower section.
Next, cross the cords between the upper and lower sections, compressing the lower section to thread cords through the appropriate holes. Maintain tension and correct alignment throughout. This methodical approach guarantees the cords are properly installed for smooth shade operation.
Adjusting Cord Tension
Before adjusting cord tension, carefully remove the shade from its mount to access the tensioning components.
Compress fabric folds and secure them with rubber bands to prevent tangling. Slide off end caps and tensioners to expose cord knots and anchoring points. The knot’s position is crucial as it determines the amount of slack in the cord, directly affecting how easily the blinds operate.
Inspect cords and bushings for damage or wear, replacing if necessary. Maintaining proper tension is essential for smooth operation and prolongs the lifespan of the blinds.
Follow these steps to adjust tension precisely:
- Mark original and desired knot positions on both cords, ensuring even placement to prevent crooked hanging.
- Untie existing knots and retie at new marked locations, securing with double knots to prevent slippage.
- Reinstall tensioners and end caps, then test the shade by raising and lowering it several times, adjusting knots as needed for smooth, balanced operation.
Reinstalling Blinds and Ensuring Proper Function
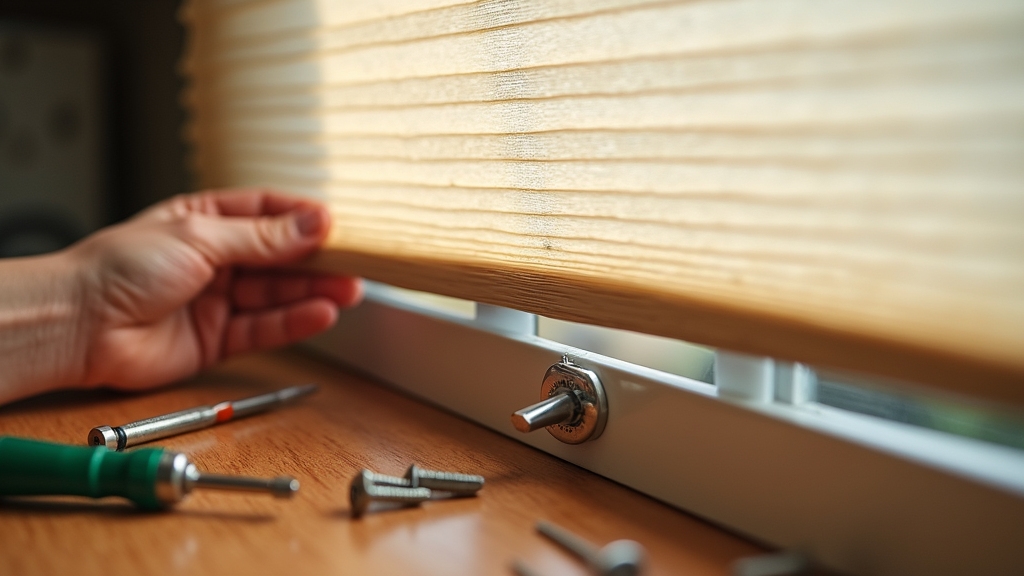
Once you’ve prepared the window and gathered your measurements, reinstalling the blinds requires precise bracket placement and secure attachment to guarantee smooth operation.
Position mounting brackets about 3 inches from window corners, avoiding bulky headrail sections. Use original screws and orientation to maintain alignment.
Snap the headrail into brackets with swivel handles open, then close to lock. Attach hold-down brackets below window corners, matching the bottom rail width to keep blinds taut.
Route cords cleanly through guides, wrap once around cord retainers, and adjust tension knots as needed. Secure bottom brackets evenly to prevent wobble, ensuring the blind is taut but not overstretched.
For optimal light control and privacy, you can adjust the blinds to allow partial light entry or full darkness as desired, based on your preference and the shade opacity.
Finally, test raising and lowering the blinds for smooth movement, confirm all screws are tight, and reinstall the valance to conceal hardware neatly.
Troubleshooting and Maintenance Tips
Although camper blinds are designed for durability, you’ll encounter common issues like broken strings, faulty cord guides, and tension problems that disrupt their function.
Camper blinds are built tough but can still face common issues like broken strings and tension problems. To keep your blinds operating smoothly, follow these troubleshooting and maintenance tips:
- Replace broken strings carefully by threading new ones through the blind’s mechanism to restore proper movement.
- Inspect cord guides and retainers regularly; swap out worn or damaged parts to prevent malfunction and tangled cords.
- Adjust tension delicately using an offset ratcheting screwdriver if needed, ensuring not to overtighten and risk damage.
For cleaning, vacuum with a soft brush or wipe with a microfiber cloth. Use vacuum cleaner with brush attachment to remove dust, dirt, and debris from RV blinds.
Apply silicone-based lubricants sparingly to moving parts for smooth operation.
Avoid harsh chemicals and always dry blinds thoroughly after cleaning to maintain longevity.
Frequently Asked Questions
Can Camper Blinds Be Repaired Without Removing Them Completely?
Yes, you can often repair camper blinds without removing them completely.
Tighten or loosen tension cords by adjusting wall anchors, realign blinds by tapping end caps, or fish slipped cords back with a hook.
Some roller shades let you unclip and adjust height or inspect mechanisms without full removal.
For minor jams or spring issues, hand-crank or slide the blind to clear obstructions.
Severe damage, however, may require partial disassembly.
What Is the Best Way to Clean Camper Blinds Without Damaging Them?
To clean camper blinds without damaging them, start by removing them if possible to avoid mishaps.
Use a vacuum with a soft brush to clear dust first; don’t go in cold turkey.
Then, gently wipe slats with a cloth dipped in a mild solution of equal water and white vinegar, plus a few drops of dish soap.
Avoid soaking. Dry thoroughly with a clean cloth and air dry completely before reinstalling to keep blinds in tip-top shape.
Are There Specific Replacement Strings Recommended for Camper Blinds?
Yes, you should use braided polyester lift cords for camper blinds, typically 1.4mm diameter for standard mini blinds.
If you have wood or faux wood blinds, go for thicker 1.8mm cords for durability.
Always match the original cord diameter and material to guarantee smooth operation.
White is the standard color to blend with most interiors.
Check specialty suppliers like Fix My Blinds for quality replacement strings made for RV use.
How Long Does a Typical Camper Blind Restringing Take?
Restringing a camper blind usually takes between 30 minutes and 1.5 hours, depending on your experience and the blind’s complexity.
Like threading a needle, it demands precision and patience. If you’re new, expect closer to an hour or more; seasoned DIYers often finish under 45 minutes.
Having the right tools, clear instructions, and proper replacement cords prepared will accelerate your work and ensure smooth operation afterward.
Can Damaged End Caps Be Repaired or Only Replaced?
You generally can’t effectively repair damaged end caps; replacement is the practical solution. Their molded shapes and integral cord holes make patching unreliable and prone to failure.
Temporary fixes like adhesive might hold briefly but won’t restore full function. To guarantee smooth blind operation, source exact or compatible replacement end caps, install them carefully, and rethread cords properly.
This approach guarantees durability and prevents jamming or uneven movement.
Extend the Life of Your Camper Blinds with Ease
Now that you’ve given your camper blinds a little TLC, they’ll glide smoothly without those pesky hiccups. By carefully restringing and reinstalling, you’ve avoided the hassle of a full replacement, saving time and money.
Keep an eye on wear and perform regular maintenance to extend their lifespan. With these practical steps, your blinds will continue to provide shade and privacy, making your camper feel just a bit more like home on every trip.

