
To keep camper pipes from freezing, insulate all exposed pipes and tanks with foam sleeves or rigid panels. Seal gaps against cold air. Use heat tape or heating pads with built-in thermostats along vulnerable water lines. Run your furnace steadily to maintain interior warmth.
Drain water tanks fully or circulate RV-approved antifreeze through your plumbing during extended cold. Protect exterior hoses with covers or heated hoses. Keep faucets dripping to maintain flow. These key steps form the foundation; additional measures will enhance your freeze defense.
Key Takeaways
- Insulate all exposed pipes and fittings with foam sleeves or spray foam to block cold air and retain heat.
- Use self-regulating heat tape with built-in thermostats on pipes, ensuring electrical safety with GFCI protection.
- Maintain interior warmth by running the furnace continuously and keeping the water heater on between 140–160°F.
- Wrap fresh water tanks and water heaters with insulated blankets or tank warmers to prevent freezing.
- Seal exterior hose inlets, valves, and compartments with weatherproof tape or caulking to block drafts and wind chill.
Essential Insulation Techniques for Camper Pipes
To effectively prevent camper pipes from freezing, you need to apply a combination of insulation techniques tailored to your RV’s layout and climate conditions.
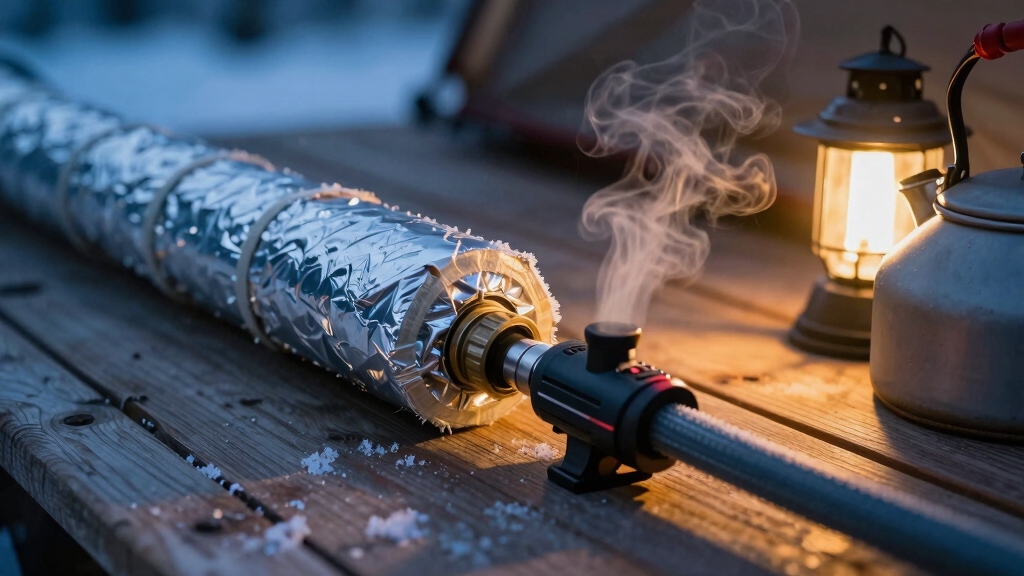
Start by sliding foam pipe sleeves over all exposed pipes, including fittings and valves, to create a passive thermal barrier.
For enhanced protection, wrap 110V heat tape in a spiral pattern around these pipes. Models with built-in thermostats activate automatically to maintain safe temperatures.
If you use low-voltage self-regulating cables, make certain your RV’s 12V or 24V system supplies adequate power.
Consider professional spray foam insulation for airtight sealing around underbelly pipes. This improves energy efficiency and blocks cold air infiltration.
Add layers like foil bubble wrap or fiberglass insulation depending on moisture exposure. Measure pipes accurately and drain lines before installation to maximize freeze protection effectively.
Using self-regulating heating systems can optimize energy use by activating heat only when necessary, enhancing safety and efficiency.
Effective Tank Protection Strategies
Although camper pipes require thorough insulation, safeguarding your tanks demands targeted strategies that address their unique exposure and heat retention challenges.
Use tank skirting to reduce airflow beneath your camper and install rigid foam panels under tanks to minimize heat loss. Proper planning and equipment make keeping an RV warm and protecting plumbing systems achievable.
Utilizing ventilation panels on covers can further reduce moisture buildup around tanks. Consider partial enclosures to create micro-environments for supplemental heating, combined with reflective foil to reduce radiative cooling.
Direct heating via adhesive pads or electric heat tape, controlled by thermostats, effectively prevents freezing. Incorporate RV-rated antifreeze carefully in wastewater tanks, avoiding freshwater contamination.
Protect plumbing valves with insulation and elevate drain lines to reduce cold pooling.
| Strategy | Method | Benefit |
|---|---|---|
| Tank Skirting | Removable insulated skirt | Reduces cold airflow |
| Heating Pads | Adhesive or heat tape | Direct conductive warming |
| Antifreeze Use | RV-approved propylene glycol | Lowers liquid freeze point |
| Valve Protection | Insulation & elevation | Prevents freeze at low points |
Step-by-Step Winterization Process
Alright, let’s talk about winterizing your RV!
First things first, you’ll want to start by fully draining your black and gray tanks. It’s a crucial step to make sure everything is nice and clean. Remember that water weight can add significant load, so draining helps reduce unnecessary strain on your RV during winter.
Once that’s done, don’t forget to bypass the water heater. This is super important because we want to prevent any antifreeze from getting into it. Many RVs include additional systems like ice makers and dishwashers that need special attention.
Now, onto the fun part! You’ll need to circulate some RV-approved pink antifreeze through all the water lines. You can use a converter kit for this. Just keep an eye out for that antifreeze – you want to see it coming out of every faucet and toilet.
Oh, and here’s a little tip: make sure to pour some antifreeze down each drain and into the toilets. This will help protect the P-traps and prevent any freezing in those traps and outlets. Using tanks made from BPA-free polyethylene can also contribute to maintaining water quality during winterization.
Drain and Bypass
Draining and bypassing your camper’s water system guarantees that no water remains to freeze and cause damage during winter storage. Start by fully draining the freshwater tank through its designated valve or plug. Open all faucets to allow air in and speed drainage.
Don’t forget to remove the water heater’s drain plug and open its pressure relief valve to avoid trapped pressure.
Next, open all low-point drain valves under the camper and operate fixtures separately. Purge residual water from supply lines and traps until flow stops or antifreeze appears.
Install or operate the water heater bypass valve to prevent antifreeze from entering the heater. Confirm bypass functionality by running the water pump briefly.
Only close low-point valves after confirming complete drainage or after antifreeze steps. Using durable RV hoses during winterization can help prevent damage from freezing and ensure reliable waste management.
Antifreeze Circulation Steps
After draining and bypassing your camper’s water system, the next step is to circulate RV-safe antifreeze through all water lines and fixtures. Using a non-toxic antifreeze ensures safety for drinking water systems during winterization.
Use only non-toxic, propylene-glycol antifreeze rated for potable water. Connect a siphon or adapter to your water pump inlet and submerge it in a container of antifreeze.
Activate the pump, then open faucets one at a time, starting closest to the pump, until pink antifreeze flows steadily from both cold and hot sides. This process prevents residual water from freezing and causing damage.
Run antifreeze through all outlets, including kitchen, bathroom, exterior showers, and appliances. Don’t forget to flush toilets until antifreeze appears in the bowl.
If your pump bypass isn’t available, pour at least 4 gallons into the freshwater tank and cycle the system similarly. It’s also important to sanitize your fresh water tank regularly to avoid contamination during storage.
Finally, pour antifreeze into all drains and traps to protect seals and prevent freeze damage.
Managing Interior Heat to Prevent Freezing
To keep your camper pipes from freezing, it’s a good idea to run the furnace continuously. This helps circulate warm air and keeps the pipe temperatures up. You might also want to keep your water heater powered on and set it between 140-160°F. This way, the connected lines stay nice and warm.
Now, maintaining a consistent warmth inside your camper is key. When you combine that with proper insulation, you’ve got a solid defense against freezing conditions. Additionally, insulating fresh water tanks can help retain heat and prevent freezing during cold weather.
So, remember to check those settings and keep things cozy! Using quality seal conditioners on rubber seals can also help maintain their flexibility and prevent damage caused by cold temperatures.
Furnace Use Benefits
Regularly running your camper’s furnace plays a crucial role in maintaining interior temperatures that protect pipes from freezing.
By providing centralized, forced-air heat, the furnace stabilizes air temperature, reducing cold spots around plumbing inside walls and under sinks. Many RV owners utilize devices like the Automatic Transfer Switch to ensure continuous power supply to their heating systems during outages.
Continuous low-level operation maintains warmth above freezing, preventing damaging freeze–thaw cycles. Furnace airflow even reaches cavities housing plumbing runs, ensuring all-around protection.
Additionally, combining furnace heat with underbelly heating can enhance protection by warming exposed plumbing and wiring beneath the camper. Consider these benefits when using your furnace for freeze prevention:
- Maintains steady interior temperatures, minimizing pipe freeze risk.
- Operates independently of shore power with propane or diesel fuel.
- Slightly increases humidity, reducing ice crystal buildup on pipes.
- Distributes heat to wall cavities and double hulls, warming hidden plumbing.
Water Heater Settings
Beyond furnace operation, managing your water heater settings plays a significant role in preventing pipe freeze-ups inside your camper. You should wrap the water heater with insulated blankets or foam wraps to retain heat effectively. Using a flexible and weather-resistant sealant around heater compartments can also help prevent drafts that lead to freezing.
Apply foam pipe insulation or heat tape to water lines connected to the heater. Seal gaps in the heater compartment with caulking or weatherproof tape to prevent cold air infiltration. For tankless models, avoid operating below 39°F to prevent system damage.
Instead, use heating pads attached to the heater bottom or pipes, connected to thermostats for regulated warmth. Consider employing accessory heat like space heaters with thermocubes that activate below 35°F, ensuring continuous protection.
When using space heaters, always plug them directly into a wall outlet rather than a power strip to avoid electrical hazards and ensure safe operation of your heating devices safe heater use. These combined measures maintain critical warmth around your water heater, safeguarding your plumbing system during freezing conditions.
Consistent Interior Warmth
Consistently maintaining interior warmth is essential for preventing your camper’s pipes from freezing during cold weather.
You should run the furnace continuously, focusing vents near plumbing to keep water lines above 32°F. Complement furnace use with tank warmers and insulation to protect holding tanks.
Keep water moving by dripping faucets or periodic usage, preventing stagnation that promotes freezing.
To effectively manage interior warmth:
- Operate the furnace steadily through sub-freezing nights to sustain heat distribution.
- Activate tank heaters automatically below 45°F; manually enable them near freezing temps.
- Insulate tanks with fiberglass enclosures and fill them fully to reduce freeze risk.
- Seal drafts and use skirting to maintain a dry, warm thermal envelope inside.
Using a heater with built-in automatic shut-off features enhances safety while maintaining consistent warmth. These steps guarantee thorough, reliable freeze protection for your camper’s pipes.
Exterior Measures to Safeguard Plumbing
To keep your camper’s exterior plumbing from freezing, you’ll need to layer up vulnerable pipes with appropriate insulation and carefully seal all exterior inlets. Using environmentally safe treatments on grey water tanks can also help maintain system function during cold weather.
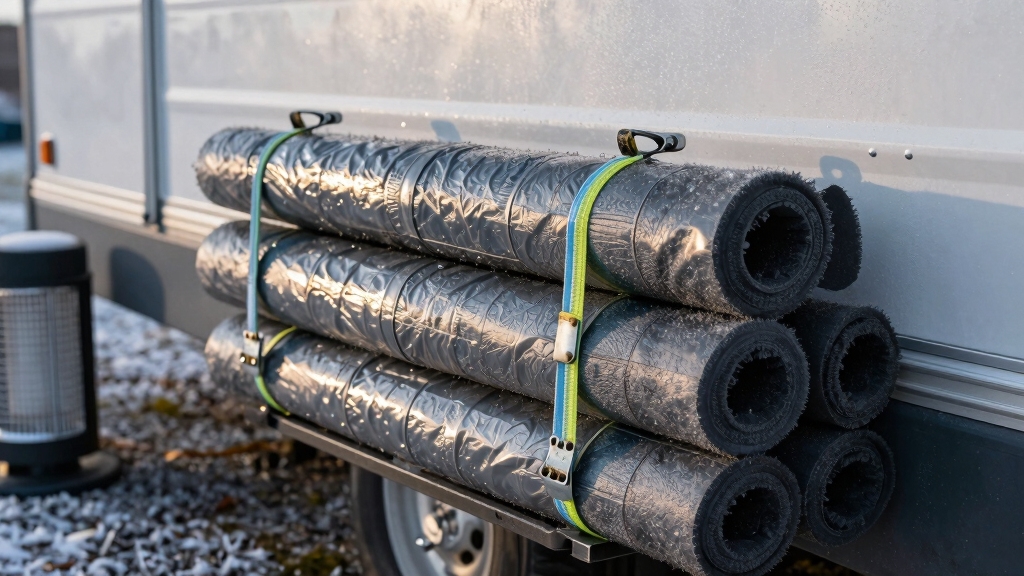
Wrap exposed water lines with foam pipe sleeves and secure fittings using self-adhesive foam tape. Cut rigid foam boards to shield pipes near camper walls, fastening with UV-resistant tape for durability.
Install insulated covers or foam plugs on city water inlets, black tank flushes, and outdoor showers, sealing entry points with weatherproof caulk. Open low-point drain valves and blow out residual water with low-pressure air to prevent ice buildup.
Before blowing out water lines, it is important to disconnect and prepare the air hose connection at the city water fill port, setting pressure to 30 PSI or less. Enclose exterior shut-off valves in insulated boxes and apply flexible skirting around the camper base to reduce wind chill.
Using Heat Tape and Heating Pads Properly

While insulating and sealing exterior plumbing forms the first line of defense against freezing, applying heat tape and heating pads adds an active layer of protection by directly warming vulnerable pipes and fittings.
To use these devices properly, you need to:
- Choose self-regulating, pipe-rated heat tape that matches your pipe material and power source to prevent damage and overheating. Ensure the heat tape includes a built-in thermostat disk that automatically regulates temperature to avoid overheating.
- Install heating cables along the pipe’s underside, securing them per manufacturer guidelines, and avoid overlapping unless allowed.
- Insulate over the heat tape with compatible foam or fiberglass sleeves to maximize efficiency and prevent heat loss.
- Use thermostatic controls and GFCI protection to optimize energy use and guarantee electrical safety.
Following these steps helps maintain reliable freeze protection while minimizing power consumption and risk.
Handling Water Hoses During Cold Weather
When preparing your camper’s water hoses for cold weather, you’ll want to focus on insulating external hoses and connections to prevent freezing.
Park guidelines in cold locations often require specific winterization measures for hookups to protect both your rig and the park’s underground pipes, so it’s important to follow any park-specific procedures.
Use closed-cell foam insulation sized to fit hoses and spigots, sealing edges with tape to block cold air. Wrap insulation with weatherproof tape to protect from moisture.
Pay special attention to joints and hose-to-RV connections, as these are common freeze points. Heated electric hoses can supplement insulation but require proper power and regular testing to guarantee reliability.
| Task | Material/Tool | Key Tip |
|---|---|---|
| Insulate hose | Closed-cell foam | Seal edges with weatherproof tape |
| Cover spigot | Foam faucet cover | Add tape to block air infiltration |
| Protect insulation | Plastic sheathing | Prevent moisture saturation |
| Heat hose (optional) | Heated water hose | Use GFCI power and test regularly |
| Inspect insulation | Visual check | Repair compression or tears promptly |
Best Practices for Maintaining Water Flow
Regularly circulating water through your camper’s plumbing prevents stagnation and reduces freeze risk. You need to keep water moving by running faucets regularly, especially during freezing conditions.
To further protect your plumbing, keep the furnace running to maintain the interior temperature and prevent freezing of water lines continuous occupancy.
Completely drain low-point drains to avoid trapped water freezing and causing damage. Filling your freshwater holding tank fully and using tank warmers maintains water temperature and flow.
Also, keep gray and black tank valves closed until dumping in milder temperatures to prevent exposure to freezing air.
- Run faucets periodically to maintain flow and prevent stagnation.
- Drain low-point drains fully to eliminate trapped water.
- Fill and warm freshwater tanks to sustain temperature.
- Keep waste tank valves closed until conditions improve.
These steps guarantee continuous water movement and help avoid pipe bursts caused by freezing.
Cost Considerations and DIY Winterization Tips
Breaking down the costs of winterizing your camper can help you plan effectively and avoid unexpected expenses.
Professional services typically range from $50 to $500, depending on thoroughness. Major freeze damage repairs can exceed $3,000. It is also important to drain fresh water tanks and add RV-specific antifreeze to the plumbing system to protect against freezing.
Labor and materials, such as RV-rated antifreeze ($10–$40) and replacement parts, add to your budget. Storage fees vary widely, from $50 for outdoor lots to $400 for indoor storage monthly.
To reduce costs, consider DIY methods: drain and bypass systems, compressed-air blowouts, or selective antifreeze application. Invest in pipe insulation and self-regulating heat tape to minimize freeze risk.
Temporary heat kits provide energy-efficient protection when electrical access is available. Prioritize spending on quality antifreeze and insulation to balance upfront expenses with long-term freeze prevention.
Frequently Asked Questions
Can Adding RV Skirting Affect Propane Heater Efficiency?
Yes, adding RV skirting can improve your propane heater’s efficiency by reducing convective heat loss beneath your camper. It traps warmer air under the RV, so your furnace doesn’t need to run as often to keep pipes above freezing.
However, to avoid short-cycling, you might need to adjust your thermostat settings. Also, make sure skirting is well-sealed to prevent cold air infiltration, maximizing fuel savings and maintaining steady heat distribution.
What Types of Antifreeze Are Safe for Potable Water Systems?
You should use propylene glycol (PG) based antifreeze for potable water systems, as it’s low-toxicity and GRAS-certified for incidental food contact.
Avoid ethylene glycol (EG) or automotive coolants; they’re toxic and unsafe.
Some alcohol-based blends can work but require proper flushing before drinking use.
Always check product labels to confirm “safe for potable water.”
Flush antifreeze completely from your system before normal use to prevent contamination.
How Often Should Heat Tape Be Inspected for Damage?
You should inspect heat tape annually as a baseline, but if you use your camper frequently or live in a cold climate, check it monthly during the season.
Always inspect after power surges, heat-tape trips, or electrical work.
Look for cracks, frayed cords, loose connections, and proper attachment to the pipe.
Replace heat tape every 1–3 years if you notice wear or if it’s been in continuous use for about five years.
Are There Eco-Friendly Alternatives to Traditional RV Antifreeze?
You might think eco-friendly RV antifreeze won’t protect as well, but that’s not true. Propylene glycol-based options, like Prestone Waterline or STAR BRITE, offer reliable freeze protection down to -50°F or -100°F.
They’re biodegradable, less toxic, and safer for pets and the environment. These formulas also include corrosion inhibitors to safeguard your plumbing and engine, ensuring performance without compromising eco-friendliness or safety.
Can Solar-Powered Pipe Heaters Be Used Effectively in Winter?
You can use solar-powered pipe heaters in winter, but their effectiveness depends on sunlight availability and insulation quality.
In mild-freeze climates, black poly pipes warmed by sun can keep water flowing during the day. However, in severe cold or prolonged cloudy conditions, they may not provide enough heat alone.
Combining solar heaters with proper insulation and backup heating guarantees pipes stay thawed, especially in sub-zero temps or extended overcast periods.
Smart Winter Prep for Worry-Free Camping
You’ve learned how to insulate pipes, protect tanks, and manage heat both inside and out to keep your camper plumbing safe from freezing. Isn’t it worth taking these precise steps to avoid costly repairs and maintain water flow during cold spells?
By using heat tape correctly and winterizing your system thoroughly, you guarantee reliable function all season. With a little effort and the right tools, you’ll confidently keep your camper pipes frost-free and ready for any winter adventure.

