
Last Updated on August 10, 2025
To remove decals from your RV, start by thoroughly cleaning and drying the area. Warm the decal with a hairdryer or heat gun on low to soften the adhesive, keeping the heat moving to avoid damage.
Gently peel the decal using a plastic scraper or your fingernail, reheating stubborn spots as needed. Remove leftover adhesive with a solvent like mineral spirits, then wash and protect the surface.
Following these steps guarantees a clean finish, and you can explore detailed techniques to perfect the process.
Key Takeaways
- Clean and dry the RV surface thoroughly using soapy water, Windex, and rubbing alcohol before starting decal removal.
- Heat decals gently with a hairdryer or heat gun on low-medium to soften adhesive without damaging paint.
- Peel decals slowly at a low angle using plastic tools or fingernails, reheating stubborn sections as needed.
- Remove leftover adhesive with heat and solvent-based removers like mineral spirits or citrus cleaners, using plastic scrapers carefully.
- Clean, polish, and protect the surface post-removal with mild detergent, oxidation remover, and a wax or sealant.
Preparing the RV Surface for Decal Removal
Before removing decals from your RV, you should thoroughly clean the surface to eliminate dirt, oils, and residues that could interfere with adhesive removal.
Start by washing the area with soapy water to remove loose debris, then apply a general-purpose cleaner like Windex to break down oils and contaminants.
Follow with rubbing alcohol to dissolve residual grease, ensuring the surface is completely dry to prevent moisture entrapment beneath adhesives.
Avoid abrasive cleaners to protect the paint finish. Using energy-efficient lighting inside the RV can reduce heat buildup, which may affect decal adhesives.
Once cleaned, inspect for scratches, rust, or faded paint that could affect removal or new decal adhesion. Use plastic tools for any gentle scraping if needed, steering clear of metal blades to avoid damage.
Using plastic scrapers helps prevent scratches during this step. Mask adjacent areas to prevent accidental harm during this preparation phase. This thorough prep guarantees safer, more effective decal removal.
Techniques for Heating Decals Safely
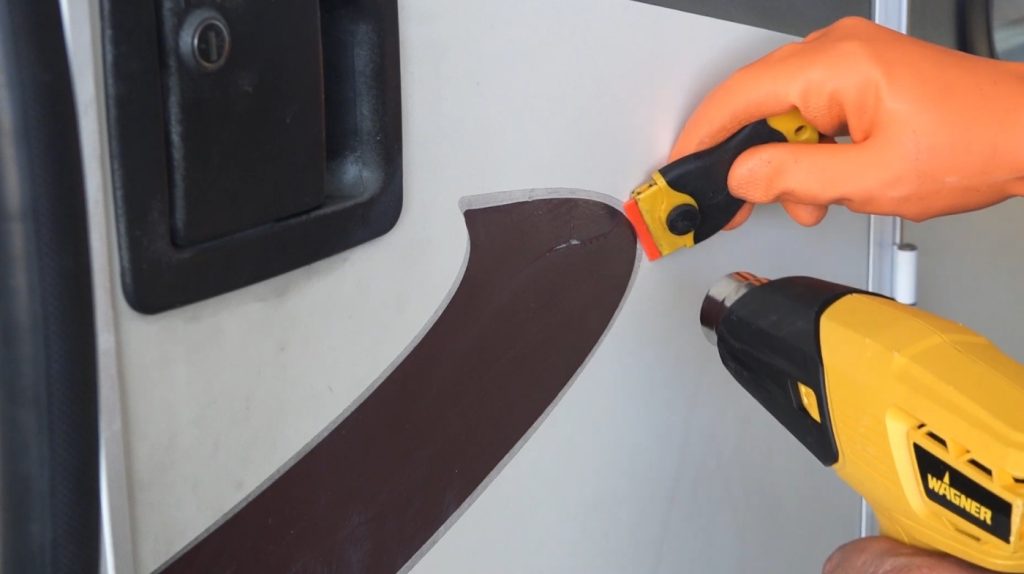
When removing decals from your RV, applying controlled heat softens the adhesive, making the vinyl easier to lift without damaging the surface. Use a hairdryer or heat gun on low to medium settings—around setting 3—to evenly warm each small decal section for about 30 seconds.
Keep the heat tool moving to prevent hot spots and avoid overheating, which can warp fiberglass or bubble paint. While heat guns are effective on decal sides, a blow dryer is generally recommended over a heat gun to prevent damage to delicate surfaces heat application safety.
Maintain a safe distance of several inches from the surface and wear heat-resistant gloves. Avoid direct sunlight and prolonged heating, as inconsistent or excessive heat risks discoloration. Using materials with corrosion resistance properties can also help prolong the lifespan of your RV’s exterior finishes.
After heating, use plastic scrapers to gently lift the decal edges without scratching. Always test a small, inconspicuous area first to gauge heat tolerance and prevent damage during the removal process.
Step-by-Step Decal Peeling Process
Although preparing the surface properly makes peeling easier, you’ll want to start by carefully lifting a decal corner using a plastic toothpick or your fingernail to avoid scratching.
Once a corner is lifted, peel the decal slowly at a low angle to minimize tearing and residue. Proper tire maintenance like regular inspections can also contribute to preserving your RV’s exterior condition.
Use a plastic scraper gently if the decal resists hand removal, avoiding metal tools that can damage paint. Work in a shaded area to keep adhesive manageable. Remove large pieces intact to reduce leftover adhesive.
Patience is essential during this process, as decal removal can be time-consuming and labor-intensive. For stubborn sections, pause peeling; apply heat (covered elsewhere) before continuing.
Employ decal removal tools like plastic scrapers or a Wonder Wheel cautiously, preventing overheating or abrasion. After peeling, inspect the surface for residual decal fragments and repeat peeling if necessary before proceeding to adhesive residue removal.
Effective Methods for Removing Adhesive Residue
After peeling off decals, you’ll often find stubborn adhesive residue clinging to your RV’s surface. To remove it effectively, start by softening the adhesive with controlled heat from a hair dryer or heat gun, avoiding damage to paint.
On the second day of removal, focus on the adhesive residue left behind for best results. Using temperature range appropriate heat prevents surface damage while softening adhesives.
Next, apply a solvent-based remover like mineral spirits, citrus-based cleaners containing d-limonene, or commercial products such as Goo Gone. Let the solvent soak to penetrate the residue.
Use a plastic razor blade scraper or a Wonder Wheel tool to gently lift softened adhesive, combining mechanical action with solvent application. Wipe residue away with paper towels moistened in remover.
Avoid metal blades to prevent scratches and overheating. Finally, thoroughly wash the area with soapy water to remove all solvent traces, protecting your RV’s finish from damage or dirt attraction.
Caring for the RV Surface After Decal Removal
To maintain your RV’s exterior integrity, you must thoroughly clean the surface once decals are removed. Start by washing with mild detergent and water to eliminate adhesive and dirt. Selecting the right products can help preserve the material durability of your RV’s finish.
Follow with a microfiber cloth dampened with isopropyl alcohol or a non-residue cleaner to remove grease. Avoid abrasive chemicals that could damage paint or gel coat. If any sticky residue remains, products like Goo Gone can be effective in removing it safely.
After cleaning, inspect for ghosting or damage.
- Use oxidation removers like Meguiar’s to address ghosting without sanding.
- Repair minor scratches or burn marks with compatible touch-up paint or gel coat kits.
- Allow the surface to dry completely before applying wax or sealant for protection.
- Regular waxing shields against UV rays and restores gloss lost during removal.
Frequently Asked Questions
Can I Remove Decals Without Any Heat or Chemical Products?
You can remove decals without heat or chemicals by using warm soapy water to soften adhesive and gently peeling edges with your fingernails or plastic scrapers. Be patient, applying soaked cloths repeatedly, especially for older decals.
Mechanical peeling combined with natural sunlight exposure can also help loosen decals over time. Avoid metal tools to prevent surface damage, and use plastic putty knives for stubborn spots.
How Long Does the Entire Decal Removal Process Typically Take?
Imagine peeling wallpaper in a Victorian parlor—that’s how meticulous decal removal can feel. You’ll spend anywhere from 1 to over 4 hours total, depending on decal size and tools. Heating softens adhesive, peeling and scraping take hours, especially on large decals.
Residue removal demands patience, with chemical applications and gentle scraping. Final cleaning and inspection add 20–40 minutes. Plan accordingly for a thorough, damage-free finish.
Are There Any Decals That Are Impossible to Remove Without Repainting?
Yes, some decals are impossible to remove without repainting. If they’ve been baked on by sun exposure or use industrial-strength adhesives, they bond permanently to your RV’s paint.
Thick, multi-layered vinyl or decals covering damaged or textured surfaces often cause paint peeling or leave adhesive stains when removed. In these cases, you’ll likely need repainting to restore a smooth, uniform finish after removal.
What Should I Do if the Decal Leaves a Permanent Stain?
When a decal leaves a permanent stain, think of it as a shadow etched in time on your RV’s surface. Act swiftly: apply a commercial oxidation remover like Meguiar’s to smooth the area microscopically.
Use adhesive removers cautiously to clear residue. If stains run deep, avoid aggressive sanding; consult a pro for refinishing. After treatment, polish and apply UV protectant to guard against future marks and restore your RV’s shine effectively.
Is It Safe to Remove Decals Myself or Should I Hire a Professional?
You can remove decals yourself if you have patience, proper tools like a heat gun and a plastic scraper, and follow safety guidelines carefully. DIY works best for small or recent decals.
However, if decals are old, baked-on, or you want to avoid surface damage, hiring a professional is safer. They use specialized tools and techniques to protect your RV’s finish and save you time and frustration. Choose based on your skill and decal condition.
Peel Like a Pro: Master the Art of Decal Removal
Removing decals from your RV is like peeling back layers to reveal a fresh canvas underneath. By preparing the surface, applying controlled heat, and carefully peeling, you’ll avoid damage and frustration.
Tackling adhesive residue with the right solvents guarantees a smooth finish, while proper aftercare protects your RV’s exterior. Follow these steps precisely, and you’ll restore your RV’s appearance efficiently, leaving it ready for your next adventure without a trace of the old decals.

