

To tighten a ball hitch, first choose the exact wrench or socket size matching the hitch nut. Clean the threads with a wire brush and apply penetrating lubricant sparingly.
Hand-tighten the nut, then use a calibrated torque wrench to tighten to the manufacturer’s specified torque, making certain even pressure without over-tightening.
Secure the hitch pin and check for play, adjusting coupler latch tension as needed to eliminate wobble. Proper technique ensures safe towing and reliable performance. Details on optimizing fit and maintenance follow.
Key Takeaways
- Match the wrench or socket size exactly to the hitch ball nut for proper grip and torque application.
- Clean threads thoroughly with penetrating lubricant and a wire brush before tightening to ensure smooth engagement.
- Hand-tighten the hitch ball nut initially to prevent cross-threading before applying final torque.
- Use a calibrated torque wrench set to the manufacturer’s specified torque value to tighten the hitch ball nut evenly.
- Double-check torque after initial tightening and first use, and reverify periodically to maintain safe, secure fit.
Selecting the Correct Tools for Hitch Tightening
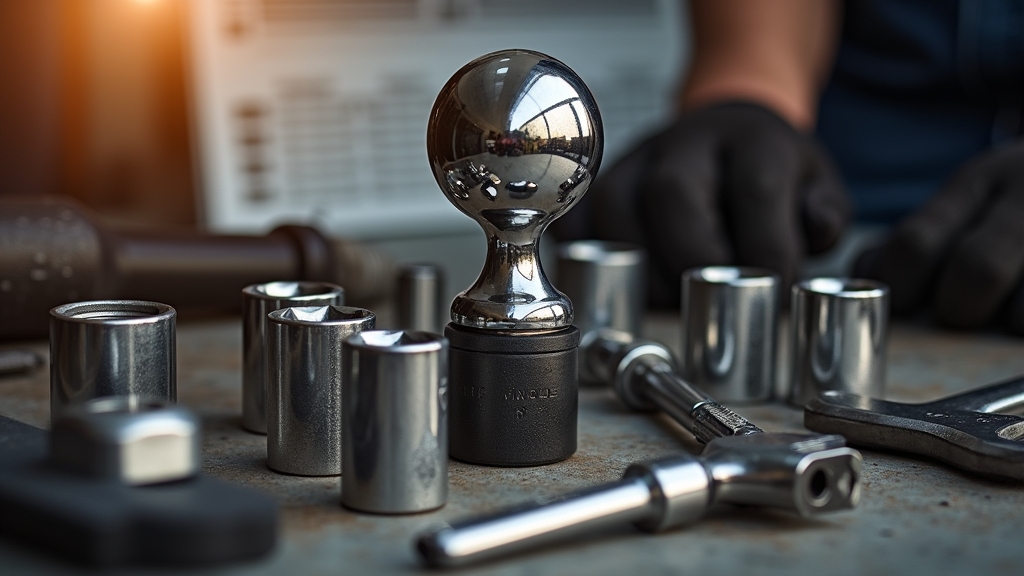
When tightening a ball hitch, selecting the correct tools is essential to guarantee a secure fit and prevent damage. You’ll want to match the wrench size exactly to the hitch ball nut, commonly 1-1/8″, 1-1/4″, 1-1/2″, or 2-5/16″. A specialized dual-ended wrench designed for 1-1/8 inch and 1-1/2 inch hitch ball nuts can simplify the tightening process while providing extra leverage.
Box-end wrenches offer maximum grip and reduce rounding nut corners, making them ideal for maintaining the integrity of the hitch components during tightening. Combination wrenches provide versatility with open and box ends for different access needs.
Specialty hitch ball wrenches, often dual-ended, fit popular nut sizes and offer long handles for leverage. Socket wrenches with a 1/2-inch drive suit high-torque tightening, especially with ratchets or impact tools.
Avoid adjustable wrenches unless properly sized to prevent slipping. Always consider manufacturer tool recommendations to guarantee proper fit and torque application, as following these guidelines ensures optimal safety and performance.
Preparing the Ball Hitch for Torque Application
Before you start applying torque, it’s really important to double-check that the bolt and nut sizes align perfectly with the hitch specifications. This helps to avoid any damage or improper tightening, which we definitely want to steer clear of! Using the correct torque also ensures optimal performance and safety.
Next up, make sure to clean the threads thoroughly. You want to get rid of any dirt or corrosion because that stuff can really throw off your torque accuracy.
When it comes to lubrication, be careful! Only apply it where it’s recommended. And remember, unless specified, you should avoid putting it on the shank threads.
Also, always use a suitable wrench or pipe wrench to tighten the nut securely for safe towing. This way, you can ensure that your torque readings remain consistent.
Verify Bolt and Nut Sizes
Two critical measurements you must verify before torque application are the bolt shank diameter and the corresponding nut size.
Confirm the shank diameter stamped on the ball matches your ball mount hole, ensuring a secure fit. It is important to select a ball with the correct diameter because the standardized sizes facilitate easier coupling and towing. Ensuring the correct fit also helps maintain durability and safety during travel.
Next, check the nut size stamped or listed in specifications; using the correct nut size prevents improper torque and damage. Use the appropriate socket or wrench for the nut size to apply torque accurately.
| Shank Diameter | Nut Size (inch) | Socket Size (inch) |
|---|---|---|
| 1 | 1-1/2 | 1-1/2 |
| 1-1/4 | 1-7/8 | 1-7/8 |
| *Metric* | *Not recommended* | *Avoid* |
Always match bolt and nut sizes precisely to guarantee safe, effective tightening.
Clean and Lubricate Threads
Although tightening a ball hitch relies heavily on proper torque, you must first clean and lubricate the threads thoroughly to guarantee smooth engagement and prevent galling.
Begin by applying a penetrating lubricant like WD-40 generously to weld nut and ball hitch threads, letting it soak for several minutes. This step helps to loosen rust and debris buildup that can obstruct threading. Using a lubricant with high resistance to weather conditions ensures longer-lasting thread protection.
Use a wire or stiff nylon brush to aggressively remove rust and debris, focusing on thread roots. Tap the threads with a notched bolt or thread chaser to dislodge lodged particles.
For heavily rusted threads, carefully use a matched thread tap perpendicular to avoid cross-threading. Repeat lubrication and cleaning until the bolt threads smoothly by hand.
Finally, wipe away excess lubricant while leaving a thin protective film to inhibit corrosion before applying torque.
Step-by-Step Torque Tightening Procedure
Alright, let’s dive into the torque tightening procedure! First things first, make sure you set your torque wrench to the manufacturer’s specified value for your ball hitch shank size. This is super important because the right torque ensures everything stays secure.
Now, when you start tightening those bolts, try to do it evenly. A good tip is to use a star or cross pattern. This way, you can guarantee balanced pressure across the mounting surface. It really helps to prevent any uneven stress, which can lead to issues down the line. Proper maintenance is key to avoiding rot and damage over time.
For best results, after reaching the initial torque setting, apply an additional quarter turn to achieve the total required torque, as recommended by the manufacturer’s instructions.
Correct Torque Application
When tightening a ball hitch, you’ll need to follow a precise torque tightening procedure to guarantee safety and proper function. First, clean threads and mating surfaces thoroughly. Proper maintenance and regular inspection are essential for preventing damage during use.
Use a calibrated torque wrench with the correct 1-7/8″ socket, matching the required torque: typically 125–150 ft/lbs for a 3/4″ shank, 215–250 ft/lbs for 1″, and up to 450 ft/lbs for 1-1/4″ shanks. It is important to use a lock washer and torque nut per manufacturer specs to ensure secure fastening.
Gradually tighten the nut, increasing torque in stages to avoid thread damage. Apply thread locker if specified by the manufacturer. Avoid over-torquing or under-torquing, as both compromise safety. Always verify the exact torque value per the ball hitch’s manual.
After initial tightening, double-check torque settings and recheck after your first tow to ensure secure installation and reliable performance. Additionally, always consider environmental factors such as wind and road conditions that may affect hitch stability.
Even Bolt Tightening
Start by clearing obstructions and aligning all bolt holes. Hand-tighten bolts to prevent cross-threading and adjust alignment. Use a torque wrench to tighten bolts to the manufacturer’s specifications to ensure proper torque application.
Additionally, consider the importance of safety features such as built-in protections that prevent damage during installation. Mark bolt heads and washers for rotation tracking. Begin torqueing from center bolts outward, alternating diagonally if multiple bolts are present to maintain frame alignment.
Apply the manufacturer’s specified torque progressively, using a breaker bar or torque wrench, and finish with a small incremental turn for full preload. Continuously check that the hitch frame remains flush against the vehicle. Use visual marks on bolts and tools to monitor rotation and detect slippage.
After tightening, perform a firm tug test and verify coupler seating to confirm secure attachment and even load distribution.
Techniques to Eliminate Hitch Rattle and Wobble
Although hitch rattle and wobble can stem from various sources, you can effectively eliminate them by applying specific tightening and stabilization techniques.
Start by using anti-rattle hitch tighteners, which clamp the ball mount firmly to the receiver, stopping play without welding or drilling. These devices are typically made from solid forged steel for enhanced durability and strength. Using products with scratch-resistant features can also help maintain the hitch’s appearance and durability.
Next, adjust the coupler latch tension carefully to achieve zero end play without binding, ensuring smooth trailer connection. Finally, secure the hitch pin and clip properly; consider locking pins to minimize movement and inspect them regularly for wear. Use heavy-duty stabilizers with bolts to lock the ball mount tightly.
Fine-tune coupler latch tension in small increments to avoid over-tightening. Replace worn pins and components to maintain precise fit and reduce vibration.
Maintaining Proper Lubrication on the Hitch Ball
After securing the hitch and eliminating any rattle or wobble, maintaining proper lubrication on the hitch ball becomes a key factor in preserving its performance and longevity.
Start by thoroughly cleaning the hitch ball to remove dirt and debris. Apply a generous, even layer of white lithium or waterproof grease, ensuring coverage in all grooves and crevices.
Regular lubrication is essential because it reduces friction between moving parts, preventing squeaking and grinding noises during towing. Proper lubrication also helps maintain the durability of sidewalls on trailer tires connected to the hitch system.
Avoid oil-based lubricants as they attract dirt and reduce effectiveness. Wipe off excess lubricant to prevent buildup. Lubricate the hitch ball before each towing trip and after exposure to harsh conditions like rain or salt.
Watch for signs of insufficient lubrication such as rust, grinding noises, or difficulty coupling. Proper lubrication reduces friction, prevents corrosion, and ensures smooth coupling, extending the life of both hitch ball and coupler.
Adjusting the Trailer Coupler Latch for Secure Fit
Why is adjusting the trailer coupler latch critical for a secure fit? Proper adjustment ensures the coupler clamps tightly around the hitch ball, preventing unwanted movement or detachment during towing. This is especially important when considering the weight capacity that the hitch and coupler must safely handle.
To adjust, turn the lock nut beneath the latch clockwise to increase tension until the latch closes with slight resistance. Then, back off the nut half to three-quarters of a turn to allow the ball to pivot freely. This process can often be done without tools, as the couplers are designed for easy manual modification.
Check washer orientation and spring tension to maintain proper latch pressure and function. Perform a fit and shake test: the coupler and ball should move as one without play.
Correct tension balances secure locking with operational ease. Proper washer and spring placement prevents loosening or over-compression. Matching coupler size to ball diameter is essential before adjustment.
Safety Checks and Regular Inspection Tips
Because regular safety checks prevent accidents and equipment failure, you should inspect all hitch components before each trip. Visually examine the hitch ball, receiver, coupler, bolts, and safety chains for cracks, rust, or looseness.
Clean dirt and salt residue, then lubricate moving parts with appropriate grease. It is also important to routinely tighten bolts and fasteners to manufacturer specifications using a torque wrench to ensure secure connections.
Tighten bolts to manufacturer specifications using a torque wrench. Confirm safety chains are crossed properly and test all trailer lights. Use this checklist to guide your inspection:
| Inspection Item | Key Action |
|---|---|
| Hitch Components | Check for cracks, rust, deformation |
| Bolts and Fasteners | Tighten to specified torque |
| Safety Chains | Ensure proper orientation and attachment |
| Lubrication Points | Apply grease to moving parts |
| Electrical Connections | Test all lights and wiring |
Perform these steps routinely to maintain hitch safety and reliability.
Frequently Asked Questions
Can I Use an Impact Wrench to Tighten Ball Hitch Bolts?
You can use an impact wrench for initial snug tightening of ball hitch bolts, but don’t rely on it for final torque.
Impact wrenches deliver bursts of torque and may over-tighten, risking damage. Always check your hitch’s manual first.
For precise final tightening, use a torque wrench set to the manufacturer’s specified torque, usually between 300–400 ft-lbs.
Retorque bolts every six months to maintain safety.
How Often Should I Replace the Hitch Ball for Safety?
Think of your hitch ball like a trusty horse’s bit. It needs regular checks to keep you safe.
You should replace it whenever you spot severe wear, deep rust, cracks, or loose fit, or immediately after any towing incident.
Inspect it at least once a year, more often if you tow heavily or in harsh conditions.
Don’t wait for failure; swapping it proactively prevents accidents and ensures your towing setup stays rock solid.
What Is the Difference Between Weight Distribution and Standard Hitches?
You’ll find that weight distribution hitches redistribute the trailer’s tongue weight across all axles, improving stability and control, especially with heavier loads.
Standard hitches simply connect the trailer without balancing weight, which can cause rear sag and sway.
Weight distribution hitches also often include sway control mechanisms, while standard hitches don’t.
Choose a weight distribution hitch if your trailer’s tongue weight exceeds 10-15% of its total weight for safer towing.
Are There Specific Torque Values for Different Trailer Weights?
Absolutely, you can’t just crank that ball hitch like a wild cowboy!
Torque values vary with trailer weight. Lighter trailers around 3,500 lbs need about 150-160 ft-lbs on a 3/4″ shank.
Mid-range trailers up to 8,000 lbs require roughly 250 ft-lbs with a 1″ shank.
Heavy-duty trailers over 10,000 lbs demand around 450 ft-lbs using 1 1/4″ or larger shanks.
Always follow precise manufacturer specs to keep things safe and secure.
Can Rust on Hitch Bolts Affect Torque Accuracy?
Yes, rust on hitch bolts definitely affects torque accuracy.
When you apply torque, rust increases friction between threads, reducing bolt tension for the same torque value. This means the bolt won’t clamp as securely as expected.
To guarantee proper tightening, you should clean and remove rust before assembly or replace corroded bolts.
Avoid over-torquing to compensate, as that risks bolt failure and unsafe conditions.
Prevent Wobble and Wear With Proper Hitch Maintenance
By tightening your ball hitch correctly, you’re not just securing a trailer. You’re ensuring peace of mind on every trip. It’s no coincidence that properly torqued connections prevent wobble, reduce wear, and keep your load safe.
Follow each step precisely, from tool selection to lubrication, and perform regular inspections. These small actions add up to reliable towing, protecting both your vehicle and what matters most to you every time you hit the road.

