
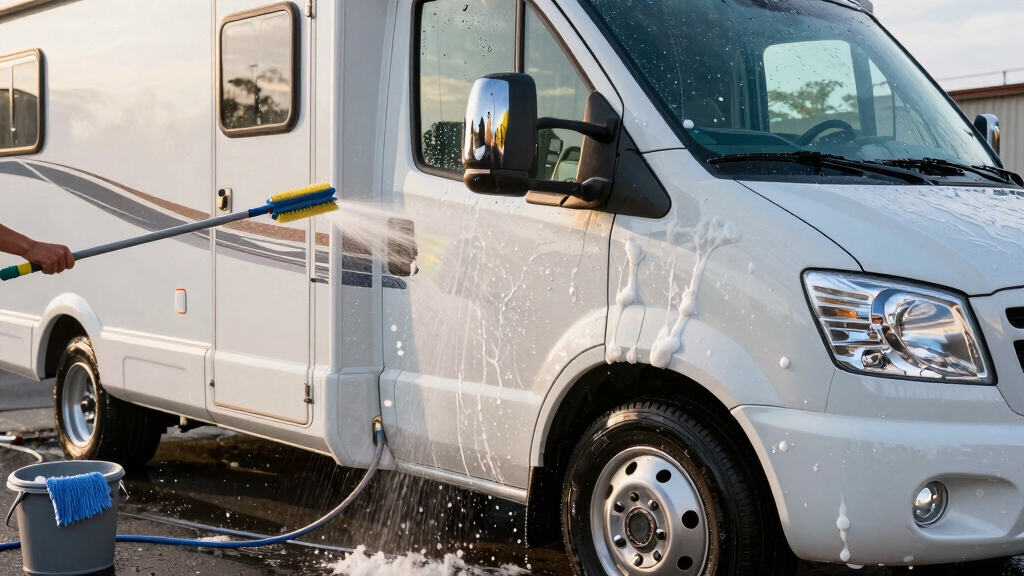
To wash your RV effectively, start by gathering RV-specific soap, microfiber towels, and the two-bucket method with soapy and rinse water to avoid scratches. Pre-rinse from top down using low-pressure water to remove debris.
Then, wash in sections with a lamb’s wool pad or mitt, rinse carefully around seals and decals, and dry with quality microfiber towels away from direct sun to prevent spots. Finishing with specialized wax protects your finish and extends shine.
Following these basics sets you up to master thorough RV care steps.
Key Takeaways
- Use RV-specific soap and a two-bucket method with microfiber mitts to gently wash without damaging paint or decals.
- Rinse the RV from top to bottom using low-pressure water to remove loose dirt and prevent damage to seals.
- Work in sections applying soap with a lamb’s wool pad, scrubbing tough bug residues with a dedicated remover.
- Dry the RV with clean microfiber towels or a chamois in shaded areas to avoid water spots and scratches.
- Protect the finish by waxing every 3–6 months with RV-specific wax, applying in thin layers and buffing to a shine.
Get the Right Tools and Cleaning Products for Your RV
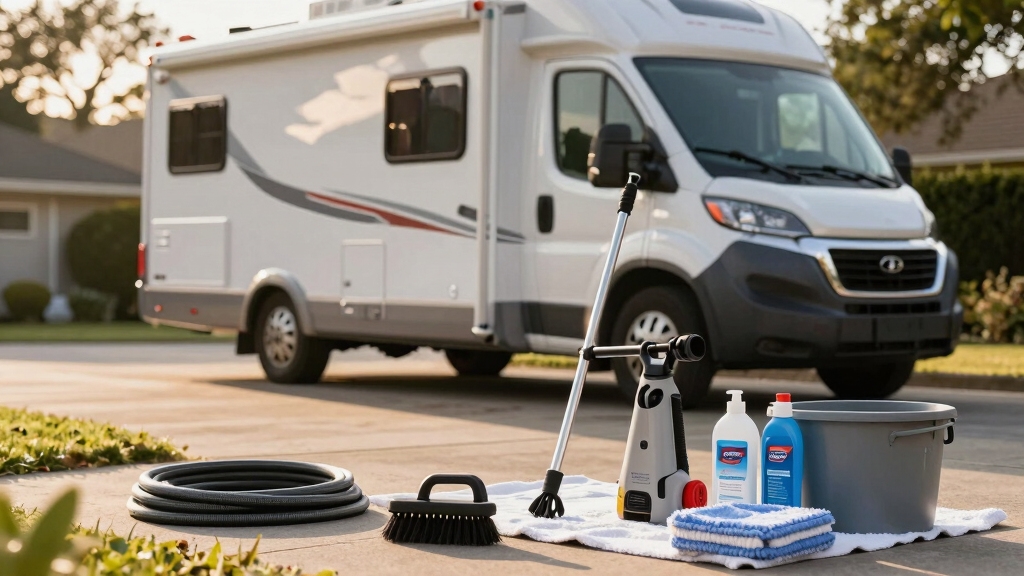
Before you start washing your RV, make sure you’ve gathered the right tools and cleaning products designed specifically for recreational vehicles.
Use RV-specific soap, like Optimum No Rinse Wash & Shine or RV wash and wax, to protect finishes.
Prepare two buckets: one with soapy water and the other with clean rinse water to prevent grit from scratching surfaces.
Microfiber towels and a chamois help dry without damaging paint.
Employ a lamb’s wool pad or microfiber mitt for gentle agitation.
If you have a pressure washer, make certain it’s adjustable to avoid harming seals or decals.
Use an extension pole to reach high areas safely.
Avoid household cleaners that can strip protective coatings.
Setting up correctly saves time and safeguards your RV’s exterior during washing.
For optimal results, consider using cleaners formulated with UV inhibitors to protect your RV’s fiberglass finish from sun damage and oxidation.
Prepare Your RV and Work Area Safely Before Washing
Although it’s tempting to start washing your RV immediately, you must first make sure the vehicle is parked on a level surface away from wind to minimize dust interference.
Always park your RV on level ground away from wind before washing to reduce dust settling on wet surfaces.
This stabilizes your workspace and prevents airborne debris from settling on wet surfaces. Next, gather all necessary tools: RV-specific soap, two buckets (one with soapy water, one clean for rinsing), microfiber towels, a chamois, and optionally a pressure washer with an extension pole for high areas.
Check seals, decals, and paint for damage to avoid harming vulnerable spots with high pressure. Make certain you have ammonia-free glass cleaner and avoid abrasive materials.
Clear the surrounding area of hazards and confirm water and electricity sources are safely accessible. Taking these precautions guarantees efficient, damage-free washing.
For optimal results and to protect your RV’s finish, consider using a soft bristle brush designed specifically to avoid scratches during cleaning.
How to Pre-Rinse Your RV to Remove Loose Dirt?
Start by thoroughly rinsing your RV from the top down to wash away loose dust, grime, and debris that could scratch the surface during washing. Use a pressure washer on large, stubborn spots, but keep the nozzle at a safe distance from seals and decals. For lighter dirt, a garden hose or foam cannon works well to loosen particles before soap application.
| Method | Equipment | Purpose |
|---|---|---|
| Garden Hose | Low-pressure nozzle | Initial dust and dirt removal |
| Pressure Washer | Adjustable nozzle | Effective on stubborn grime |
| Foam Cannon | Foam generating unit | Loosens dirt via thick foam |
| Final Rinse | Deionized water | Spot-free drying |
This pre-rinse step makes certain dirt is suspended, reducing the risk of scratches during washing. Using cleaners with biodegradable formulas during this process helps protect the environment while effectively removing contaminants.
How to Wash Your RV Step by Step?
Alright, let’s get started with washing your RV! First things first, you’ll want to gather all the supplies you need. Make sure you have RV-specific soap, some microfiber towels, and if you have one, a pressure washer. Oh, and don’t forget to park your RV on a level surface and away from any wind—that’s super important!
Now, while you’re washing, it’s crucial to follow some safety precautions. For instance, steer clear of using high-pressure spray near the seals and decals. Trust me, you don’t want to accidentally damage those! Also, remember to never wash dry surfaces; that can lead to scratches and other issues.
Once you’re all set up, it’s time to get to work. Start washing your RV from the top and work your way down. A great tip is to use the two-bucket method—one for soapy water and the other for rinsing. This helps keep your wash water clean.
Finally, when you’re done washing, make sure to dry your RV with microfiber towels or a chamois. This will help you avoid any pesky scratches or water spots. Happy washing! Additionally, applying an RV roof coating after washing can protect your roof from UV rays and moisture, extending its lifespan.
Preparation And Safety
Before washing your RV, prepare thoroughly by gathering all necessary supplies. This includes RV-specific soap, microfiber towels, chamois, buckets for the two-bucket washing method, a lamb’s wool pad, and a pressure washer if available.
Park the RV on a level surface away from wind to minimize dust. Use non-abrasive cleaners and an extension pole for high areas. Avoid washing dry surfaces to prevent scratches. Keep pressure washer nozzles at a distance from seals and decals to avoid damage.
Many RV owners find that using an eco-friendly cleaner helps protect both their vehicle and the environment during the washing process.
| Task | Tool Needed | Safety Tip |
|---|---|---|
| Soap application | Buckets, soap | Use two-bucket method |
| Dirt removal | Pressure washer | Keep distance from seals |
| Agitation | Lamb’s wool pad | Avoid dry surface scrubbing |
| Drying | Microfiber towels | No paper towels on paint |
| Reach high areas | Extension pole | Make sure stable footing |
Washing And Drying
Once your RV is properly prepped and safety measures are in place, you’ll focus on washing and drying it methodically.
Begin by applying soap or foam from the top down, working in manageable sections to make certain thorough coverage.
Use a lamb’s wool pad or microfiber towel to gently agitate and lift dirt without scratching.
Employ the two-bucket method to avoid reintroducing grime.
Rinse each section with low pressure, steering clear of seals and decals.
For drying, use microfiber towels or a chamois to carefully remove water, preventing scratches and spots.
If you’ve rinsed with DI water, you can air dry without worrying about spotting.
Finish glass surfaces with an ammonia-free cleaner and a lint-free cloth to avoid streaks.
This precise approach protects your RV’s finish and prolongs its lifespan.
Regular waxing every three to six months with a specialized RV wax enhances protection against UV rays and weather damage.
Dry Your RV Safely to Prevent Scratches and Spots

When it comes to drying your RV, you definitely want to avoid those pesky scratches and spots, right? So, the best way to do this is by using high-quality microfiber towels.
These towels are fantastic because they trap moisture without causing any abrasion on your RV’s surface.
Oh, and here’s a tip: try to avoid drying your RV in direct sunlight. I know it might seem convenient, but the heat really speeds up water evaporation, which can lead to those annoying mineral spots.
Instead, find a shaded area if you can. Another great tool to have on hand is a chamois. It’s perfect for gently absorbing excess water. Using one will help you achieve that smooth finish and keep streaks from forming on your painted surfaces. Happy drying!
For best results, consider applying a protective wax after drying to shield your RV from environmental damage.
Use Microfiber Towels
Frequently, drying your RV with microfiber towels proves essential for preventing scratches and water spots that can damage the finish. Microfiber’s fine fibers trap moisture efficiently without abrasive friction, reducing surface abrasion risks.
Use clean, high-quality towels dedicated solely to drying to avoid embedding grit that causes micro-scratches. Work methodically from top to bottom, folding towels to expose clean sections and replace when saturated.
Avoid circular motions; instead, gently blot or drag towels straight to wick water away efficiently. After drying, inspect for residual spots and buff lightly with a dry microfiber cloth to restore shine.
Proper microfiber maintenance, washing without fabric softeners and air drying, preserves their absorbency and softness. This ensures safe, repeatable drying that protects your RV’s paint and clear coat integrity.
For best results, apply black streak remover products in dry, moderately warm conditions to prevent streaks from reappearing during the drying process.
Avoid Direct Sunlight
Although drying your RV under direct sunlight might seem efficient, it actually increases the risk of water spots and surface scratches. This happens because water and cleaning solutions evaporate too quickly.
When moisture evaporates rapidly, minerals and detergents leave deposits that form visible spots. Additionally, fast drying forces you to wipe wet areas repeatedly, increasing the chances of abrasion.
To prevent this, always dry your RV in shaded conditions or during cooler parts of the day. Park your RV in a garage or under a canopy if possible.
Use microfiber towels to gently absorb moisture without pressing hard, avoiding surface damage. Maintaining a controlled drying environment guarantees even water removal, preserves the finish, and reduces the need for re-washing.
Avoiding direct sunlight is a small step that protects your RV’s paint and prolongs its lifespan. Applying a waterproofing spray after washing can further protect your RV’s exterior from water damage and stains.
Employ Chamois Drying
Chamois drying consistently offers a safe and effective method to remove water from your RV’s surface without causing scratches or spots.
Before you start, soak the chamois in clean water and wring it out until damp but not dripping.
Use gentle, overlapping strokes to absorb water, working top-down to prevent drips.
Avoid pressing too hard, which can trap grit and cause micro-scratches.
Rinse and wring the chamois frequently to release debris and maintain absorbency.
Unlike microfiber towels, a well-maintained chamois molds to curved surfaces, effectively removing water from crevices.
After drying, inspect for remaining moisture spots, especially near seams and decals, and address them with a soft microfiber cloth.
Employing chamois drying reduces water spotting and minimizes the risk of damage during the drying phase.
To maintain your RV’s finish, consider following drying with the application of a protective sealant to preserve its shine and prevent oxidation.
Clean Tough Spots: Bugs and Undercarriage on Your RV
When tackling tough spots like bug residue and the undercarriage, you’ll need specialized tools and targeted cleaners to guarantee thorough removal without damaging your RV’s surfaces.
Use a dedicated bug remover like Love Bug Eraser to soften hardened insect remnants. Apply it liberally and let it dwell for several minutes before gentle agitation with a microfiber or lamb’s wool pad.
Apply a dedicated bug remover generously, let it sit, then gently scrub with a microfiber or lamb’s wool pad.
For the undercarriage, attach a foam cannon or undercarriage brush to your hose or pressure washer to reach tight spots. Use an RV-safe degreaser or chassis foam to break down grime and road debris.
Avoid high-pressure water near seals and decals to prevent damage. After cleaning, rinse thoroughly to remove all residues.
Regular cleaning of these areas prevents corrosion and preserves your RV’s appearance and functionality.
Apply RV Wax and Protectants for a Lasting Shine
After thoroughly removing bugs and grime from your RV’s surfaces, applying wax and protectants helps lock in cleanliness and safeguard the finish.
Use an RV-specific wax designed for large surfaces and durable protection against UV rays and road contaminants.
Apply wax with a lamb’s wool applicator or microfiber pad in thin, even layers, working in shaded sections to prevent premature drying.
Allow the wax to haze according to product instructions before buffing with a clean microfiber towel, ensuring a deep, uniform shine.
For added defense, use synthetic sealants or polymer-based protectants that bond longer than traditional waxes.
Regular application every 3-6 months maintains your RV’s glossy appearance and shields paint, decals, and trim from oxidation, fading, and environmental damage.
Frequently Asked Questions
How Often Should I Wash My RV During the Camping Season?
You don’t have to wash your RV after every campsite visit, but if you did, you’d probably end up with a sparkling mobile palace!
Realistically, aim to wash it every two to four weeks during the camping season.
Frequent cleaning prevents grime buildup and protects seals, decals, and paint.
After dusty trails or heavy rain, give it a quick rinse.
Regular maintenance keeps your RV looking sharp and extends its lifespan efficiently.
Can I Use Household Cleaning Products on My RV Exterior?
You shouldn’t use household cleaning products on your RV exterior because they often contain harsh chemicals or abrasives that can damage paint, seals, and decals.
Instead, choose RV-specific soaps or non-abrasive cleaners like Optimum No Rinse Wash & Shine.
These products clean effectively without stripping wax or causing cracks.
Using the right cleaners helps maintain your RV’s finish and prolongs its lifespan, ensuring it stays protected and looking great.
What’s the Best Way to Clean RV Tires and Wheels?
To clean your RV tires and wheels effectively, start by rinsing off loose dirt with a hose or pressure washer at a safe distance.
Use a dedicated wheel cleaner that’s safe for your wheel type and apply it generously.
Scrub with a stiff-bristled brush to remove brake dust and grime.
Rinse thoroughly to avoid residue.
Finish by applying a tire dressing for protection and shine, ensuring it’s silicone-free to prevent drying or cracking.
How Do I Prevent Water Spots if I Can’T Air Dry?
If you can’t air dry, prevent water spots by promptly drying your RV with microfiber towels or a chamois.
Use a squeegee from top down to remove excess water first, then gently buff remaining moisture.
Avoid paper towels as they can scratch surfaces.
For glass, use a lint-free cloth with ammonia-free cleaner to prevent streaks.
Applying a spray detailer after drying helps repel water and adds shine, reducing spot formation.
Is It Safe to Wash My RV in Direct Sunlight?
It’s not ideal to wash your RV in direct sunlight because water and soap dry too quickly, causing streaks and water spots.
If you must, work in small sections, rinsing and drying promptly to avoid residue.
Use a high-quality RV-specific soap with lubricants, and dry with microfiber towels or chamois immediately after rinsing.
Whenever possible, choose a shaded area or wash early morning or late afternoon for best results.
Every Great Journey Deserves a Well-Cared-For RV
Washing your RV is like tuning a precision instrument. Each careful step guarantees peak performance and longevity. Just as a violinist knows that a clean, well-maintained instrument produces the best sound, your RV shines brightest when you use the right tools and follow thorough cleaning steps.
By investing time in proper washing and waxing, you’re not just cleaning; you’re preserving your home on wheels for countless adventures ahead.

