
Last Updated on July 15, 2025
To winterize your RV water heater, first drain the tank completely after turning off power or gas. Install a water heater bypass kit to avoid filling the tank with antifreeze.
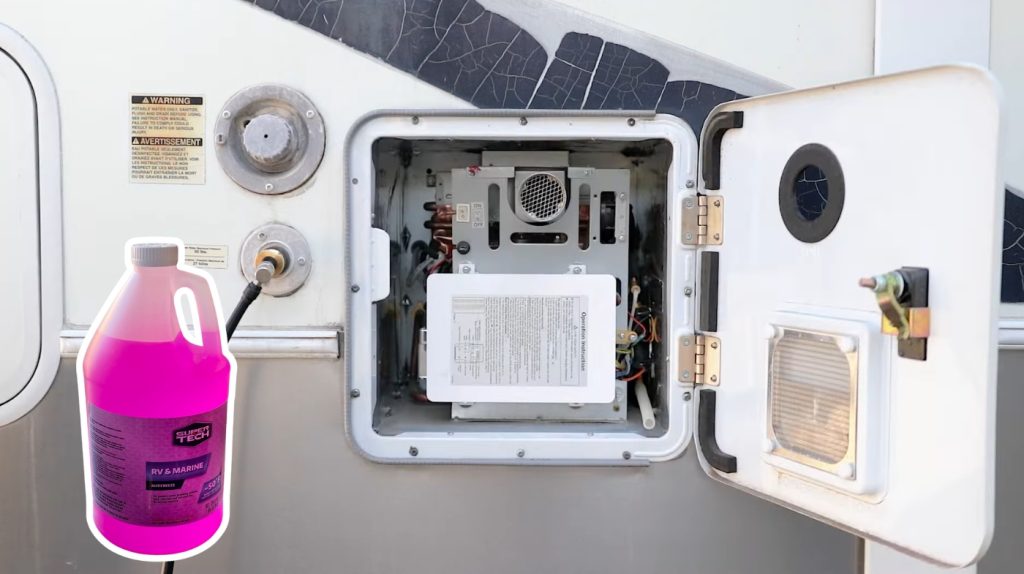
Then, connect a pump to circulate non-toxic RV antifreeze through your plumbing system, opening all faucets to guarantee full coverage. Don’t forget to add antifreeze to toilets and drains.
Proper preparation shields your system from freeze damage and simplifies spring startup. You can find detailed steps to complete the process smoothly.
Key Takeaways
- Turn off power or gas to the water heater and allow it to cool before draining the tank completely.
- Install a water heater bypass kit to avoid filling the tank with antifreeze during winterization.
- Drain the water heater fully by opening the drain valve and pressure relief valve.
- Close cold and hot water valves, open bypass valves, and circulate non-toxic RV antifreeze through the plumbing system.
- Confirm antifreeze flows through all faucets and drains, then seal the system and prepare the RV for storage.
Gathering Essential Supplies and Tools
Before you begin winterizing your RV water heater, gather all essential supplies and tools to guarantee a smooth process. Start with non-toxic RV antifreeze made from propylene glycol, safe for potable water systems. Choose common brands like Splash RV/Marine or Prestone Waterline Antifreeze.
Next, get a water heater bypass kit, typically brass or durable plastic, to divert antifreeze and reduce usage. Include a water pump converter kit, which redirects the pump intake from the freshwater tank to the antifreeze container, ensuring even distribution.
Installing a bypass kit is crucial as it helps save antifreeze and simplifies dewinterizing later. Bypass the Water Heater and Add Antifreeze An air compressor (around 60 gallons, 10 CFM) or blowout plug helps clear water from the system to prevent freeze damage.
Finally, pack an adjustable wrench, tank cleaning wand, funnel, gloves, protective eyewear, and towels for safety and cleanup.
Draining the Water Heater and Plumbing System
With all your supplies ready, the next step focuses on draining the water heater and plumbing system to prevent freeze damage. Begin by shutting off the power or gas supply and letting the heater cool. Using a battery with a built-in Battery Management System can help monitor power safely during this process.
Prepare by shutting off power or gas and allowing the water heater to cool before draining.
Then open the pressure relief valve to release pressure. Next, open the drain valve at the tank’s base and let all water exit. The drain hole is designed as the lowest point in the tank for effective drainage.
Don’t forget to drain the entire plumbing system by opening all faucets and low point drains. Follow these key actions:
- Turn off power/gas and open pressure relief valve.
- Open water heater drain valve and fully empty the tank.
- Open all RV faucets and low point drains to drain pipes.
- Drain fresh and waste tanks completely to avoid freezing.
Installing and Using the Water Heater Bypass Kit
Although newer RV models often include a water heater bypass kit, you may need to install one on older units to streamline winterization.
Start by shutting off power and water supply, then drain the heater tank. Ensure the water heater is completely cooled before beginning installation to avoid injury or damage to components water heater safety.
Remove existing fittings, wrap new valve threads with Teflon tape, and install valves facing each other. Connect the bypass hose between valves, then reattach cold and hot water lines.
During winterization, switch valves to bypass mode to redirect antifreeze, saving gallons of antifreeze and protecting your heater.
| Step | Action |
|---|---|
| 1 | Power and water off |
| 2 | Drain heater tank |
| 3 | Install valve fittings |
| 4 | Attach bypass hose |
| 5 | Switch valves for winterize |
Blowing Out Water Lines With Compressed Air
After installing the water heater bypass kit, the next step in winterizing your RV’s plumbing is to blow out the water lines using compressed air.
First, verify the RV’s power, water heater, and pump are off. Connect an air compressor set to 30 PSI or less to the city water inlet using a plastic adapter and tubing. Use a tankless compressor with built-in air filter to ensure clean operation and prevent debris from entering the plumbing system.
Using equipment designed for durability in windy conditions can help maintain consistent pressure during the process. Open all faucets, low-point drains, and showerheads. Then, blow air into the system, starting from the highest fixture and moving downward, using 1-2 minute bursts to clear water.
- Drain fresh water tank and water heater tank completely.
- Close bypass valve to isolate water heater.
- Attach air compressor to city water fill with proper fittings.
- Blow air through fixtures until no water exits.
Circulating Antifreeze Through the Plumbing
Start by securely connecting the siphon hose to the fresh water intake and placing it into the jug of RV-specific antifreeze. Activate the water pump to draw antifreeze through the plumbing, ensuring it reaches all faucets and low point drains.
Monitor each outlet carefully until you see pink antifreeze flow, confirming complete circulation throughout the system. Be sure to use approximately 2-3 gallons of antifreeze depending on the length of your RV and the number of faucets to adequately protect the entire plumbing system.
Using durable materials for hoses and connections can help prevent leaks during the winterization process.
Connecting Antifreeze Pump
When you connect the antifreeze pump, first identify the suction side of the water pump where the bypass hose will attach. Remove or bypass the fresh water supply line to avoid contamination, and set the water heater bypass valves to the bypass position.
Attach the bypass hose securely to the pump inlet, then place its other end into a container filled with RV-safe antifreeze. Double-check all clamps for tightness.
Follow these steps:
- Locate and access the water pump inlet and bypass valves.
- Connect the bypass hose to the pump suction side.
- Position the hose end in the antifreeze container.
- Verify bypass valves route antifreeze around the water heater.
This setup ensures antifreeze circulates through the plumbing without entering the water heater tank. Using durable materials for hoses and clamps helps prevent leaks and damage during winterization.
Ensuring Complete Circulation
Although you’ve connected the antifreeze pump and set the bypass valves, ensuring antifreeze fully circulates through both hot and cold water lines is essential to protect your RV’s plumbing. Start by closing the cold water inlet valve to the water heater and opening the crossover valve, allowing antifreeze to flow from cold to hot lines.
Open all faucets—sinks, showers, exterior outlets—to confirm antifreeze visibly flows, indicating complete circulation. Systematically open and close each fixture after antifreeze appears to maintain pressure and flow, paying special attention to seldom-used fixtures and toilet water lines.
Using a flexible cleaning wand can help maintain hygiene in toilet water lines during this process. This thorough circulation prevents water pockets that could freeze and damage pipes.
Use the pump to maintain steady flow, ensuring antifreeze reaches all plumbing sections without entering the water heater tank, preserving its lining. Before disconnecting any components, inspect plumbing connections around the hot water tank for leaks, damage, or wear to ensure the system’s integrity.
Monitoring Antifreeze Flow
Before pumping antifreeze through your RV’s plumbing, confirm all valves are correctly positioned to guarantee proper flow and avoid filling the water heater tank. Using a bypass valve helps to protect the water heater from damage during winterization.
Close the cold and hot water valves while opening the crossover and bypass valves to direct antifreeze around the heater. Then, activate the water pump to circulate antifreeze through the system. It is important to set bypass valves correctly to ensure antifreeze bypasses the water heater, preventing damage.
Monitor antifreeze flow by opening each faucet, including external showers and kitchen taps, until you see antifreeze emerge, confirming full coverage. This prevents water pockets that could freeze and cause damage.
- Close cold and hot water valves (perpendicular to pipes).
- Open crossover and bypass valves (parallel to pipes).
- Turn on water pump switch to start circulation.
- Open faucets individually; check for antifreeze flow.
Protecting Drains and Fixtures With Antifreeze
To protect your RV’s drains and fixtures from freezing damage, you must use only RV-safe antifreeze designed for potable water systems. Start by pouring 1-2 cups down each sink and shower drain to fill P-traps, then add about 2 cups into the toilet bowl without flushing to protect valve seals.
Use a hand pump to introduce antifreeze into the black tank flush inlet and city water connection, ensuring anti-siphon valves and check valves are protected. It’s important to avoid dumping antifreeze on the ground and instead send it through RV waste tanks to proper dump sites for environmental safety.
Regular maintenance of these components helps ensure tire longevity by preventing unnecessary strain on your vehicle’s systems. Flush all cold and hot water faucets, outdoor fixtures, and the toilet until antifreeze appears, guaranteeing full system coverage.
Always bypass the water heater tank to avoid wasting antifreeze and complicating dewinterizing. Monitor antifreeze levels during pumping, refilling as needed to maintain protection throughout all plumbing components.
Preparing the RV for Storage After Winterization
Once you finish winterizing your RV’s plumbing and water systems, focus on preparing the vehicle for storage to prevent damage from environmental factors and pests.
Begin by sealing all exterior vents with covers and waterproof plastic wrap, and inspect slide-out seals, windows, doors, and roof seams for gaps to reseal. Install RV vent covers over all exterior vents to block snow, ice, pests, and humid air effectively.
Using eco-friendly treatments around vent areas can further reduce odor and pest issues during storage. Next, place the RV on blocks to distribute weight evenly and prevent tire flat spots; apply tire sealer after cleaning.
Remove perishables and clean the interior thoroughly to deter pests, while removing electronics and valuables. Be sure to wipe down and dry moist areas inside the RV, such as bathrooms, kitchens, and windows, to reduce the risk of mold and mildew growth.
Finally, lubricate moving parts like stabilizer jacks and slide-outs to prevent rust and ensure smooth operation post-storage.
- Seal vents and reseal exterior gaps.
- Block RV and treat tires.
- Clean and clear the interior.
- Lubricate mechanical components.
Frequently Asked Questions
Can I Use Automotive Antifreeze Instead of Rv-Specific Antifreeze?
You shouldn’t use automotive antifreeze in your RV water system. It’s toxic, containing ethylene glycol, which can contaminate your potable water and pose serious health risks. Automotive antifreeze also damages RV plumbing materials.
Instead, always choose non-toxic, RV-specific antifreeze formulated for water lines. It protects against freezing safely and is designed to avoid plumbing corrosion. Always flush your system thoroughly before use to remove any antifreeze residue.
How Often Should I Winterize My RV Water Heater?
You should winterize your RV water heater at least once a year missing it’s like inviting an arctic storm right into your pipes. If you use your RV frequently or store it for long periods, winterize more often. Always do it before the first freeze, especially in colder climates.
Draining, flushing, and using RV antifreeze protect your system. Follow manufacturer guidelines and inspect valves and drains during each winterization to guarantee peak performance.
What Are the Signs of a Water Heater Freeze Damage?
You’ll notice freeze damage if your RV water heater’s copper pipes have a rough, “orange peel” texture or if cracks appear on the tank or pipes. Leaks around valves and fittings, rust spots, or bulging tanks also signal damage.
Functionally, watch for no hot water, low flow, water leaking from relief valves, or frequent shutdowns. Cold water line freezes or inconsistent hot water supply further indicate freeze-related issues.
Can I Winterize My Water Heater Without a Bypass Kit?
Yes, you can winterize your water heater without a bypass kit, but it requires extra care. Fully drain the water heater by opening the drain plug and all low point drains. Pump antifreeze through the system, cycling it through both hot and cold faucets to guarantee coverage.
Pour antifreeze into drain traps and toilets. Keep all faucets open during pumping to avoid trapped water, which could freeze and cause damage.
Is It Necessary to Disconnect the Water Heater’S Power Source?
Yes, you need to disconnect your water heater’s power source before winterizing. Turning off both electrical and propane supplies prevents heating elements from activating, which could cause damage or hazards when the system is drained or filled with antifreeze.
Always verify the unit has cooled down completely before opening valves. Disabling power also protects you from electrical shocks during maintenance and ensures safe, effective winterization.
Antifreeze 101: Keep Your RV Water Heater Lines Safe All Winter
Winterizing your RV water heater is like preparing a ship for a long voyage through icy seas. By draining, bypassing, and flushing with antifreeze, you’re sealing and safeguarding every pipe and valve from frozen damage.
Each step ensures your system stays intact, ready to sail smoothly when spring arrives. Follow these instructions carefully, and your RV’s water heater will emerge from winter’s grip strong, reliable, and ready for your next adventure.

