

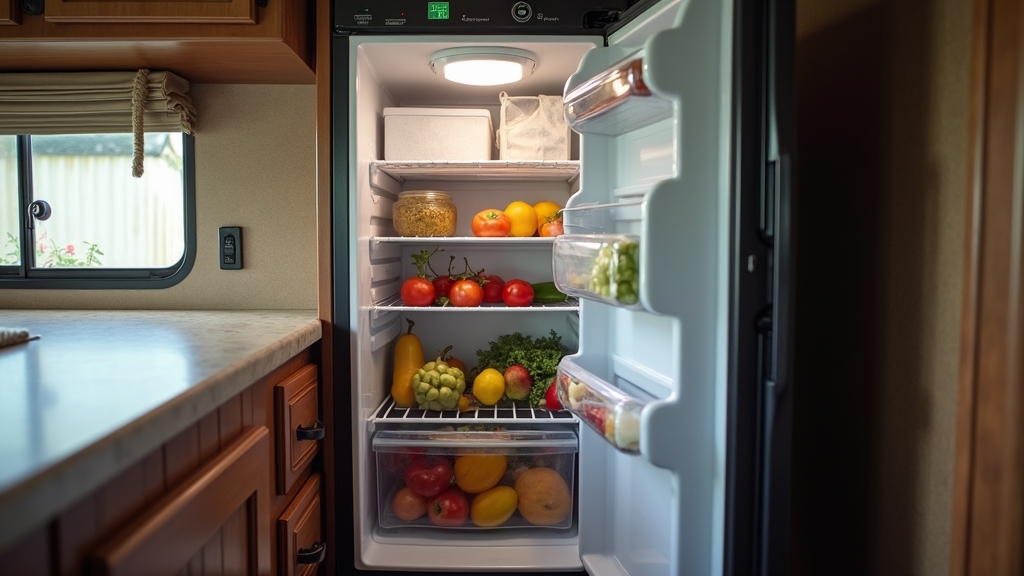
If your RV refrigerator’s freezer stays cold but the fridge doesn’t, it’s often due to airflow blockage between compartments, improper leveling causing ammonia circulation issues, or faulty thermistors giving inaccurate temperature readings.
Check and clean vents, ensure the RV is level within specs, inspect door seals for air leaks, and verify your power supply and control board function. Addressing these common causes typically restores cooling balance.
You can explore deeper troubleshooting and fix techniques to get your fridge running efficiently again.
Key Takeaways
- Blocked vents or poor airflow often cause warm fridge compartments but cold freezers in RV refrigerators.
- Faulty thermistors or temperature sensors can misread fridge temps, impairing compressor control and cooling.
- Damaged or leaking evaporator coils or gaskets allow warm air infiltration, reducing fridge cooling efficiency.
- Improper ventilation behind the fridge traps heat, causing uneven cooling between freezer and fridge sections.
- Electrical issues like blown fuses or faulty control boards may stop fridge cooling while freezer remains cold.
Common Causes of RV Refrigerator Cooling Issues

When your RV refrigerator isn’t cooling properly, the issue often stems from one or more mechanical or electrical components failing to function as designed.
Inadequate ventilation behind the unit can trap heat, reducing cooling efficiency and causing warm fridge but cold freezer conditions. Blocked vents and debris restrict airflow, so regularly inspect and clean these areas.
The condenser is crucial in dissipating heat, and if airflow is obstructed, it can significantly impact the cooling performance. Ensuring proper power supply with a reliable deep cycle battery can also influence the refrigerator’s efficiency.
Thermocouples play a critical role by sensing temperature and regulating LP gas burners. If faulty, they prevent proper ignition, disrupting cooling. Thermocouples detect temperature and control LP gas burners; when faulty, they stop ignition and halt cooling.
Additionally, damaged components in the cooling unit, like the evaporator, fins, or heater elements, impair heat absorption and transfer. Checking these parts for corrosion or frost buildup is essential. Electrical faults in control boards or wiring can also interrupt cooling cycles.
Understanding the Difference Between Fridge and Freezer Cooling
Although both the fridge and freezer compartments work together to keep your food fresh, they rely on distinct cooling processes and temperature controls tailored to their specific needs. Understanding these differences helps diagnose why one might fail while the other works.
Freezers operate below 0°F (-18°C), requiring deeper, more consistent cooling than fridges at 35°F-40°F (1.5°C-4.5°C). Many RV refrigerators feature latching doors to maintain proper temperature and prevent cold air loss.
Using secure fastening methods like tie down straps can also help prevent door misalignment during travel, preserving the cooling integrity. Separate evaporators or airflow control maintain distinct temperature zones within combined units.
Refrigerants cycle between evaporators and condensers, absorbing heat inside and releasing it outside. Compressor models cool faster and maintain freezer temperatures better than absorption types, which cool slower and are sensitive to leveling.
Independent thermostats and sensors regulate fridge and freezer temperatures, ensuring stability and efficiency. Knowing these factors helps you pinpoint issues affecting only the refrigerator compartment.
How Leveled Position Affects Refrigerator Performance?
Hey there! If you want to keep your RV refrigerator running smoothly, it’s super important to keep it as level as possible. Why? Well, it all comes down to how ammonia circulates in the cooling system.
When your fridge is on an uneven surface, that circulation gets disrupted. This can really mess with the cooling efficiency and even lead to ammonia crystals forming, which can permanently damage the fridge. Yikes, right? Many RV users find that installing pressure-enhanced systems can also improve overall appliance performance.
The cooling process relies heavily on gravity to move ammonia liquid through the evaporator coils, so maintaining proper leveling is critical. To avoid these issues, using leveling blocks or RV jacks is a great idea. They help you maintain the recommended tolerances, which not only prevents costly mechanical problems but also helps extend the lifespan of your fridge.
Importance of Leveling
Since proper leveling directly influences the ammonia flow within your RV refrigerator’s absorption system, maintaining the unit within manufacturer-recommended angles is essential for peak performance.
Typically, this means keeping it within 3 degrees side-to-side and 6 degrees front-to-back. When your fridge tilts beyond these limits, ammonia circulation slows or stops, causing crystal formation that blocks the cooling cycle.
You can prevent this by ensuring:
- Use stable leveling blocks or mechanical jacks for precise adjustment.
- Check levels regularly, especially before long stops.
- Support the entire tire surface to maintain RV balance.
- Avoid debris near ventilation to reduce heat buildup.
- Confirm angles with a digital level tool for accuracy.
Additionally, proper airflow over the coils is essential for heat transfer and cooling efficiency in absorption refrigerators. Maintaining adequate ventilation also helps prevent odor control issues commonly associated with poor tank maintenance.
Effects of Uneven Surfaces
When your RV refrigerator isn’t positioned on an even surface, the internal chemical processes that drive cooling get disrupted, causing serious performance issues. Uneven surfaces cause the refrigerant solution to pool improperly, triggering crystal formation inside cooling pipes.
These crystals permanently damage coils, creating hot spots that prevent uniform heat transfer and proper refrigerant cycling. As a result, the refrigerator compartment may fail to cool while the freezer still works, reflecting imbalanced heat distribution and reduced cooling efficiency.
The cooling units contain a mixture of ammonia, hydrogen, water, sodium chromate, pressurized around 3,500 PSI, which is especially sensitive to such disruptions in flow cooling unit chemicals. Running your fridge off-level beyond manufacturer limits (typically 3° side-to-side, 6° front-to-back) accelerates wear and risks complete failure.
To avoid costly repairs and maintain ideal performance, always level your RV refrigerator during operation and storage. This ensures proper refrigerant flow, prevents crystallization, and extends appliance lifespan.
Diagnosing Electrical and Power Supply Problems
First things first, make sure your RV refrigerator is hooked up to a stable power source, whether that’s AC or DC. You definitely want to check for any interruptions in the power supply. Using an RV battery monitor can help you keep track of the power status and avoid unexpected failures by providing real-time data.
Next up, take a look at all the circuit breakers and fuses for both the 12V and 120V systems. It’s important to ensure that none of them are blown or tripped. If you find any issues, go ahead and fix those loose connections or reset any breakers before diving deeper into the electrical troubleshooting.
Keep in mind that RV refrigerators use a chemical absorption cooling system that requires proper power to maintain effective cooling.
Power Source Verification
How can you pinpoint electrical or power supply issues causing your RV refrigerator to fail? Start by verifying the external power source and internal connections meticulously.
Check that your RV is connected to the proper electrical supply, either 30 amp or 50 amp. Measure the voltage to ensure it’s within 105-130 volts AC. Inspect for any irregularities like brownouts or surges that might disrupt operation. Using a surge protector can help safeguard your RV’s electrical system from damaging power fluctuations and improve overall power reliability.
Internally, assess wiring harnesses and grounding for secure contact and absence of damage. Use a multimeter to test voltage presence at critical points including the compressor terminals. Remember that battery charge can affect 12V models, so verify battery voltage with a multimeter to ensure sufficient power.
- Confirm proper RV power source and voltage range
- Inspect surge protector status and power interruptions
- Examine internal wiring, connectors, and grounding
- Test voltage continuity on control board terminals
- Ensure correct fridge power mode settings for electric use
Fuse and Breaker Check
Although fuse and breaker issues can be subtle, they often cause your RV refrigerator to lose 12-volt power and stop cooling effectively. Start by locating the fuses and breakers, which may be hidden behind the fridge, near the battery, or on the control board.
Use a digital multimeter to test continuity; look for blackened or broken fuses, especially the 5-amp time-delay type, which requires exact replacement. Check manual-reset breakers for tripped positions and reset if needed.
Always disconnect power before testing to avoid shorts. Inspect wiring harnesses nearby for damage or corrosion that might cause repeated fuse blows. Familiarizing yourself with the RV’s electrical system, including common fuse locations, can greatly simplify troubleshooting and repair efforts.
Regular maintenance and timely inspections are key to avoiding electrical issues that can compromise your RV refrigerator’s performance, similar to how annual sealing preserves wood trailer decks.
The Role of Thermistors and Temperature Sensors

Since maintaining precise temperature control is critical for your RV refrigerator’s performance, understanding the role of thermistors and temperature sensors is crucial. Thermistors act as heat-sensitive resistors that provide real-time temperature feedback to the control board, enabling accurate regulation of cooling cycles.
Thermistors provide temperature feedback to the control board, ensuring precise regulation of cooling cycles. In your RV fridge, the thermistor is usually embedded in the refrigerator compartment’s cooling fins, not the freezer, making its placement essential for proper operation.
Proper sensor placement can be compared to the importance of awning setup stability in harsh conditions to ensure optimal function. When the thermistor malfunctions, it can cause incorrect temperature readings, leading to cooling failures confined to the refrigerator section.
Note that the control board monitors the resistance from the thermistor to gauge and adjust the refrigerator’s temperature. Key points to consider:
- Thermistors change resistance with temperature shifts.
- Control board uses resistance to control compressor cycles.
- Proper thermistor function ensures stable refrigerator temps.
- Faulty thermistors cause erratic or halted cooling.
- Testing thermistors with an ohmmeter aids diagnostics.
Airflow and Ventilation Challenges Inside and Outside the RV
Accurate temperature sensing relies on effective cooling, which depends heavily on proper airflow and ventilation both inside and outside your RV. Ensure your refrigerator’s lower intake and upper exhaust vents are clear and unobstructed to facilitate natural convection.
Proper vent placement and size, similar to considerations for standard license plate dimensions, can influence airflow efficiency. Inspect external vent compartments regularly for debris, dust, or nests that block airflow and reduce cooling efficiency.
Inside, avoid overpacking and maintain proper air circulation; consider installing internal fans to improve temperature uniformity. Additionally, routine maintenance such as cleaning vents and coils is essential to prevent airflow blockages and maintain cooling performance.
Check door seals for tight closure to prevent warm air infiltration and replace missing drip tube caps. Remember, parking on unlevel ground or in hot ambient temperatures can impair ventilation.
Regular cleaning and adherence to manufacturer vent specifications are crucial for maintaining optimal heat dissipation and preventing the cooling unit from overheating.
Identifying and Repairing Rust or Leaks in the Cooling Unit
When you notice a decline in your RV refrigerator’s cooling efficiency, inspecting the cooling unit for rust or leaks is essential. Rust often forms inside the steel tubing, causing pitting and eventual leaks that release ammonia and hydrogen gases.
These leaks degrade cooling, corrode components, and can emit a strong ammonia odor. To identify and address these issues: Remove the fridge to access and inspect the cooling unit for rust, corrosion, or yellow sodium chromate deposits.
Smell inside the cabinet for ammonia; absence of odor doesn’t guarantee no leaks. Check if the boiler and coils heat up during operation; cold components suggest leaks. Use penetrating oil to loosen rusted fittings for safe disassembly.
Rust inhibitor breakdown and micro leaks at the heat tube weld point are common causes of failure, so inspecting these areas closely is important heat tube weld point. Because regular maintenance is crucial, performing routine inspections can help detect issues before they worsen, preserving equipment durability.
Understand that leaks usually require cooling unit replacement or professional rebuild as field repairs fail. Act promptly to prevent further damage and restore cooling performance.
Checking and Replacing Door Seals and Gaskets
After ruling out rust or leaks in the cooling unit, inspecting the door seals and gaskets becomes the next step to guarantee your RV refrigerator maintains proper insulation.
Check the gasket for cracks, warping, or dirt buildup, cleaning it with mild soap and water. If damaged, gently remove the old seal by lifting it from a corner or using a putty knife to break adhesive bonds. Cleaning and realigning the seal can often restore proper function without needing a full replacement.
Install the new gasket by aligning one corner and pressing it firmly into the groove for an airtight fit. Hold the door closed to help the seal mold properly, preventing cold air leaks that impair cooling.
| Inspection Focus | Action |
|---|---|
| Dirt and residue | Clean with mild soap, dry thoroughly |
| Cracks or warping | Replace damaged gasket |
| Seal attachment | Ensure gasket is securely seated |
| Seal material | Match replacement to original |
Tips for Testing and Troubleshooting Your RV Refrigerator
Although diagnosing an RV refrigerator can seem complex, focusing on key areas like power supply, thermostat function, ventilation, and propane systems will help you isolate and resolve most issues efficiently.
Start by ensuring your fridge receives adequate power: check battery voltage, fuses, and wiring integrity. Also, confirm that the fridge is plugged in and the power supply is stable to avoid simple power source issues. Next, verify the thermostat setting and calibrate the internal thermistor if needed.
Inspect ventilation pathways and condenser coils for blockages that impair airflow. For absorption fridges, evaluate propane supply, ignition components, and safety sensors.
To troubleshoot effectively, you should:
- Measure battery voltage and test circuit breakers
- Confirm thermostat accuracy and responsiveness
- Clean vents and verify airflow channels
- Check propane valve status and ignition system
- Inspect control board relays and reset tripped cutoffs
Frequently Asked Questions
Can Using the Wrong Type of Propane Affect RV Refrigerator Cooling?
Yes, using the wrong propane can disrupt your RV refrigerator’s cooling by causing unstable or incomplete combustion. This reduces heat input essential for the absorption cycle, leading to poor cooling performance.
You should always use high-purity, RV-grade propane to guarantee a steady blue flame and efficient operation. Regularly check flame color and burner condition, and source propane from trusted suppliers to avoid damage or safety risks caused by improper fuel quality.
How Often Should RV Refrigerator Cooling Chemicals Be Professionally Serviced?
You should have your RV refrigerator’s cooling chemicals professionally serviced at least twice a year. For frequent or full-time use, consider inspections every 2-3 months to catch leaks or refrigerant degradation early.
Professionals test refrigerant levels, repair leaks, and clean coils to maintain essential cooling. Regular servicing prevents chemical loss and system damage, ensuring efficient operation and extending your refrigerator’s lifespan.
Does Altitude Impact RV Absorption Refrigerator Efficiency?
Yes, altitude greatly influences your RV absorption refrigerator’s efficiency. Above 5,000 feet, lower ambient pressure diminishes propane combustion efficiency, restricting heat input for the absorption cycle.
This causes your fridge compartment to struggle maintaining cold temperatures while the freezer may still work.
To mitigate this, make sure your propane regulator is suitable for high altitudes, keep your fridge level, and consider professional servicing to check ammonia levels and absorption system integrity for peak performance.
Can Overloading the Freezer Compartment Cause Fridge Cooling Issues?
Yes, overloading the freezer can reduce airflow by blocking vents, which lowers cooling efficiency in the fridge compartment by up to 20%. When airflow is restricted, the compressor works harder, stressing components and causing uneven temperatures.
You should avoid filling the freezer past 80% capacity and ensure vents stay clear. Regularly check door seals and maintain proper ventilation to keep your RV fridge running efficiently and extend its lifespan.
Are There Specific Brands Prone to Fridge/Freezer Cooling Imbalances?
Yes, brands like Dometic, Norcold, and Atwood are more prone to fridge/freezer cooling imbalances. You’ll often see thermistor failures in Dometic units causing fridge cooling loss while the freezer stays cold.
Norcold frequently suffers from rusted cooling tubes leaking gas. Atwood models are sensitive to leveling and ventilation issues. To fix this, you should check sensors, inspect for leaks, ensure proper leveling, and clear ventilation paths.
Upgrade Your RV’s Cooling System for Reliable Chill Anywhere
Picture your RV refrigerator humming steadily, its freezer frosted with crisp ice while the fridge section barely chills. By checking power sources, leveling your RV, inspecting seals, and ensuring proper airflow, you can restore that cool balance.
Don’t overlook sensors or hidden rust that disrupt cooling. With careful diagnosis and targeted repairs, you’ll turn your uneven cold into a seamless, efficient system, keeping your food fresh and your journey worry-free.

