Camper walls typically range between 1.25 and 3.25 inches thick, depending on the build and materials you use.
Thinner walls prioritize weight savings, while thicker ones offer better insulation and durability.
Most standard walls measure about 1.25 inches from interior paneling to exterior sheeting, but heavier-duty or slide-out walls can approach 3 inches.
Accurate thickness matters for selecting proper fasteners and ensuring structural integrity.
Understanding these factors helps you optimize comfort, weight, and strength in your camper walls.
Key Takeaways
- Camper wall thickness typically ranges from 1.25 to 3.25 inches, varying by build type and materials used.
- Standard RV walls often measure about 1.25 inches from interior paneling to exterior sheeting.
- Higher-end or heavier-duty campers usually have walls around 3 inches thick for better insulation and durability.
- Wall construction includes layers: outer shell, insulation (foam, fiberglass, or spray foam), and interior paneling.
- Slide-out walls commonly match main wall thickness, approximately 3 inches, with reinforced framing for stability.
What Is the Typical Thickness of Camper Walls?
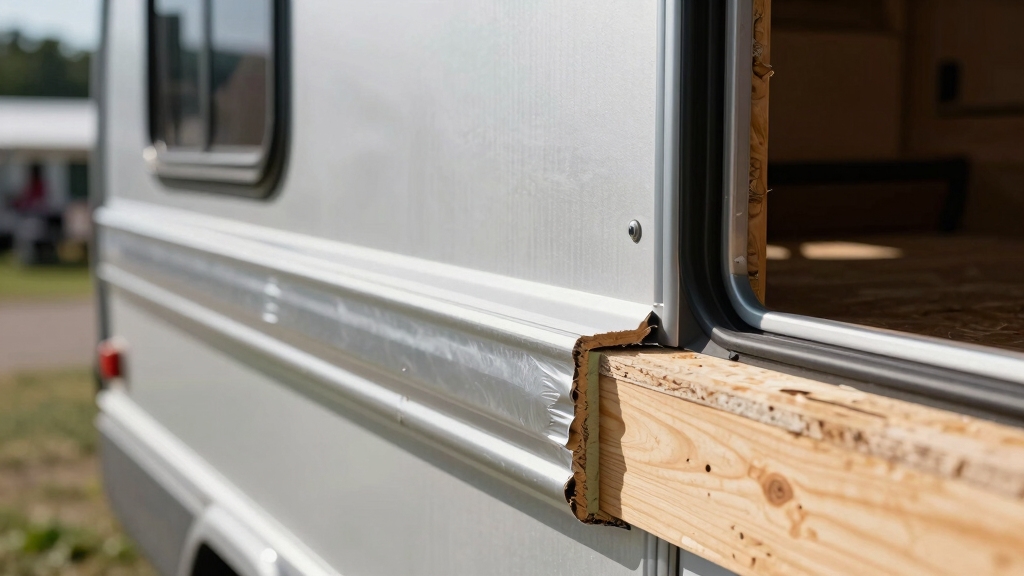
Although camper wall thickness varies by model and construction, you’ll typically find walls ranging from 1.25 to 3.25 inches thick.
Most standard RV walls measure about 1.25 inches from interior luan to exterior sheeting.
Standard RV walls typically measure around 1.25 inches from interior luan to exterior sheeting.
Higher-end or heavier-duty campers often advertise wall thickness near 3.25 inches, but actual measurements commonly fall closer to 3 inches.
Slide-out walls in some models match the main wall thickness, around 3 inches.
Thickness depends more on build type and material layers than brand name.
Camper walls usually consist of three layers: an outer shell, insulation, and an interior panel, commonly plywood or MDF.
These layers contribute to overall thickness, affecting insulation and structural performance.
Knowing typical thicknesses helps you choose appropriate fasteners and mounting hardware.
Additionally, selecting materials with good water repellency can enhance wall durability and protection from the elements.
How to Measure Camper Wall Thickness Accurately?
To measure camper wall thickness accurately, you’ll want to grab some precise tools like calipers or a depth gauge. This way, you can avoid any guesswork—nobody wants that!
It’s also a good idea to stick to consistent measurement points, like window openings or cutouts. This helps ensure you capture the full wall assembly.
And don’t forget to apply proper techniques! Taking the time to account for layers and trim will really pay off, giving you reliable data for any repairs or modifications you’re planning. Trust me, it makes a difference!
Since camper walls often include windows with sealants that accommodate expansion and contraction, accurate thickness measurements help ensure proper sealing and long-lasting protection.
Tools For Measurement
Accurately measuring camper wall thickness requires the right tools and techniques to avoid errors caused by trim, flanges, or differing material layers.
Start with a digital caliper for precise measurements, especially when dealing with thin walls around 1.25 inches. A depth gauge or a vernier caliper helps measure recessed areas like window frames accurately.
For thicker or obstructed sections, use a telescoping gauge paired with a micrometer to gauge internal dimensions. A stud finder can locate framing members, ensuring you measure between structural elements rather than trim.
Carry a reliable tape measure as a backup for quick, less precise checks. These tools minimize guesswork, helping you verify true wall thickness before mounting or repairs.
This ensures screw length and insulation choices match the actual wall assembly. Proper exterior sealing and weatherproofing are essential to maintain wall integrity and prevent damage during winter storage, as detailed in Exterior Inspection.
Measurement Techniques
Begin by identifying accessible points on the camper wall where you can measure thickness without interference from trim or external attachments. Use a reliable caliper or depth gauge for accuracy.
Follow these steps:
- Remove any removable interior panels gently to expose the wall cross-section.
- Measure from the interior surface (luan or paneling) to the exterior sheeting, avoiding trim.
- Check thickness at multiple locations, including near windows or vents, for consistency.
- Compare measurements with frame depth visible in window openings to verify accuracy.
For enhanced precision, consider the impact of insulation and wall materials on overall thickness when measuring.
How Wall Thickness Varies by Construction Type?
When you examine camper wall thickness, construction type plays a pivotal role in the variations you’ll encounter. Basic models often feature walls around 1.25 inches thick, using minimal framing and thinner panels to save weight.
Mid-range campers typically have thicker walls near 2 to 3 inches, incorporating more robust framing and insulation layers for improved durability and thermal performance. Premium or luxury builds may push wall thickness beyond 3 inches, using advanced framing techniques and higher-density insulation.
Slide-out walls usually match the main wall thickness to maintain structural integrity. Keep in mind that these measurements often include the full wall assembly—outer shell, insulation, and interior lining.
Understanding your camper’s construction type helps you anticipate wall thickness, essential for selecting proper fasteners or planning modifications without damaging the structure. Additionally, choosing heavy-duty materials for structural components can enhance durability and resistance to outdoor conditions.
What Materials Make Up Camper Wall Layers?
Camper walls consist of multiple layers, each serving a specific purpose to balance weight, durability, insulation, and moisture resistance.
Camper walls are designed with layered materials to optimize weight, strength, insulation, and moisture protection.
When you examine these layers, you’ll find:
- Exterior Layer: Typically aluminum or fiberglass sheeting, this protects against weather and physical damage.
- Insulation Core: Usually foam board or fiberglass batting, it provides thermal resistance without adding excessive weight.
- Interior Paneling: Commonly thin plywood or MDF, which offers structural support and a smooth finish.
- Optional Interior Finish: Higher-end campers may add vinyl paneling for moisture resistance and aesthetics.
Understanding these materials helps you make informed decisions about repairs or upgrades.
Each layer’s composition impacts overall wall thickness, but also durability and moisture control. Additionally, selecting coatings with UV protective properties can enhance the longevity and energy efficiency of camper walls.
How Insulation Impacts Camper Wall Thickness and Comfort?
Balancing insulation thickness directly affects both your camper’s wall dimensions and interior comfort levels. Thicker insulation improves thermal resistance, reducing heat transfer, but adds to overall wall thickness.
You need to select insulation that fits your wall cavity without compromising interior space or increasing wall weight excessively.
| Insulation Type | Typical Thickness (inches) |
|---|---|
| Foam Board | 1 – 2 |
| Fiberglass Batts | 1.5 – 3 |
| Spray Foam | 1 – 2.5 |
| Reflective Foil | 0.25 – 0.5 |
Choosing the right insulation balances R-value and space. Too thin lowers comfort; too thick can interfere with cabinetry or wall fixtures.
Always measure your camper’s wall cavity before upgrading insulation to maintain ideal thickness and comfort. For optimal thermal efficiency, consider materials with solar-reflective properties that can help reduce interior temperature.
Why Interior Wall Materials Matter for Camper Walls?
When it comes to the interior walls of campers, you’ll often see thin plywood and MDF as the go-to materials. They’re pretty common, and for good reason!
Some of the higher-end models even step it up with vinyl paneling.
Now, here’s why these choices matter: they directly influence durability, weight, and how well the walls resist moisture. So, picking the right material isn’t just about aesthetics; it really helps maintain the integrity of the walls.
Plus, it can affect the overall wall thickness, which is something to keep in mind when you’re designing or renovating your camper.
Additionally, selecting materials with proper moisture resistance is crucial to prevent mold and mildew growth inside the camper walls.
Common Interior Materials
Interior wall materials play a crucial role in the overall performance and durability of camper walls.
When selecting or evaluating these materials, you’ll want to take into account weight, moisture resistance, and ease of repair.
Common interior materials include:
- Thin plywood – lightweight, easy to cut, and commonly used in budget-friendly campers.
- Medium Density Fiberboard (MDF) – denser than plywood, offers a smooth finish but adds weight.
- Vinyl paneling – found in higher-end campers, it resists moisture and cleans easily.
- Fiberglass Reinforced Panels (FRP) – mostly used on ceilings, it’s lightweight and highly moisture resistant.
Each material influences wall thickness and overall camper performance.
Understanding their characteristics helps you make informed choices during upgrades or repairs.
Additionally, choosing materials that complement your camper’s weatherproofing needs can enhance durability and comfort.
Material Impact On Durability
Several factors tied to interior wall materials directly influence the durability of camper walls. When you select thin plywood, expect decent rigidity but limited moisture resistance, which can lead to warping or delamination over time.
MDF offers a smoother surface but absorbs moisture readily, reducing lifespan if exposed to humidity. Higher-end vinyl paneling adds moisture resistance and resists impacts better, enhancing durability without markedly increasing weight.
Since camper walls are thin—often between 1.25 and 3.25 inches—choosing materials with moisture resistance is critical to prevent structural damage. You should also consider how these materials interact with insulation and fasteners; improper match-ups can cause premature failure.
Ultimately, understanding material properties helps you maintain wall integrity and avoid costly repairs in varied environmental conditions. For enhanced moisture and rot resistance, options like marine plywood are ideal in high-humidity environments commonly encountered in campers.
What Differences to Expect Between Main Walls and Slide-Outs?
Although main walls and slide-outs share similar construction principles, you’ll find key differences in their thickness and assembly details that affect installation and performance.
Slide-outs often match or slightly exceed main wall thickness, typically around 3 inches, to maintain structural integrity when extended.
Slide-outs typically match or exceed main wall thickness, around 3 inches, to ensure strength when extended.
Here’s what to expect:
- Slide-outs incorporate reinforced framing to support movement and prevent flexing.
- Insulation layers may vary, balancing thermal performance with weight restrictions.
- Attachment points require precise alignment for smooth slide operation, impacting wall assembly.
- Exterior sheeting on slide-outs often uses flexible or segmented panels to accommodate expansion.
When working with either wall type, you should measure thickness directly to ensure compatibility with fasteners and accessories.
Assumptions based on advertised specs can lead to errors.
Why Screw Length Really Matters for Camper Walls?
When it comes to camper walls, the length of your screws really makes a difference. You want to pick screw lengths that fit your camper’s wall thickness perfectly. If you use screws that are too long, you might end up causing some serious damage.
For example, those long screws could compromise insulation or even puncture wiring hidden inside the wall. Ouch!
Prevent Wall Damage
When installing fixtures or accessories on camper walls, selecting the correct screw length is essential to guarantee damage prevention.
Using screws that are too long can puncture insulation or exterior layers, compromising structural integrity and causing moisture intrusion.
Conversely, screws that are too short won’t secure the fixture properly, risking loosening and wall wear.
To prevent wall damage, follow these practical steps:
- Measure wall thickness accurately before choosing screws.
- Avoid screws that extend beyond the interior layer into insulation or outer sheathing.
- Use screw lengths that provide a firm grip without over-penetration.
- Consider wall material rigidity and density to guarantee secure anchoring without splitting.
Choose Proper Screw Length
Selecting the correct screw length guarantees secure mounting without damaging camper walls.
Camper walls typically range from 1.25 to 3.25 inches thick, so you must measure accurately before choosing screws.
Using screws that are too long can penetrate insulation or puncture exterior layers, causing structural and moisture issues.
Conversely, screws that are too short won’t provide sufficient holding strength, risking loose fixtures.
Aim for screws that penetrate the wall’s interior substrate by at least half an inch without protruding through the outer shell.
Always account for material layers—plywood, insulation, and sheeting—when determining length.
Proper screw length maintains wall integrity and secures long-lasting attachment of accessories or repairs.
Measure twice, select precisely, and avoid costly wall damage or compromised insulation performance.
How Wall Thickness Affects Camper Wall Weight and Durability?
Wall thickness directly influences both the weight and durability of camper walls by determining the amount and type of materials used in the assembly.
Wall thickness shapes camper wall strength and weight through material quantity and selection.
When you assess wall thickness, keep in mind:
- Thicker walls typically incorporate more insulation and stronger outer shells, increasing durability against impacts and weather.
- Heavier materials add structural rigidity but affect overall camper weight, impacting fuel efficiency and handling.
- Thinner walls may reduce weight but risk compromising strength, requiring careful selection of materials to maintain durability.
- Wall thickness affects screw length choices; improper fasteners can damage components or reduce wall integrity.
How to Choose the Right Camper Wall Thickness for Your Needs?
Because camper wall thickness impacts insulation, durability, and weight, you should consider your specific usage and environment before choosing.
If you camp in colder climates, thicker walls with higher-quality insulation layers improve thermal performance. For frequent travel or lightweight towing, thinner walls around 1.25 inches reduce weight without severely compromising strength.
Check actual wall measurements rather than advertised specs, as thickness varies by build and affects screw length for mounting. Also, consider material composition; rigid, moisture-resistant layers add durability but increase thickness and weight.
Evaluate your priorities: if durability and insulation matter more, opt for walls near 3 inches thick with layered construction. If weight savings and maneuverability are critical, thinner walls suffice.
Always verify thickness on your unit to make certain compatibility with accessories and repairs.
Frequently Asked Questions
How Does Camper Wall Thickness Affect Resale Value?
You’ll find that thicker camper walls generally boost resale value because they offer better insulation and durability, appealing to buyers seeking comfort and longevity.
Thinner walls might reduce weight but can signal less robust construction, potentially lowering value.
When selling, highlight your camper’s wall quality and insulation.
Always verify actual thickness since advertised specs can differ, ensuring you accurately represent the camper’s build quality to prospective buyers.
Can Camper Wall Thickness Influence Noise Insulation?
You might think thicker camper walls always mean better noise insulation, but that’s not necessarily true.
While thicker walls often include more insulation material, noise reduction depends on the wall’s construction layers and materials used.
For example, a 3-inch wall with quality foam insulation blocks sound better than a thin plywood wall.
Are Thicker Camper Walls Harder to Repair or Modify?
Yes, thicker camper walls are generally harder to repair or modify because they’ve more layers and denser materials to penetrate.
You’ll need longer fasteners and specialized tools to handle insulation and exterior sheeting properly. Plus, thicker walls may have integrated wiring or plumbing that complicates modifications.
Always measure the exact thickness before starting work to avoid damaging structural components or insulation during repairs or upgrades.
Does Wall Thickness Impact Camper Heating and Cooling Costs?
Yes, wall thickness impacts camper heating and cooling costs, but it’s not the only factor.
Thicker walls usually mean more insulation, which helps regulate interior temperatures and reduce energy use. However, the type and quality of insulation matter more than thickness alone.
You should also consider wall materials and construction. To optimize costs, focus on well-insulated wall assemblies rather than just increasing thickness.
How Do Camper Wall Thicknesses Compare to Traditional Home Walls?
You’ll find camper walls are markedly thinner, typically 1.25 to 3.25 inches, compared to traditional home walls.
These often measure 4.5 to 6 inches including insulation and drywall.
This reduced thickness means less thermal mass and insulation capability.
When working on insulation or mounting hardware, always verify your camper’s actual wall thickness.
It varies by model and construction, unlike the more standardized dimensions in residential buildings.
Final Thoughts on How Thick Camper Walls Are
When choosing camper wall thickness, you want to strike the perfect balance between weight, insulation, and durability.
Remember, the devil’s in the details; small differences in materials or measurements can materially impact comfort and longevity.
By understanding construction types, insulation, and screw length importance, you’ll make an informed choice that suits your needs.
Measure carefully, consider your climate, and pick walls that keep you safe and cozy without adding unnecessary bulk.