
Last Updated on May 4, 2023
If you’re an RV enthusiast and wonder if your RV batteries should be grounded to the chassis, you should definitely take this precaution.
Proper grounding ensures a safe and efficient electrical system, ensuring passengers’ and vehicles’ safety. However, taking the necessary precautions to ensure proper grounding is essential.
Learn why proper grounding is necessary to keep your batteries in top shape, along with step-by-step instructions for getting it right. So, let’s get started.
Do RV Batteries Need To Be Grounded To Chassis: Discovering the Essentiality
Whether RV batteries ought to be grounded to the chassis is common among RV enthusiasts. It is recommended that they be grounded. But why?
Grounding an RV battery to the chassis is crucial to ensuring a safe and efficient electrical system in your vehicle. There are several reasons grounding is necessary, including safety concerns, prevention of damage from power surges, and cost-effectiveness.
#1. Safety Concerns
Regarding RV batteries, safety should always be a top priority. One important safety measure is properly grounding the battery to the chassis of the RV. Without proper grounding, there is a risk of electrical shock or even fire.
An RV battery’s grounding helps prevent electrical shock by providing a direct path for any stray electrical current to flow safely into the ground. This can happen if there is a fault in the wiring or if someone accidentally touches a live wire while working on the electrical system.
In addition to safety concerns, grounding an RV battery can help prevent damage from power surges. Power surges can occur when there is a sudden increase in voltage, which can cause damage to electronics and other sensitive equipment.
Any excess voltage will be safely directed into the ground by grounding the battery rather than causing damage.
Another benefit of properly grounding an RV battery is increased efficiency and cost-effectiveness. When an RV’s electrical system is grounded, it allows for a more stable flow of electricity throughout the system.
This means that appliances and other devices will operate more efficiently, which can save energy and money over time.
#2. Prevent Damage from Power Surges
Power surges can occur in an RV electrical system for various reasons, such as lightning strikes, faulty wiring, or sudden power fluctuations. These surges can damage the delicate electronic components of your RV appliances and equipment, leading to costly repairs or replacements.
One way to prevent damage from power surges is by properly grounding your RV battery to the chassis. Grounding provides a direct path for excess electrical energy to flow into the ground instead of damaging your RV’s electrical system.
This is especially important for sensitive electronic devices like laptops, TVs, and smartphones often used in an RV.
In addition to protecting your appliances and equipment from damage, grounding ensures your and your family’s safety. Without proper grounding, electrical energy can build up in your RV’s wiring and metal frame, creating a potential shock hazard.
Grounding is also more cost-effective than installing surge protectors or other protective devices. Surge protectors can be expensive and may not always protect against power surges completely.
#3. Efficiency and Cost-Effectiveness of Grounding

Proper grounding of an RV battery to the chassis is not only important for safety reasons but also for efficiency and cost-effectiveness.
When an RV battery is grounded to the chassis, it creates a direct path for electrical current to flow back into the ground. Any excess electricity or power surges can be safely redirected away from the RV’s electrical system.
Grounding an RV battery to the chassis can also improve efficiency by reducing resistance in the electrical system. Resistance occurs when obstacles in the electrical current path can cause energy loss and reduce the system’s overall performance.
Resistance is minimized by providing a direct path for current flow through proper grounding, and energy is conserved.
In addition to safety and efficiency benefits, proper grounding can also be cost-effective. Power surges can damage expensive electronic equipment such as TVs, refrigerators, and air conditioners without proper grounding.
By preventing this damage through proper grounding techniques, costly repairs or replacements can be avoided.
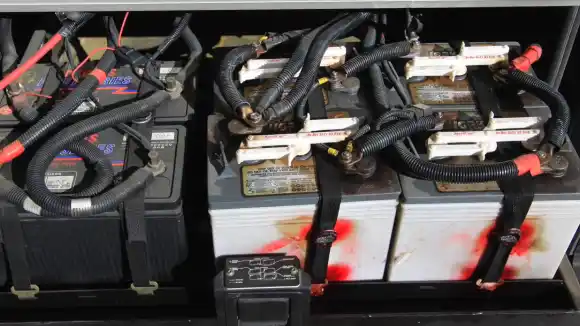
Steps to Properly Ground an RV Battery to Chassis
Grounding an RV battery to the chassis is important in ensuring that your recreational vehicle operates safely and efficiently. Proper grounding helps prevent electrical shocks, fires, and other hazards caused by poor connections or faulty wiring.
This section will outline the steps you need to take to ground your RV battery to the chassis properly.
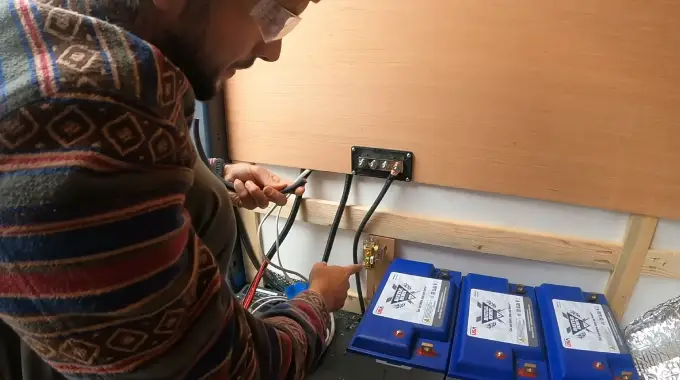
Step 1: Gather Materials and Tools Needed for the Grounding Process
Grounding an RV battery to the chassis is essential for ensuring your vehicle’s safety and proper functioning. Before starting the grounding process, you must gather all the necessary materials and tools for this task.
The materials needed for grounding an RV battery to the chassis include a heavy gauge wire, a bolt or screw, and a wire brush. You will also need some safety gear, such as gloves and safety glasses.
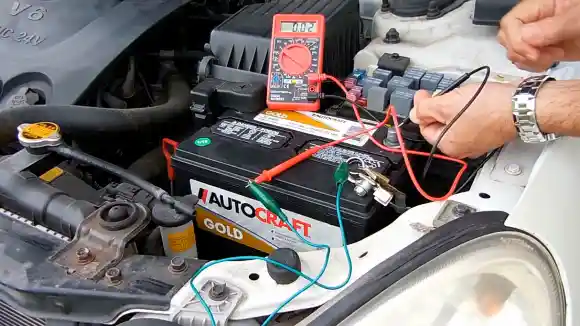
The tools required for this process are a wrench, pliers, wire strippers, and a multimeter. The wrench is used to loosen and tighten bolts, while pliers are used to cut wires. Wire strippers are used to remove insulation from wires, while a multimeter is used to test the voltage drop.
It’s important to note that when selecting the heavy gauge wire, you should choose one that matches or exceeds the amperage rating of your RV battery. This ensures that it can handle the current flowing through it without overheating or melting.
Step 2: Disconnect the Negative Terminal of the Battery from the RV
When it comes to properly grounding an RV battery to the chassis, one of the most important steps is disconnecting the battery’s negative terminal from the chassis before beginning any work. This step ensures that no electrical current flows through the system while you are making your connections.
You will need a wrench or pliers to loosen the nut that holds it in place to disconnect the negative terminal. Before starting this process, turn off all power sources and remove any keys from ignition switches.
Once you have loosened the nut, gently pull the terminal away from the battery post and secure it in a safe location where it cannot accidentally come into contact with any metal surfaces.
It is important to note that you should never remove the positive terminal first when disconnecting a battery. Doing so can create sparks and potentially cause damage or injury. Always start with the negative terminal and then move on to disconnecting the positive terminal if necessary.
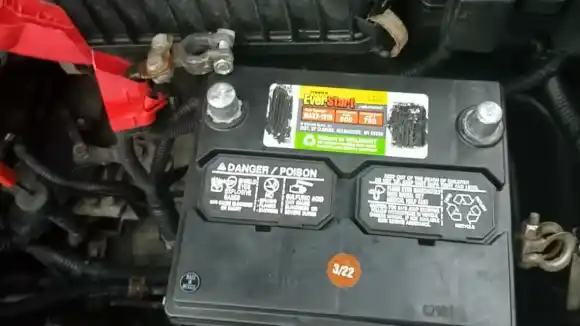
Step 3: Clean the Area on the Chassis Where You Will Attach the Ground Wire
When grounding an RV battery to the chassis, it is important to ensure that the area where you will attach the ground wire is clean and free of any debris or rust. This step is crucial as it ensures a solid connection between the battery and the chassis, which helps in preventing any electrical issues.
To clean the area, you will need a wire brush and sandpaper. First, use the wire brush to remove any dirt or debris from the surface. Make sure to scrub thoroughly so that all particles are removed.
Next, take your sandpaper and gently rub it over the area to remove any rust or corrosion that may be present. It is important to note that if there is significant rust or corrosion on the surface, it may be necessary to replace the part entirely.
After thoroughly cleaning the area, you can attach the ground wire securely. Remember to use a heavy gauge wire for this process, as it needs to handle high currents without overheating or breaking down.
When running the battery cable to the chassis of your RV, make sure that it is not near any moving parts or hot surfaces.
Step 4: Connect a Heavy Gauge Wire to the Negative Terminal of Your Battery
Connecting a heavy gauge wire to the negative terminal of your RV battery is essential in properly grounding your battery to the chassis. This process ensures that any excess current or electricity is safely directed away from the battery and into the ground.
Before starting this step, gathering all the necessary materials and tools for the grounding process is crucial. You will need a heavy gauge wire, wire cutters, a wrench or pliers, and a bolt or screw.
Locate the negative terminal on your RV battery and use your wrench or pliers to loosen the cable nut. Once loosened, remove the cable from the terminal.
Next, strip about ½ inch of insulation from one end of your heavy gauge wire using your wire cutters. Then attach this end securely onto the negative terminal of your RV battery by tightening it down with a nut.
Once you have connected one end of your wire to the negative terminal of your battery, route it toward where you plan on attaching it to the chassis.
Step 5: Run The Wire From The Battery To The Chassis Of The Vehicle
When running the wire, it is important to avoid sharp edges, hot surfaces, and moving parts that could damage or cut through it. It is also important to keep it away from other wires and components that could cause interference or electrical noise.
To ensure a safe and secure connection, it is recommended to use zip ties or clamps to secure the wire in place. These should be placed at regular intervals along their length and at both ends.
Once you have routed the battery wire to the chassis, you can move on to connecting it securely. This involves attaching one end of the wire to the negative terminal of your battery using a suitable connector such as a ring terminal or lug.
The other end of the wire should be attached securely to a bare metal surface on your vehicle’s chassis using a bolt or screw. It is important to ensure that this surface is clean and free from rust or corrosion, as this can affect its conductivity.
Step 6: Using A Bolt or Screw, Attach The End Of The Wire To A Bare Metal Surface On The Vehicle’s Chassis
To complete the grounding process for your RV battery, the final step is to connect the wire to a bare metal surface on the chassis using a bolt or screw. This step is crucial as it ensures that the electrical current flows from the battery through the wire and into the chassis, which serves as a ground.
When selecting a location on the chassis to attach the wire, look for a bare metal surface that is free of paint, rust, or any other coating that may prevent proper contact with the wire. It is also important to choose a location close to where you disconnected the negative terminal of your battery in step two.
Once you have identified a suitable location, use a bolt or screw to attach one end of your wire to this spot securely. Make sure that it is tight enough so that there is no play in it but do not over-tighten it, as this can cause damage.
After attaching one end of your wire to the chassis, connect the other end securely to your battery’s negative terminal using an appropriate connector. Ensure that all connections are tight and secure before testing your RV’s electrical system.
By following these steps carefully and correctly grounding your RV battery to its chassis, you can ensure the proper functioning of all electrical components within your vehicle.
What happens if you don’t ground an RV battery?
Grounding an RV battery is crucial for safety as it prevents electric shock or fire caused by electricity buildup in the RV frame. Proper grounding involves connecting the battery negative to a good ground source using corrosion-resistant connectors and outdoor-rated cables.
Neglecting to ground the RV battery can be catastrophic as it can cause harm to individuals and ignite flammable materials. Therefore, grounding should always be prioritized for RV safety and security.
How can I confirm if my RV battery is properly grounded?
Checking the grounding of an RV battery is essential for safety while camping. One can check for a wire from the battery’s negative terminal to the RV’s chassis, as it indicates proper grounding.
If no such wire is found, then it is imperative to contact a technician. Furthermore, one must ensure that all electrical components in the RV are properly grounded, as improper grounding can cause electric shocks or even deadly fires.
Therefore, confirming the proper grounding of an RV battery is critical in ensuring safety while camping.
Ensure RV Battery Safety with Proper Grounding
As an RV owner, you must invest in the safety and longevity of your vehicle’s electrical system. Grounding your RV batteries to the chassis is a cost-effective way to attain this.
By following the step-by-step instructions highlighted in this blog post, you should have peace of mind knowing that your RV batteries are correctly grounded.
Don’t take any chances when dealing with electrical systems in your RV. Always prioritize safety and maintenance, and you’ll have a fantastic journey.

