

Last Updated on May 1, 2023
When you hit the open road in your RV, the last thing you want to worry about is an overheated engine. That’s where your rear radiator comes in. It helps regulate your engine’s temperature and keeps everything running smoothly.
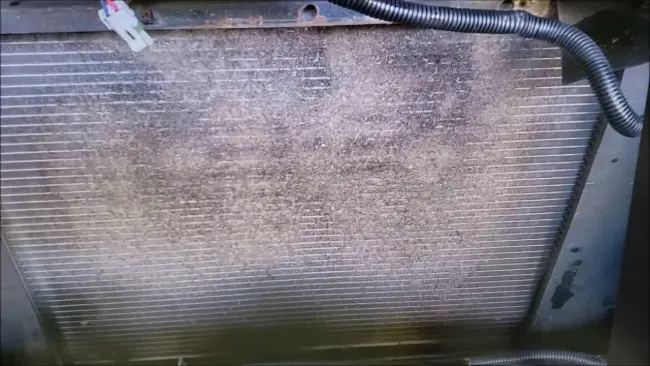
But over time, dirt and debris can build up on the radiator fins, reducing its efficiency and potentially leading to engine problems. Do you want to know how to clean the RV rear radiator?
Preparing your RV for a thorough clean requires careful steps. To start, lightly spray the radiator with water to dampen it before applying an appropriate solution cleaner and allowing time for it to work its magic. If needed, you can always repeat this process. Just be sure not to overlook any essential step.
How to Clean RV Rear Radiator: Easy DIY Steps
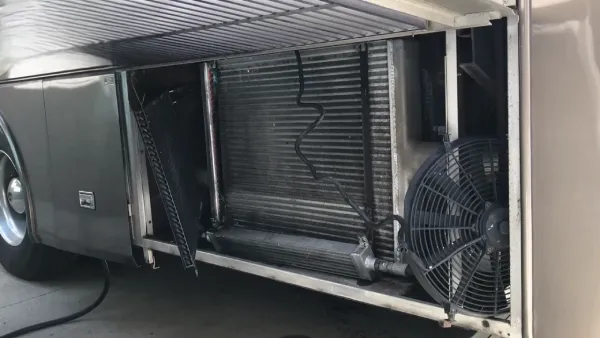
You should never overlook the importance of cleaning your RV’s radiator. Over time, dirt, dust, and debris can accumulate in your radiator, reducing its efficiency and causing your engine to overheat. This section will discuss how to clean an RV rear radiator effectively.
Step 01: Preparing for Cleaning
To ensure that the cleaning process of your RV rear radiator goes smoothly, it is important to prepare beforehand.
Firstly, gather all the necessary tools and materials for the cleaning process. This includes a soft-bristled brush, a vacuum cleaner with a crevice tool attachment, an appropriate radiator cleaner solution, and water for rinsing. Having all these items ready beforehand will save you time and make cleaning more efficient.
Next, find a suitable area to park your RV where you can easily access the rear radiator. It should be a flat surface that allows for easy maneuvering around the back of your vehicle. Ensure there are no obstacles or hazards in the area that may cause accidents or damage to your RV.
Before starting any cleaning procedures, it is important to turn off the engine and allow it to cool down completely. This will prevent any burns or injuries from hot engine parts and also ensure that the cleaning solution does not evaporate too quickly.
Step 02: Spray Water on the Radiator to Dampen It
To properly clean an RV rear radiator, it is important to follow a step-by-step process that ensures all debris and dirt are removed effectively. One of the key steps in this process is to dampen the radiator with water.
Spraying water on the radiator helps loosen any dirt or debris stuck on the fins. It also helps to prepare the surface for applying a cleaning solution. Before spraying water on the radiator, ensure you have turned off your engine and allowed it to cool down completely.
To dampen the radiator, use a hosepipe or a spray bottle filled with clean water. Direct the water onto the radiator’s fins, ensuring it covers every part. It’s important to note that you should not use high-pressure water as this can damage delicate parts of the radiator.
Once you have sprayed enough water on the radiator, allow it to sit for a few minutes to loosen up any dirt or debris. This will make it easier to remove them during cleaning.
After dampening your RV rear radiator, you can apply an appropriate cleaner solution per the manufacturer’s instructions. This will help remove any remaining dirt or debris from your RV rear radiator leaving it clean and functioning optimally.
Step 03: Apply an Appropriate Radiator Cleaner Solution
Applying an appropriate cleaning solution is crucial when cleaning an RV rear radiator. This solution helps to break down and remove any stubborn dirt or debris stuck in the radiator’s fins.
There are several types of radiator cleaner solutions available on the market, so it’s important to choose one that is suitable for your RV’s specific make and model. Some cleaners are designed for aluminum radiators, while others are better suited for copper radiators.
Before applying the cleaner solution, it’s important to ensure the radiator is completely cool. You should also wear protective gloves and eyewear to prevent any potential harm from the chemicals in the cleaner.
You can use a spray bottle or a specialized applicator tool to apply the cleaner solution. Spray or apply the solution evenly over the radiator’s surface, covering all areas thoroughly.
Once you’ve applied the cleaner solution, let it sit for several minutes according to manufacturer instructions. This will allow it time to break down any dirt or debris that may be stuck in the radiator’s fins.
After letting it sit, rinse off the radiator with water using a hose or pressure washer. Be sure to rinse thoroughly to remove all traces of the cleaner solution.
Step 04: Leave the Cleaner Solution on for Some Time
After applying an appropriate radiator cleaner solution, it’s essential to let it sit for a while to allow it to break down any remaining debris and grime effectively. The exact amount of time needed will vary depending on the specific cleaner being used, so be sure to follow the instructions on the product label.
Most radiator cleaners generally require anywhere from 5-15 minutes of dwell time to work effectively. During this time, it’s best to avoid running the engine or exposing the radiator to any extreme temperatures or weather conditions.
While waiting for the cleaner solution to do its job, take a moment to inspect other areas of your RV’s cooling system for any signs of damage or leaks. This is also a good opportunity to double-check that all necessary parts have been removed and set aside safely.
After the recommended dwell time has passed, rinse off the radiator thoroughly with water. Use enough water pressure to get rid of the cleaner and any remaining debris between the fins.
Step 05: Rinse off with Water
After leaving the cleaner solution on the radiator fins for some time, it’s time to rinse it off with water. A hose or pressure washer can be used for this. Make sure to spray water from the back of the radiator towards the front so debris is flushed outwards and not inwards.
Ensure that all of the cleaner solutions are rinsed off properly, as any remaining solution may cause damage to your RV’s engine. Additionally, you should check for any remaining debris on the fins and repeat the cleaning process if necessary.
Step 06: Repeat If Necessary
If you notice debris still stuck in the fins after rinsing off the radiator, do not worry. It is common for some debris to be stubborn and require multiple cleaning attempts. Simply repeat the cleaning process until all debris has been removed from the RV rear radiator.
If you had to repeat the cleaning process, it might indicate that your RV’s cooling system needs attention. A dirty or clogged radiator can cause your engine to overheat and lead to costly repairs. Therefore, it is recommended to perform regular maintenance on your RV’s cooling system to prevent any potential issues.
Step 07: Finishing Up
After cleaning the RV rear radiator, it is important to complete some finishing tasks to ensure everything is back in place and working properly. Here are some steps to follow:
Check for Any Leaks or Damage
Once the RV rear radiator is clean, check for any leaks or damage. This step ensures that your radiator is functioning properly and that there are no underlying issues that could cause problems down the road.
To begin, inspect the radiator carefully for any signs of leakage. Look for wet spots or puddles of coolant around the radiator or on the ground beneath your vehicle. If you notice any leaks, addressing them immediately is important to prevent further damage.
Next, check for any visible damage to the radiator itself. Look for bent fins or other signs of physical damage that could impair its ability to cool your engine effectively. If you notice any damage, it may be necessary to replace the radiator entirely.
Reinstall any Removed Parts
After you have finished cleaning your RV rear radiator, it’s time to reinstall any parts that were removed during the cleaning process. This is an important step to ensure that your radiator functions properly and efficiently.
Before reinstalling any parts, make sure that you have thoroughly checked for leaks or damage. If you notice any issues, address them before proceeding with the reinstallation process.
Next, carefully put back any parts you took out during cleaning. This may include hoses, clamps, and other components. Be sure to tighten all connections securely to prevent any leaks.
Start up Your Engine and Monitor the Temperature
Once you’ve cleaned your RV rear radiator, starting up your engine and monitoring the temperature is important. This step will help you ensure that everything is working properly and that there are no leaks or damage.
To start your engine, turn on the ignition and wait for the engine to warm up. As the engine warms up, keep an eye on the temperature gauge to ensure it stays within a safe range. If the temperature rises too high, turn off the engine immediately and check for any issues.
Taking your RV for a short drive after cleaning the radiator is also a good idea. This will help circulate coolant throughout the system and ensure everything functions properly.
How do you clean behind a cast iron radiator on RVs?
Cleaning behind a cast iron radiator on an RV can be quite tricky. But, keeping the RV’s heating system running smoothly is necessary.
To clean behind the radiator, fill a bucket with hot water and wash up the liquid. Next, immerse a dishcloth in this mixture and wring it out. Place a towel under the radiator and use the dishcloth to clean in between the radiator columns. Gently move the cloth up and down to ensure that every part of the radiator is clean.
Cleaning your RV radiator might be a bit time-consuming, but it will ensure efficient heating during colder months.
How do you clean the inside of an RV radiator without removing it?
Cleaning the RV radiator without taking off the cover might seem impossible. But, it can be done. The most efficient way to clean RV radiators inside is to use a radiator brush. This tool is designed to reach the tight spaces inside the radiator.
The brush’s bristles will loosen all the dirt and debris inside the radiator, ensuring your RV’s heating system operates efficiently. Regular cleaning of your RV radiator is crucial, and a radiator brush makes the task less daunting.
Why does it smell musty from behind your RV radiator?
A musty smell coming from behind your RV radiator is quite common, especially after an extended period of non-use. A build-up of dirt, dust, hair, and other debris behind the radiator typically causes the smell. To eliminate the musty smell, you should clean the RV radiator thoroughly. Use a hand-held vacuum cleaner to remove dirt and debris.
Also, a duster will help remove any dust the vacuum cleaner may have missed. Clean your RV’s central heating radiators regularly to maintain good air quality and avoid musty smells.
Protect Your Engine and Save Money: Make Rear RV Radiator Cleaning a Priority
Maintenance is crucial to keeping your vehicle running in top condition as an RV owner. One of the essential aspects of maintenance is cleaning your rear RV radiator. Neglecting this task can lead to potential engine damage and costly repairs in the future.
The process involves gathering necessary tools and parking in a suitable area before removing debris using a soft-bristled brush and vacuum. Afterward, spraying water to dampen the radiator and applying appropriate cleaning solutions are critical to complete the process.
Check for leaks, reinstall removed parts, and monitor the temperature before turning on the engine. Keep up with regular cleaning, and enjoy a smooth ride with a long-lasting engine.

