
Last Updated on May 12, 2026
To remove black streaks on your RV, start by inspecting common runoff areas like roof seams and window drains. Wet the stained areas, then apply an RV-safe black streak remover gel, letting it sit for 30–60 seconds.
Gently scrub with a soft brush or microfiber mitt, rinse thoroughly, and dry to prevent water spots. Use extendable tools for high spots, and repeat if needed.
Exploring deeper tips can help you keep your RV looking clean and protected long-term.
Key Takeaways
- Inspect RV in daylight, focusing on roof seams, window drains, awnings, and panel joints for black streaks caused by water runoff and condensation.
- Wet affected areas thoroughly, apply an RV-safe black streak remover gel, and let it sit 30–60 seconds to loosen grime before scrubbing gently.
- Use a soft brush or microfiber mitt on extendable poles to scrub streaks with controlled pressure, especially on high or hard-to-reach spots.
- Rinse the cleaned areas thoroughly with water to remove residue, then dry with a soft cloth to prevent water spots and final streak buildup.
- Maintain quarterly washing and waxing, keep roof clean annually, and avoid parking under trees to prevent black streak recurrence and protect surfaces.
What Causes Black Streaks on Your RV?

Although black streaks on your RV might seem like just dirt, they actually form when rain or condensation carries grime, grease, and dirt down the walls. This leaves stubborn stains as the water evaporates.
You’ll often find these streaks near roof seams, window drains, awnings, and body panel joints, where water runoff concentrates. Organic airborne particles also settle on your RV, promoting mold and mildew growth that darkens these streaks further.
Plus, condensation from your air conditioner drips can worsen the problem by providing consistent moisture. Understanding these causes helps you target cleaning effectively and prevent streak buildup.
Keeping these trouble spots in mind lets you maintain your RV’s exterior and avoid stubborn black streaks that can degrade its appearance over time.
Using the right black streak remover can make the cleaning process easier and protect your RV’s surfaces from damage.
Preparing Your RV Exterior for Black Streak Removal
First things first, take a good look at your RV’s exterior. You want to spot all those pesky black streaks that need attention. It’s easier to tackle them all at once if you know where they are!
Once you’ve got a clear picture of the problem areas, it’s time to gather your cleaning supplies. Make sure you have an RV-safe remover, some soft cloths, and a hose for rinsing. Trust me, having everything at hand will make the process smoother.
Before you dive in, don’t forget to clear the surrounding area. This will give you easy access to your RV and help prevent any accidental damage while you’re cleaning. Keeping things tidy will make the whole experience a lot more enjoyable!
For best results, choose a cleaner formulated specifically for fiberglass that also offers oxidation and stain removal to safely restore your RV’s surface.
Inspect Exterior Surfaces
Before you begin removing black streaks, you need to thoroughly inspect your RV’s exterior surfaces to identify all affected areas and understand the severity of the buildup.
Walk around your RV in daylight to spot streaks clearly, focusing on roof seams, window drains, awnings, and body panel joints.
Check for streaks caused by condensation near the air conditioner drip lines as well. Use a flashlight for shaded or less visible spots.
Assess if the streaks are light or heavily ingrained, as this will guide your cleaning approach.
Note any additional damage or mold that might require special attention. This careful inspection ensures you target every affected area effectively, setting you up for a thorough and efficient cleaning process.
Be sure to select cleaners with effective cleaning methods that match the severity of the buildup for best results.
Gather Cleaning Materials
To effectively remove black streaks from your RV, you’ll need to gather the right cleaning materials that guarantee thorough and safe treatment of the surfaces.
Start with an RV-safe black streak remover solution. Gel formulas cling better to vertical surfaces for more effective cleaning.
Grab a soft cloth or brush for scrubbing, and a microfiber chenille wash mitt on a pole to reach high or awkward spots.
Prepare a water source like a hose or bucket for wetting and rinsing your RV.
Finally, have a soft cloth on hand to dry the exterior and prevent water spots.
Choosing a cleaner with biodegradable formulas ensures effective cleaning while protecting your RV’s rubber roof and the environment.
Clear Surrounding Area
Once you have gathered all your cleaning materials, create enough space around your RV to move freely while working.
Clearing the surrounding area guarantees safety and efficiency as you tackle those black streaks. Start by removing any outdoor furniture, garden tools, or other obstacles near the RV.
Check the ground for slippery spots or uneven surfaces that could cause falls. Here’s a quick checklist to prepare your workspace:
- Clear a 3-foot perimeter around the RV for unrestricted movement.
- Remove low-hanging branches or objects that might obstruct your reach.
- Position your water source and cleaning supplies within easy access.
For optimal cleaning, consider using an extendable, lightweight handle brush to reach high or awkward spots safely without ladders.
Step-by-Step Guide to Black Streak Removal on RV Walls
Sure! Here’s a more conversational version of your text:
First things first, you’ll want to wet the affected area really well. This helps to loosen up any dirt and grime that’s stuck there.
Once that’s done, grab your black streak remover solution and apply it evenly over the stains. Let it sit for about a minute to give it a chance to break everything down.
After that, it’s time to get scrubbing! Use a soft brush or cloth to gently work on those streaks. Rinse everything off thoroughly, and if you still see some marks, don’t hesitate to repeat the process for that clean finish you’re aiming for.
Using products with UV reflective capabilities can also help prevent future discoloration from sun damage. Happy cleaning!
Preparing The Surface
Before applying any cleaning solution, you’ll want to thoroughly wet the affected area to loosen dirt and grime. This step helps prevent scratching and allows the remover to penetrate more effectively.
Follow these steps to prepare your RV surface:
- Use a hose or bucket to wet the streaked area completely, focusing on seams, window drains, and awnings where buildup is heaviest.
- Let the water sit for a few minutes to soften dirt and organic particles embedded in the surface.
- Gently wipe the area with a soft cloth or mitt to remove loose debris without scrubbing hard yet.
Completing this preparation ensures your cleaning solution will work efficiently and reduces the risk of damaging your RV’s exterior during removal. For long-term protection against leaks and damage after cleaning, consider applying waterproof RV roof tape to vulnerable areas.
Applying Remover Solution
After preparing the surface, you’ll apply the remover solution directly to the wet black streaks to break down the grime effectively.
Use an RV-safe product like McKee’s 37 or Simple Green, spraying evenly over each streak.
Let the solution sit for 30 to 60 seconds to penetrate and loosen dirt without drying out.
For vertical surfaces, a gel formula works best as it clings longer.
Avoid applying too much to prevent runoff and waste.
Focus on areas near roof seams, window drains, and awnings where buildup is heaviest.
Make sure the streaks remain wet during this dwell time. If they begin to dry, lightly mist with water.
This step primes the grime for easier removal during scrubbing and rinsing.
Using products with UV inhibitors and acrylic polymer sealants can help protect the surface after cleaning.
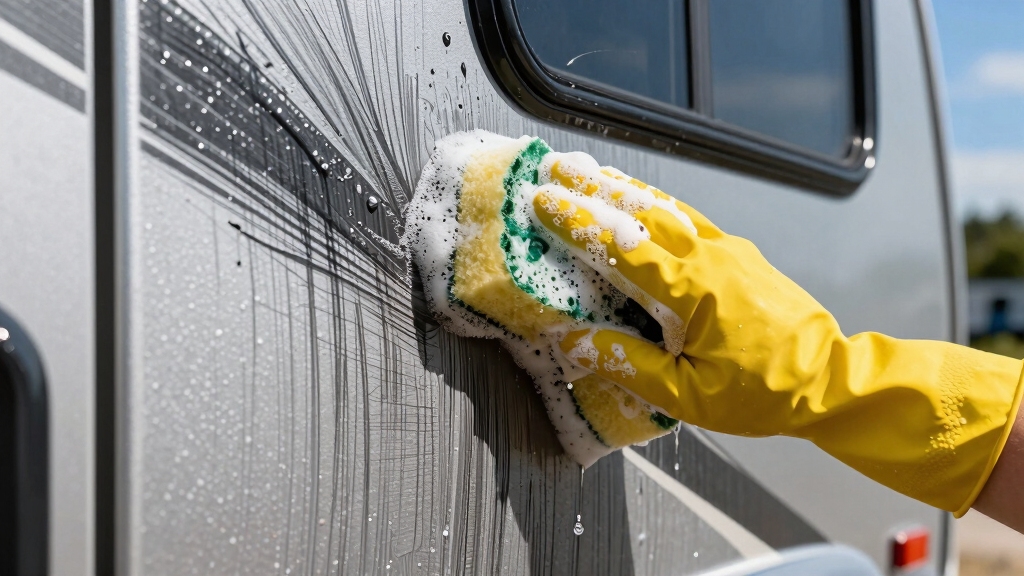
Scrubbing And Rinsing
Once the remover solution has had time to work on the black streaks, it’s time to scrub the affected areas to lift and remove the loosened grime.
Start by using a soft cloth or brush, applying firm but controlled pressure to avoid damaging your RV’s surface. Focus on the streaks, working in small sections.
Next, thoroughly rinse the area with clean water to wash away residue and loosened dirt. Use a hose or bucket for effective rinsing.
Repeat the process if streaks persist. Here’s a quick step-by-step:
- Scrub streaks gently but firmly with a cloth or brush.
- Rinse the area completely with water.
- Inspect and repeat scrubbing and rinsing as needed.
Finish by drying the surface with a soft cloth to prevent water spots. For best results, use an eco-friendly and biodegradable cleaner designed for RV surfaces.
Top Products for Removing Black Streaks From Your RV
When tackling black streaks on your RV, choosing the right product can make the process faster and more effective.
McKee’s 37 Black Streak Remover Gel is a top choice for stubborn marks because its gel formula clings to vertical surfaces, allowing deeper cleaning without runoff.
If you prefer a versatile option, Simple Green works well and is safe for gel coat, fiberglass, and painted surfaces.
For milder streaks, a mix of vinegar or mild dish soap can also do the trick.
Always pick products specifically labeled safe for RV exteriors to avoid damage.
Using these recommended removers guarantees thorough cleaning while protecting your RV’s finish, making the removal process straightforward and efficient.
Additionally, cleaners with biodegradable formulations are preferred to ensure environmental safety during the cleaning process.
How to Prevent Black Streaks From Returning?
Choosing the right remover gets rid of black streaks effectively, but keeping them from coming back requires regular care and specific habits.
Selecting the right remover eliminates black streaks, but lasting prevention depends on consistent care and good habits.
You’ll want to maintain your RV’s cleanliness and protect it proactively.
Here are three key steps:
- Wash and wax quarterly: This prevents dirt buildup and creates a protective barrier against contaminants.
- Keep the roof clean annually: Dirt and organic debris on the roof contribute to streak formation along seams and drains.
- Avoid parking under trees: Reducing exposure to organic particles minimizes mold and mildew growth.
Additionally, use an RV cover during storage to limit dirt and moisture contact.
Regular upkeep makes streaks less likely, saving you time and effort in the long run.
Effective Techniques for Cleaning Hard-to-Reach RV Spots and Roofs
For tackling hard-to-reach spots on your RV, such as roof seams, window drains, and awnings, using the right tools makes all the difference.
Equip yourself with a microfiber chenille wash mitt attached to an extendable pole to reach high or tight areas safely.
Use an RV-safe black streak remover in gel form, as it clings longer to vertical surfaces, boosting cleaning effectiveness.
Start by wetting the area, then apply the remover and let it sit for 30-60 seconds before scrubbing with gentle pressure.
A sprayer on a stream setting helps rinse thoroughly from the ground.
Don’t forget to clean roof seams carefully, as dirt buildup there often causes streaks.
Consistent, targeted cleaning prevents buildup in these tricky spots and keeps your RV looking its best.
Frequently Asked Questions
Can Black Streak Removers Damage RV Decals or Graphics?
Black streak removers can sometimes damage RV decals or graphics if they contain harsh chemicals or abrasive ingredients.
You should always test the product on a small, inconspicuous area first to check for adverse reactions.
Opt for RV-safe removers labeled as safe for painted surfaces and gel coats.
Using gentle scrubbing tools and avoiding prolonged contact will also help protect your decals while effectively removing streaks.
How Long Does It Take for Black Streaks to Reappear After Cleaning?
Black streaks can reappear within a few weeks to a couple of months after cleaning, depending on your environment and maintenance.
If you park under trees or in humid areas, expect quicker recurrence due to organic debris and condensation.
To delay streaks, clean and wax your RV quarterly, keep the roof free of dirt, and use covers during storage.
Regular upkeep helps you keep those streaks at bay longer.
Are There Eco-Friendly Alternatives to Chemical Black Streak Removers?
Did you know vinegar’s acidity can dissolve grime without harsh chemicals?
Yes, you can use eco-friendly alternatives like a vinegar and water mix or mild dish soap to tackle black streaks on your RV.
These options are safe for gel coats and fiberglass.
Just spray, scrub gently, and rinse.
They’re practical, affordable, and better for the environment, especially if you clean regularly and avoid buildup.
Can Black Streaks Cause Long-Term Damage to RV Materials?
Yes, black streaks can cause long-term damage to your RV materials if left untreated.
The contaminants and organic particles trapped in those streaks can degrade paint, gel coat, and fiberglass over time.
Mold and mildew growth can further weaken surfaces and lead to costly repairs.
By addressing black streaks promptly and maintaining regular cleaning, you protect your RV’s exterior.
This helps preserve both its appearance and structural integrity.
Is Professional Cleaning Recommended for Severe Black Streak Buildup?
Yes, you should consider professional cleaning for severe black streak buildup.
Professionals have specialized tools and stronger, RV-safe chemicals to tackle stubborn stains without damaging surfaces.
If streaks are deeply embedded or cover large areas, DIY methods mightn’t fully restore your RV’s finish.
Hiring experts guarantees thorough removal, preventing long-term damage and saving you time and effort.
Still, maintain regular cleaning to avoid severe buildup in the future.
Preserve Your RV’s Beauty with Simple Cleaning Habits
Don’t let black streaks turn your RV into a rolling eyesore! With the right prep, products, and techniques, you can banish those stubborn marks faster than you’d imagine.
Keeping your RV spotless isn’t just about looks; it protects your investment and boosts your pride on the road. Follow the steps and preventive tips carefully, and you’ll keep your RV gleaming like new, no matter where your adventures take you.

