
Last Updated on September 25, 2023
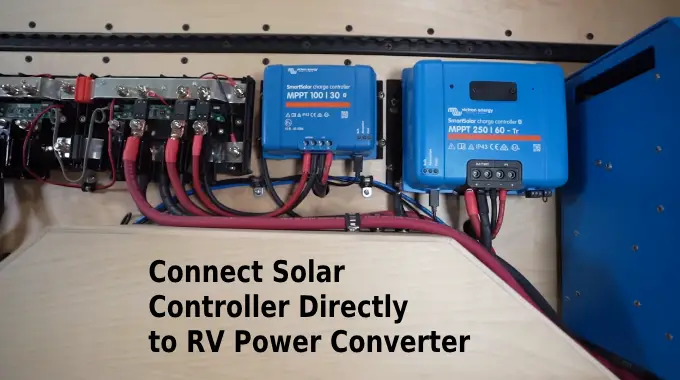
Solar controller installation in your RV has the potential to enhance your power options while on the road. You might wonder, “Can I connect a solar controller directly to my RV’s power converter?” This question reflects a common curiosity among RV enthusiasts looking to maximize their energy efficiency.
Creating a direct connection between a solar controller and an RV power converter is possible. But, it’s not a straightforward task and requires careful consideration of various factors to ensure a successful and safe integration.
Compatibility between the solar controller and the power converter, accurate battery voltage sensing, optimal charging decisions, proper wiring sizing, and circuit protection are all key aspects to bear in mind.
We will discuss several factors to consider when connecting the solar controllers directly to the RV power converter and how to do so.
Can I Connect Solar Controller Directly to RV Power Converter: Factors to Consider
To connect a solar controller directly to an RV power converter, you have to consider a few things.
- Compatibility of components
- Charge controller type
- Wiring and circuit protection
- Battery voltage sensing
- Controller placement
- Fuse Placement
- Simultaneous charging
- Inverter consideration
Let’s examine these factors in detail so you are aware of what to keep in mind before connecting the solar controller directly to the RV power converter.
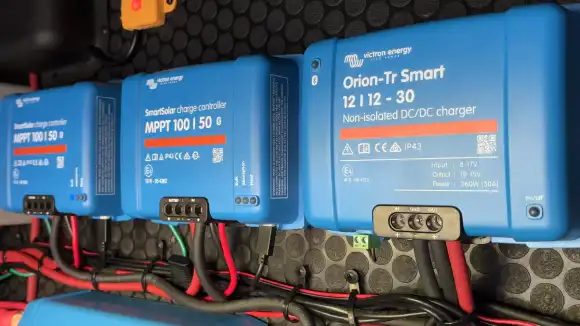
1. Compatibility of Components
When you connect a solar controller directly to your RV’s power converter, it’s essential to consider the compatibility of components.
Not all solar charge controllers and power converters work well together, and using incompatible components can cause damage and malfunctions.
Before making a purchase, research and choose a solar charge controller that’s compatible with the voltage and type of batteries in your RV, as well as the power converter’s specifications. This ensures a seamless connection and optimized performance.
2. Charge Controller Type
The charge controller type is another critical factor to consider with an RV’s power converter. PWM and MPPT are the two main types of solar charge controllers available in the market.
While PWM controllers are more affordable, MPPT controllers are more efficient and handle higher voltage panels better, making them the preferred choice for this setup.
They also reduce the risk of overcharging your batteries and optimize power output, which translates into more energy savings in the long run.
3. Wiring and Circuit Protection
Another crucial thing to consider is the wiring and circuit protection when you connect a solar controller directly to your RV.
Improper wiring and insufficient circuit protection can lead to voltage drop and potential overheating, causing damage to your RV and putting your safety at risk.
As a rule of thumb, appropriately size and protect the wire between the controller and converter.
Use fuses, circuit breakers, and wire gauges according to the distance between components and the solar panel’s wattage. Doing so ensures a safe and optimized connection.
4. Battery Voltage Sensing
Positioning the solar charge controller closer to the batteries is essential for accurate battery voltage sensing and temperature compensation.
This allows the controller to make optimal charging decisions based on the battery’s actual state. Therefore, when you connect a solar controller directly to your solar panel or RV’s power converter, make sure to place the sensor closer to the batteries. By doing so, you can ensure that your batteries stay healthy and last longer.
5. Controller Placement
Ensure you choose a well-ventilated area for the solar controller and mount it securely to protect it from environmental elements.
The placement of the solar controller is crucial for its proper functioning and longevity. A well-ventilated area helps prevent overheating, which can significantly impact the controller’s efficiency and lifespan.
When exposed to excessive heat, the controller may experience performance issues and even fail prematurely. Additionally, mounting the solar controller securely ensures its protection from external factors such as dust, moisture, and physical damage.
These elements can interfere with the controller’s functionality, leading to potential malfunctions or failures. Therefore, it is essential to carefully consider the location and mounting of the solar controller to optimize its performance and ensure its longevity.
6. Fuse Placement
When connecting a solar controller directly to your RV’s power converter, it’s critical to consider the fuse placement.
Installing fuses on the controller end is not recommended because it can cause potential safety hazards.
Instead, fuses should be located on the battery end to protect the wiring. This ensures protection and safety in case of a malfunction or short circuit.
7. Simultaneous Charging
If you plan to use other charging sources like generators or shore power, you must consider the interaction between the solar charging system and these sources. A well-designed setup should allow for proper coordination of all charging methods. This ensures that all charging sources work seamlessly together to provide the optimal energy output you need while avoiding overcharging or undercharging your batteries.
8. Inverter Consideration
If your RV has an inverter for AC power, you must ensure that it’s compatible with simultaneous solar charging and power conversion.
Address potential issues related to overcharging and high-voltage protection. Proper integration of your inverter system with your solar charging system ensures that you have a stable and consistent power output that meets your needs.
How to Connect a Solar Controller Directly to an RV Power Converter? Step-By-Step Guide
You will need to follow a series of steps to connect your solar controller directly to your RV power converter. They are as follows:
Step 1: Gather Equipment
To start with, make sure you have all the necessary equipment for the installation. You’ll need a compatible solar charge controller, suitable solar panels for your RV’s energy needs, wiring, appropriate wire gauges, connectors, insulation materials, fuses, circuit breakers, and other protective devices.
Also, gather tools like wire cutters, crimping tools, and screwdrivers. Having all the necessary equipment ensures a successful installation and efficient utilization of solar power for your RV.
Step 2: Choose Solar Controller Location
For accurate voltage sensing, you’ll want to select a well-ventilated location close to the batteries for your solar controller.
By placing the solar controller near the batteries, you can minimize any voltage drop or fluctuations that may occur due to long wire runs.
Also, choosing a well-ventilated location is crucial to prevent overheating the solar controller. High temperatures can negatively impact the performance and lifespan of the controller. Find a spot that allows for adequate airflow, as this will help dissipate any heat generated during operation.
Step 3: Mount Solar Panels
Once you have chosen the location for your solar controller, it’s time to mount the solar panels.
Make sure to clean the mounting area thoroughly to ensure proper adhesion. If you’re mounting the panels on the roof, inspect it for any signs of damage or leaks.
Attach the brackets or rails securely to the surface, as they will serve as the foundation for the solar panels.
Handle the panels correctly, ensuring they are aligned and spaced appropriately.
Use the appropriate screws and fasteners to secure the panels to the mounting hardware, ensuring a sturdy and reliable installation.
Step 4: Wire Solar Panels
To wire the solar panels, ensure that the positive terminals are connected to the negative terminals in series or parallel, depending on your system’s voltage and current requirements.
Connect the panels in series if you need to increase the voltage output while keeping the current constant. This involves connecting one panel’s positive terminal to the next’s negative terminal.
On the other hand, if you need to increase the current capacity while maintaining the voltage output, connect the panels in parallel.
Join the positive terminals together and the negative terminals together. Choose the connection type that best suits your system’s requirements. Once the panels are wired, connect the panel wiring to the solar controller’s input terminals.
Step 5: Connect to Converter Output
Make sure you appropriately size the wiring from the output terminals of the solar controller to the output terminals of the RV power converter.
Here are three important considerations when connecting the solar controller to the converter output:
- Wire gauge: Use a wire gauge that can handle the current generated by your solar panels. Consult the manufacturer’s specifications for the solar controller and the RV power converter to determine the appropriate wire gauge size.
- Wire length: Keep the wiring between the RV power converter and solar controller as short as possible to minimize power loss. Longer wires can lead to voltage drops and decreased solar system performance.
- Wire connectors: Use high-quality wire connectors to connect solar controller wiring to RV power converter wiring securely. This will ensure a reliable and durable connection.
Step 6: Install Protection Devices
Install fuses or circuit breakers on the positive wire between the solar controller’s output and the battery to protect against overcurrent and short circuits.
By placing these protection devices in the wiring path, you can prevent excessive current flow that could damage your components or even pose a fire hazard.
Select the right fuse or breaker size for your system based on its current capacity. This will ensure that the protection device can effectively trip or blow in case of an overcurrent situation.
Step 7: Battery Connection
Ensure that you properly identify the positive and negative terminals on both the solar controller and the battery bank before making the battery connection.
This step is crucial to avoid any damage to the equipment or potential safety hazards.
Once you have identified the terminals, follow these steps to connect the solar controller to the RV’s battery bank:
- Verify that the RV’s battery bank is properly fused or has circuit protection to prevent electrical issues.
- Connect the solar controller’s positive terminal to the battery bank’s positive terminal. This ensures that the controller can effectively manage the charging of the batteries.
- Connect the solar controller’s negative terminal to the battery bank’s negative terminal. This completes the circuit and allows the controller to regulate the flow of power.
Step 8: Test and Monitor
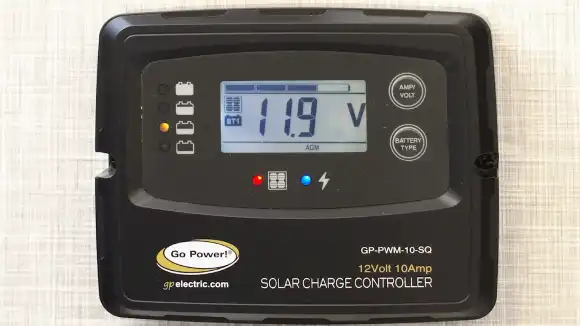
After completing the battery connection, testing and monitoring the solar panels to ensure they are functioning correctly is important. To begin, turn on the solar panels and keep an eye on the solar controller’s display. This will allow you to verify if the panels are charging as they should.
Pay attention to any error codes or abnormal readings that could indicate a problem with the panels or the controller.
Additionally, it’s crucial to check if the power converter is still operating properly. This can be done by observing if it continues to convert the solar energy into usable power for your RV.
Why Should I Incorporate 6 Volt Batteries in My RV Solar System?
When it comes to maximizing the efficiency and performance of your RV solar system, using 6 volt batteries in rv solar is a smart choice. These batteries offer higher capacity and longer lifespan than traditional 12 volt batteries. With their ability to store more energy, they ensure a reliable power supply for all your camping adventures. Additionally, their deep cycle design allows for efficient energy conversion, making them ideal for powering your RV appliances and electronics. Incorporating 6 volt batteries in your RV solar system will undoubtedly enhance your overall camping experience.
What Size Solar Array and Charge Controller Should You Use for Your RV?
The appropriate size of a solar array and charge controller for your RV depends on your energy consumption needs and usage patterns. If you intend to simply keep your battery bank topped off while your RV is not in use, a minimum of 200 watts of solar might suffice.
However, for active usage of your RV, especially if you plan to use small inverters, a larger setup would be beneficial. Installing a 700-watt solar package, like for toy haulers, has proven effective for many RVers.
This capacity appears to strike a balance, offering ample power generation to support various devices and appliances while on the road.
Always assess your specific power requirements and consider the solar package that aligns best with your usage to ensure a reliable energy supply during your travels.
Can you connect multiple solar panels to the same solar charge controller and converter setup?
Using the same solar charge controller and converter setup for multiple solar panels is possible. By connecting solar panels in parallel or series, you can increase the overall power output and better meet your RV’s energy needs.
You need to ensure that the combined voltage and current of the panels match the specifications of your charge controller and converter.
Additionally, proper wiring, appropriate fusing, and careful consideration of the system’s capacity are essential to ensure efficient and safe operation.
If needed, consulting manufacturer guidelines and seeking professional advice can help you optimize the performance of your multi-panel solar setup within your RV’s electrical system.
Harness the Sunshine: Power Your RV Adventures with Solar Energy
You now understand the feasibility and considerations involved in connecting a solar controller directly to an RV’s power converter. This setup can be valuable to your RV, offering enhanced energy efficiency and greater independence on your journeys.
Keep in mind that while the integration is possible, it demands careful attention to compatibility, wiring, protection measures, and proper positioning.
By taking these factors into account and following a step-by-step approach, you can successfully establish a direct connection that optimizes your solar charging capabilities. Whether you’re a weekend explorer or a seasoned traveler, a well-integrated solar system can truly elevate your RV experience, allowing you to make the most of the power of the sun.

