
Last Updated on September 25, 2023
You generally use 12-volt batteries on your RV to power your adventures on the open road. But have you ever wondered, “Can I use 6-volt batteries in my RV solar system?”
You can use 6-volt batteries in your RV solar system. While 12-volt batteries are the traditional choice for RVs, 6-volt deep-cycle batteries offer a compelling alternative that’s worth exploring.
These versatile batteries can efficiently fuel various components within your RV, from interior lights to appliances and entertainment systems.
By understanding how to integrate 6-volt batteries into your RV solar system, you can unlock many benefits that enhance your mobile lifestyle.
We’ll explore the advantages of using 6-volt batteries and the steps to seamlessly incorporate them into your RV solar setup.
Can I Use 6 Volt Batteries in an RV Solar System: 4 Benefits

Regarding your RV solar system, using 6-volt batteries can provide several benefits. These are:
- Increased amp hours
- Better discharge and recharge performance
- Longer lifespan
- Tolerance for deep discharge
Let’s examine each of the benefits of using 6-volt batteries in RV solar systems in more detail.
1. Increased Amp Hours
To maximize your RV’s battery life, you’ll need to consider the increased amp hours of 6-volt batteries compared to 12-volt batteries.
The higher amp-hour capacity of 6-volt batteries means that they can store and deliver more energy than their 12-volt counterparts.
This is particularly advantageous for RV owners who rely on solar power systems. With increased amp hours, you can power more appliances and devices in your RV for longer periods without recharging. This allows for a more comfortable and convenient experience while on the road.
Additionally, the increased capacity of 6-volt batteries means they can handle more frequent charging and discharging cycles, prolonging their lifespan.
Choosing 6-volt batteries for your RV solar system provides you with greater energy storage and longevity, ensuring you can enjoy your adventures without worrying about running out of power.
2. Better Discharge and Recharge Performance
The increased capacity of 6-volt batteries allows them to handle deeper discharges and more frequent recharge cycles, making them ideal for extended periods of dry camping.
When it comes to powering RV solar systems, using 6-volt batteries brings several advantages:
- Enhanced Durability: 6-volt batteries are built to withstand the demands of deep cycling, where they are discharged to a lower level before being recharged. This feature ensures their longevity and reliability, especially in off-grid situations.
- Longer Lasting Power: With their ability to handle deeper discharges, 6-volt batteries provide a higher reserve capacity, meaning they can deliver power for longer periods before recharging.
- Faster Recharge Times: The design of 6-volt batteries allows for more efficient recharging, enabling them to bounce back quickly after discharge. This means you can spend less time waiting for your batteries to recharge and more time enjoying your RV adventures.
3. Longer Lifespan
Utilizing 6-volt batteries in your RV solar setup can lead to a longer lifespan, saving you money in the long run.
Due to their construction and thicker plates, 6-volt batteries are designed to withstand deep discharges and frequent recharges, making them ideal for solar systems.
This means that they can handle the demands of your RV’s power needs without wearing out quickly.
The thicker plates also allow for better energy storage, ensuring that you have a reliable power source for your adventures.
Additionally, 6-volt batteries are designed to be more durable and able to withstand the rigors of the road and the vibrations commonly experienced in an RV.
4. Tolerance for Deep Discharge
6-volt batteries can handle deep discharge cycles without significantly impacting their longevity. This makes them an excellent choice for use in an RV solar system. Here’s why:
- Deep Discharge Tolerance: Unlike other types of batteries, such as 12-volt batteries, 6-volt batteries are designed to handle deep discharges. This means you can use a larger portion of their capacity before needing to recharge them. This is particularly important in an RV solar system where power needs can vary greatly.
- Longer Lifespan: By installing 6-volt batteries in your RV solar system, you can extend the lifespan of your battery bank. The ability to handle deep discharge cycles without damage means that these batteries can last longer, giving you more reliable power for your adventures on the road.
- Cost-Effective: 6-volt batteries are typically more affordable compared to their 12-volt counterparts. This means you can save money while still getting a battery that can handle the demands of your RV solar system.
How to Use 6 Volt Batteries in Your RV Solar System: Step-by-Step Instructions
There are several important steps to follow when using 6-volt batteries in your RV solar system. The following are among them:
Step 1: Battery Selection and Determine Battery Configuration
To choose the right batteries for your RV solar system, consider the quality and capacity that matches your energy needs.
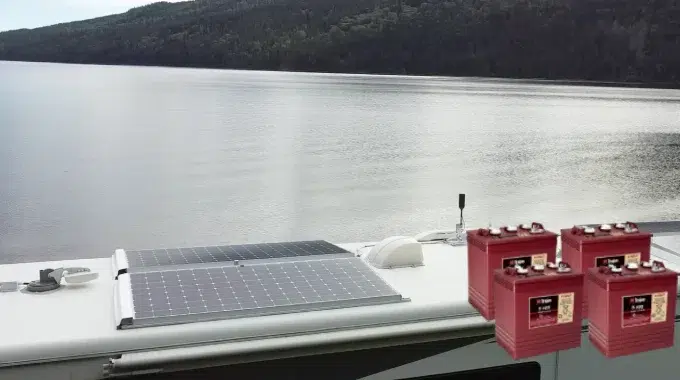
When selecting batteries, opt for good quality 6-volt deep cycle batteries, such as the ones commonly used in golf carts. These batteries are designed to provide a steady flow of power over an extended period, making them ideal for solar systems.
Once you have chosen the batteries, the next step is to determine the battery configuration. You can wire the batteries in series or parallel, depending on your specific requirements.
Wiring in series will increase the voltage while keeping the amp hours the same. On the other hand, wiring in parallel will increase the amp hours while maintaining the voltage.
Consider your energy needs and decide which configuration will work best for you.
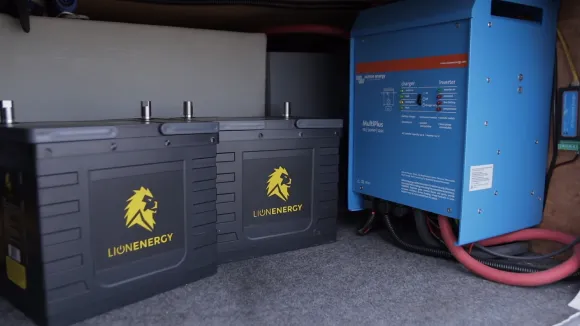
Step 2: Battery Placement
Once you have selected the battery type and determined the battery configuration, you should consider the placement of the battery.
Consider the weight distribution, ventilation, and protection from the elements as you find suitable locations in your RV to place the batteries.
When determining the ideal location, ensure that the weight is evenly distributed to maintain stability while on the road. It is also important to provide adequate ventilation to prevent overheating of the batteries, as excessive heat can reduce their lifespan.
Also, protecting the batteries from the elements, such as rain or extreme temperatures, is essential to prevent damage and ensure their optimal functioning.
Using battery boxes or compartments specifically designed for RV use will help secure the batteries in place, providing both safety and convenience.
Step 3: Wiring Configuration
Now that you have determined the placement of your batteries, it’s time to move on to the next step: wiring configuration. This step is crucial in ensuring that your RV’s solar system functions properly.
Here are three key considerations for wiring your 6-volt batteries in an RV solar system:
- Series Connection: Connect the positive terminal of one battery to the negative terminal of the next battery. This will increase the voltage output of your system.
- Parallel Connection: Connect the remaining positive terminals together and the remaining negative terminals together. This will increase the overall capacity of your battery bank.
- Connection to RV’s Electrical System: Use your battery bank’s positive and negative terminals to connect to your RV’s electrical system, ensuring a secure and reliable connection.
Step 4: Charging System
Connect the charge controller between your solar panels and batteries to regulate the charging process effectively. The charge controller protects your batteries from overcharging and ensures efficient power conversion.
When selecting a charge controller for your RV solar system, it is important to consider the compatibility with your battery type.
If you use 6-volt batteries, ensure the charge controller is designed to handle this specific voltage. Additionally, make sure the charge controller has the capacity to handle your solar panel’s output.
Oversizing the charge controller can provide additional headroom and prevent potential issues.
To install a charge controller between the solar panels and batteries of the RV solar system, locate a suitable and easily accessible location to mount the charge controller. This is typically near your battery bank.
Next, connect your solar panels’ positive and negative terminals to the corresponding terminals on the charge controller. Ensure these connections are secure to prevent any loose wiring issues.
Then, connect the charge controller’s output terminals to your battery bank, paying close attention to the polarity to avoid any electrical mishaps.
Ensure your charge controller is configured correctly, usually via settings or dip switches, to match your battery type and desired charge parameters.
Step 5: Inverter Installation
You’ll need to connect an inverter to your battery to power your AC appliances. The inverter takes the DC power stored in the batteries and converts it into AC power that your appliances can utilize.
Here are three important steps to follow when installing an inverter for your RV solar system:
- Determine the power requirements: Calculate the total wattage of the appliances you plan to use simultaneously. This will help you choose an inverter with the appropriate capacity.
- Select the right inverter: Consider factors such as the inverter’s power rating, waveform type (pure sine wave or modified sine wave), and efficiency. Match these specifications to your power requirements and budget.
- Install the inverter: Connect the inverter to your battery system using the appropriate cables. Ensure proper grounding and follow the manufacturer’s instructions for installation and safety precautions.
What happens if you use a 12V charger on a 6V battery in your RV?

Using a 12V charger with a 6V battery can lead to overcharging and potential safety hazards.
When a 12V charger is used on a 6V battery, the higher voltage can cause the battery to be charged at a rate that is too high for its capacity. This overcharging can lead to thermal runaway, where the battery becomes excessively hot and can potentially leak, explode, or even catch fire.
The voltage mismatch can also damage the battery and compromise its lifespan. So, using the correct charger for your battery system is crucial to ensure proper functioning and safety.
What Are the Reasons for Using RV Tire Covers?
There are 11 reasons to use rv tire covers. Firstly, they protect tires from harmful UV rays, preventing cracking and premature aging. Secondly, they shield tires against harsh weather conditions like rain, snow, and excessive heat. Thirdly, they contribute to better fuel efficiency by maintaining optimal tire pressure. Fourthly, they prevent sidewall damage caused by sun exposure. Fifthly, they deter tire dry rot caused by extended periods of inactivity. Sixthly, they keep tires clean and free from dirt, dust, and debris. Seventhly, they enhance the overall appearance of the RV. Eighthly, they minimize the need for tire replacements, thus saving money in the long run. Ninthly, they offer convenience with easy installation and removal. Tenthly, they reduce the risk of blowouts or flat tires, ensuring safer travels. Lastly, they increase the lifespan of tires, prolonging their usability.
How many watts rating does a 6V battery have in an RV solar system?
In an RV solar system, a 6-volt battery typically has a watt rating of 12 watts. This rating reflects the battery’s capacity to deliver power over time.
Remember that the watt rating represents the potential output, and the energy you can draw from the battery depends on factors like its ampere-hour (Ah) capacity and the efficiency of your RV’s electrical system.
When planning your solar setup, it’s essential to consider the watt rating of your batteries, their capacity, and how they match your energy needs to ensure a reliable power supply during your adventures on the road.
How long should 6-volt RV batteries last in an RV solar system?
In an RV solar system, 6-volt batteries can typically last for approximately six years or even longer with proper care and maintenance.
To maximize their lifespan, it’s advisable to discharge these batteries to around 50% of their capacity daily and ensure a recharge of around 90%.
This practice helps preserve the battery’s health and ensures it remains a reliable power source for your RV adventures.
Regularly monitoring your battery’s state of charge and adhering to proper charging and discharging routines will extend the longevity of your 6-volt RV batteries within your solar setup.
Experience the Power of 6-Volt Batteries: Your Road to Uninterrupted Adventures
Incorporating 6-volt batteries into your RV solar system opens up a world of advantages.
With increased amp hours, better discharge and recharge performance, longer lifespan, and a high tolerance for deep discharge, these batteries are tailor-made for RV enthusiasts seeking reliable and sustainable power solutions.
You’ll harness their full potential by following the step-by-step instructions for integrating them into your system.So, when you hit the road, rest assured that your RV will be powered efficiently, ensuring comfortable and uninterrupted adventures. Embrace the benefits of 6-volt batteries and let them fuel your travels on the road.

