
Last Updated on September 19, 2023
Are you worried about running out of power on your RV adventures? Adding more solar panels to your existing system is the solution you’ve been looking for.
You can easily increase your RV’s energy production with portable solar panels. And if you’re concerned about your roof space, rooftop solar panels are a great option, too.
In this case, you’ll need to assess and plan for the additional power requirements and space availability. Next, select compatible panels that can be easily integrated into your current setup.
Additionally, it may be necessary to upgrade your charge controller to accommodate the increased power input.
Here, we’ll explore the pros and cons of both options and share how to combine them for maximum efficiency. Get ready to power up your RV and embrace endless adventures.
How Do You Add More Solar Panels to Your Existing RV System?
If you’re looking to add more solar panels to your existing RV system, there are a few key steps to follow.
- Step 01. Assessment and planning
- Step 02. Selecting compatible panels
- Step 03. Upgrading charge controller
- Step 04. Adding mounting hardware
- Step 05. Wiring and connection
- Step 06. Connect to the charge controller
- Step 07. Test the system
- Step 08. Secure panels and components
Let’s dig into these steps to understand how to upgrade your RV solar system with more panels.
Step 01. Assessment and Planning
Before adding more solar panels to your existing RV system, assessing and planning is important. Start by evaluating the components of your current system, such as the solar panels, charge controller, batteries, and wiring.
Ensure that your system can handle the additional panels in terms of voltage and capacity. Check if your charge controller can accommodate the extra power and if your batteries have enough storage capacity.
Next, calculate your energy needs by considering your daily power consumption and the sunlight available in your location. This will help you determine how many more panels you’ll need to meet those requirements. It is also important to consider factors like available space on your RV roof and weight limitations.
Step 02. Selecting Compatible Panels
When selecting panels for your RV solar system, choosing ones compatible with your existing setup is important. This means considering the voltage and amperage of the panels. Matching these specifications ensures that the solar panels will work seamlessly with your current system and maximize its efficiency.
Either portable or rooftop solar panels, to determine compatibility, check your current panels’ voltage and amperage ratings. Then, find new panels with similar ratings. This will ensure that the new panels are compatible with your existing ones.
In addition to voltage and amperage, consider the physical dimensions of the new panels. Make sure they fit within the available space on your RV roof. This will ensure the installation process goes smoothly and the panels are securely mounted.
Step 03. Upgrading Charge Controller
To optimize the charging process and prevent overcharging, ensure your charge controller can handle the increased solar input from the new panels. Upgrading your charge controller is crucial when adding more solar panels to your RV system.
The charge controller acts as a safeguard by regulating the flow of electricity from the panels to the batteries. By choosing a charge controller with a higher capacity, you ensure that it can handle the combined output of your existing panels and the new ones.
This upgrade will allow for efficient charging and protect your batteries from potential damage caused by overcharging.
Select a charge controller compatible with your system’s voltage and current requirements, and consult the manufacturer’s specifications for guidance.
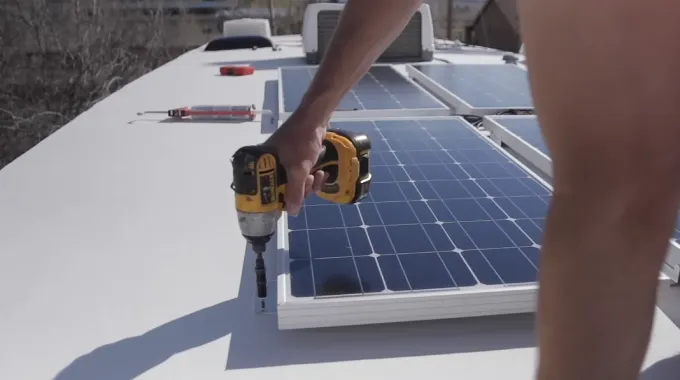
Step 04. Adding Mounting Hardware
Follow the manufacturer’s instructions and install the mounting hardware for securing the new solar panels on your RV roof. Properly securing the panels is crucial to ensure their stability and prevent any damage while you’re on the road.
Use the provided brackets and screws to attach the mounting hardware to the roof. Ensure to align the brackets properly and tighten the screws lightly to ensure further adjustments can be made later.
For portable systems, choose a durable and safe mounting surface to secure the system. Place the solar panel frames up against the chosen surface and use screws or other fastening devices to attach them in place. Ensure all parts are properly tightened before exposing your system to sunlight.
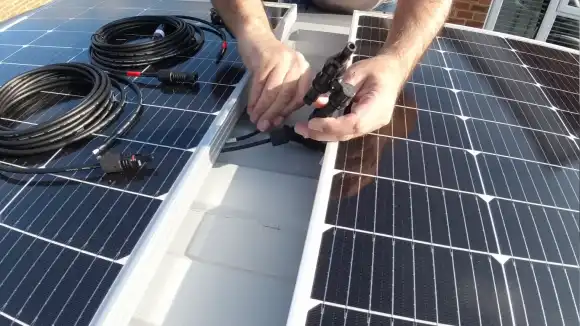
Step 05. Wiring and Connection
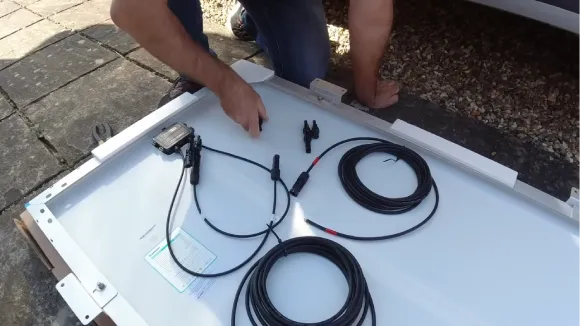
Ensure that you properly connect the new solar panels to your wiring system, extending or replacing the wiring if necessary.
When adding more solar panels to your existing RV system, it is essential to maintain the integrity of your wiring connections. Start by identifying the appropriate connection points on your current wiring system.
If the distance between your new panels and the existing system is too far, you may need to extend the wiring to ensure a secure and efficient connection. On the other hand, if the existing wiring is unsuitable for the increased power load, replacing it with a higher gauge wire is crucial to prevent power loss or electrical issues.
Remember to follow the proper polarity when connecting the panels to ensure maximum efficiency and performance.
Step 06. Connect to Charge Controller
Connect the wiring from the new panels to the charge controller, ensuring that you follow the manufacturer’s guidelines and pay attention to the positive and negative terminals.
The charge controller acts as a regulator, managing the energy flow from the panels and preventing overcharging of the batteries. Start by identifying the positive and negative terminals on both the panels and the charge controller.
Use appropriate gauge wire to connect the panel’s positive terminal to the charge controller’s positive terminal and its negative terminal to the charge controller’s negative terminal. Secure the connections using appropriate connectors or crimping tools.
Double-check your connections to ensure they are secure and properly insulated. Following these steps will ensure a successful integration of the new panels into your RV system.
Step 07. Test the System
Before permanently securing the new panels and components, test the system to confirm that the panels are generating power and that the charge controller is functioning correctly. This step is crucial to ensure the seamless integration of the new solar panels into your existing RV system.
Start by monitoring the battery voltage and charging process. Check if the panels are generating the expected amount of power and if the charge controller is effectively regulating the charging process. Use a multimeter to measure the voltage and current output of the panels, ensuring they match the manufacturer’s specifications.
Observe the charge controller’s LED indicators for errors or irregularities. It is important to address any issues before proceeding to the permanent installation, as it will save you time and effort in the long run.
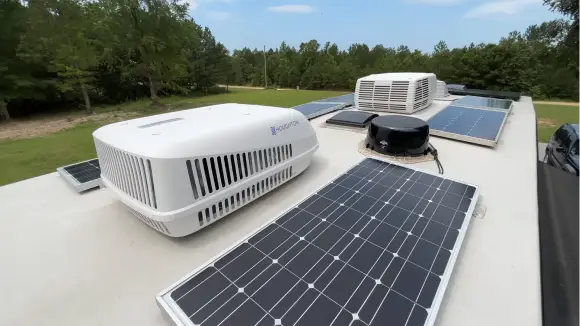
Step 08. Secure Panels and Components
Once you’ve confirmed the system is functioning correctly, go ahead and securely fasten the new panels and components to your RV roof. This step is crucial to ensure the stability and longevity of your solar setup.
Start by aligning the panels properly with the mounting hardware on the roof. Use the appropriate tools to tighten the bolts securely, but be careful not to overtighten and damage the panels or the roof.
It’s important to prevent any movement or shifting of the panels while driving, as this can cause damage and reduce the system’s efficiency.
And for the portable option, the panels and components can be securely attached to the stand or frame. Double-check that all connections are secure and that there are no loose wires or components.
Once the system is completely installed, cover the junction box and wiring with waterproofing materials like sealant or electrical tape.
Pros and Cons of Portable Solar for RVs
One advantage of using portable solar panels for your RV is the flexibility to position them in optimal sunlight while keeping your RV shaded. This allows you to maximize energy generation while ensuring a comfortable living environment inside your vehicle.
Portable solar panels are easy to install and typically come with adjustable stands or brackets, making setup a breeze. Additionally, they offer scalability, allowing you to easily add more panels as needed to increase your power generation capacity.
These panels can also be used for other outdoor activities, such as camping or picnicking, providing an alternative power source.
However, there are a few drawbacks to consider. Setting up and taking down portable panels can be time-consuming, especially if you frequently change locations. They also have lower wattage than rooftop installations, limiting their ability to power larger appliances or multiple devices simultaneously.
Additionally, storing them securely while driving and the potential for theft or damage when left unattended are concerns. Some RV experts also prefer the clean look of a rooftop solar setup.
Pros and Cons of Rooftop Solar for RVs
Now that you’ve learned about the pros and cons of portable solar panels for RVs let’s explore the advantages and disadvantages of rooftop solar panels.
One major benefit of rooftop panels is continuous charging. These panels are always exposed to sunlight while you’re driving or parked, ensuring a consistent energy flow to charge your batteries.
Additionally, once installed, rooftop panels require minimal effort. You don’t need to set them up or take them down every time you park. They become a permanent fixture on your RV.
Aesthetically, rooftop panels are integrated into the RV’s design. They maintain their look without requiring extra storage space.
However, there are some downsides to consider. Installing rooftop panels can be complex. It may involve drilling into the RV’s roof and routing wires through its interior.
Shading can also significantly reduce energy production with rooftop panels. Since they are fixed, they may only sometimes capture the optimal angle of the sun.
Finally, rooftop solar panels’ upfront cost can be higher than portable panels.
Can I use both portable and rooftop solar panels together on my RV?
Combining portable and rooftop solar panels on your RV allows you to maximize power input and maintain a consistent energy flow to charge your batteries.
You can utilize both types of panels to take advantage of their strengths. While rooftop panels provide continuous power throughout the day, portable panels can be positioned to capture the maximum amount of sunlight.
This combination is especially beneficial if your RV batteries can accept more power than one set of panels can provide. With both sets of solar panels working together, they will provide charge to the best of their ability.
Remember, combination systems require a perfect balance between the two types of panels to ensure they both work efficiently. You can get help from professionals to ensure you get the most out of your solar panels.
Can I use solar panels to run my air conditioner on my RV?
You can run your RV air conditioner using solar power by ensuring solar panels convert sunlight into enough electrical energy. To do this, you will need a sufficient number of solar panels and batteries to meet the power demands of your air conditioner.
It is important to calculate the power requirements of your air conditioner and determine the size and capacity of solar panels needed. Additionally, consider your solar panels’ orientation and tilt angle to maximize sunlight absorption.
Investing in an inverter to convert the DC power generated by the solar panels into AC power that your air conditioner can use is also advisable.
Maximize Your RV’s Energy Efficiency with Additional Solar Panels
Adding more solar panels to your existing RV system is a great way to increase your energy efficiency and reduce your reliance on traditional power sources.
Combining the pros of portable solar panels, like flexibility and ease of use, with the benefits of rooftop solar panels, like maximum power generation and space utilization, you can create a robust RV solar setup.
However, keep in mind that running an air conditioner solely on solar power may not be feasible due to the high energy requirements. So, while solar panels can significantly enhance your RV experience, it’s important to consider your power needs and limitations.
As the saying goes, “A well-equipped RV is like a shining star on the open road.”

