
Last Updated on December 24, 2023
Removing RV water line clamps is an essential task that you may need to undertake for various reasons.
Whether you’re dealing with a leak, replacing damaged clamps, or performing routine maintenance, knowing how to remove these clamps is a valuable skill for any RV owner.
To remove RV water line clamps, you have to turn off the water supply and disconnect the water hoses.
After that, loosen and remove the clamps with pliers or a wrench. Make sure you don’t damage the pipes when you do this.
We will discuss all the steps in detail so you can easily remove RV water line clamps without causing any damage to your RV.
How to Remove RV Water Line Clamps: Steps to Follow
If you need to remove RV water line clamps, there are some basic steps to follow.
Step #1: Gather the Necessary Tools
Step #2: Prepare the Area
Step #3: Remove the Clamp Covers
Step #4: Loosen and Remove the Clamps
Step #5: Check the Water Line Plumbing
Step #6: Reattach or Replace the Clamps
Step #7: Test the Water System
Let’s get into the details.
Step #1: Gather the Necessary Tools
You must gather all the tools needed to remove the RV water line clamps. These tools include a flat-head screwdriver, pliers, and pipe cutters. All these tools ensure you can effectively disconnect the water line clamps and avoid any mistakes.
Step #2: Prepare the Area
Prepare the area before working on the RV water line clamps to avoid any mess or damage.
Turn off the water supply to your RV to prevent any water from flowing through the pipes while you work. This will ensure you can work on the clamps without water leakage or damage.
Once you’ve turned off the water supply, lay down some towels or a bucket underneath the area where you’ll remove the clamps. This will catch any residual water that may be present and protect the surrounding area from any potential water damage.
Step #3: Remove the Clamp Covers
Now it’s time to reveal the hidden mechanism of your water system by prying off the covers with your trusty screwdriver. This will give you a clear view of the clamp underneath.
Using your flat-head screwdriver, locate the slot on the cover and insert the tool. Twist the screwdriver gently to pry the cover off, carefully not to damage the cover or the clamp underneath while removing it.
Once the cover is removed, you can see the clamp mechanism clearly. This step is crucial to proceed with the removal of the clamp. Note that some covers may be more difficult to remove than others, so take your time and patience.
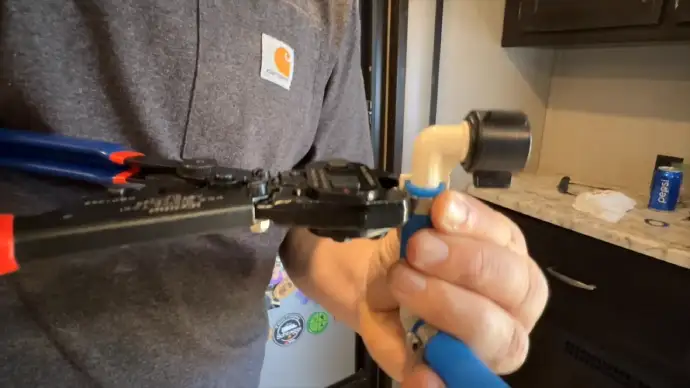
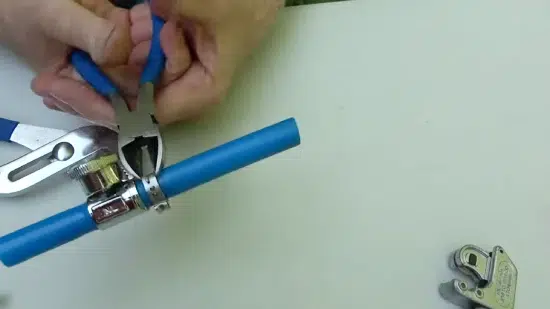
Step #4: Loosen and Remove the Clamps
It is time to release those clamps. With your pliers or wrench in hand, give those rusted old shackles a counterclockwise twist to release their grip on your water system.
If the clamps are particularly stubborn, don’t be afraid to use some penetrating oil to help loosen them up. This will make the removal process much easier and prevent any damage to your water lines.
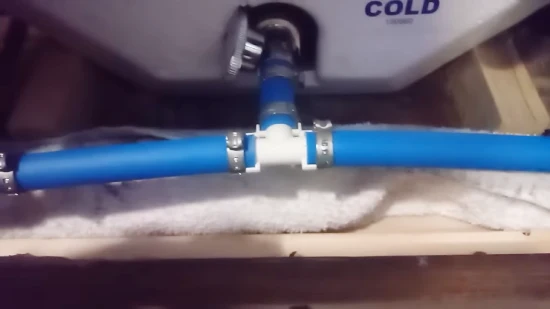
Step #5: Check the Water Line Plumbing
After releasing the shackles, carefully inspect the plumbing for potential damage or leaks to ensure the water system is functioning properly. This allows you to identify any issues that may need attention.
Look closely at the pipes for any cracks, corrosion, or other signs of damage. Even a small leak can cause big problems, so it’s best to catch them early.
If you notice any issues, addressing them before continuing the removal process is important. Depending on the severity of the damage, you may need to replace the affected pipes or fittings.
Step #6: Reattach or Replace the Clamps
To ensure the safety of your water system, you’ll want to secure the pipes with new clamps or reattach the existing ones using pliers or a wrench.
If the water line clamps are in good condition, you can slide them back onto the pipes and tighten them to ensure a secure connection. Remember to avoid overtightening, as this could cause damage to the pipes.
Replacing the clamps with new pinch clamps for a secure connection is best if the clamps are damaged or rusty.
Once you have the new clamps, slide them onto the pipes and tighten them with pliers or a wrench until they are securely fastened. Maintaining your RV’s water system will prevent leaks and bursts.
Step #7: Test the Water System
After reattaching or replacing the clamps on your RV water line, it’s time to put the system to the test. You don’t want any leaks to go unnoticed, so closely monitoring the connections and pipes while the water is running is important.
Here’s what you need to do to ensure your water system is leak-free:
- First, turn on the water supply to your RV.
- Check all connections for leaks. This includes the clamps you’ve just reattached or replaced and any other connections in the system.
- Run water through all faucets and fixtures in your RV. This will help you spot any leaks that may have gone unnoticed during the initial inspection.
Can you use regular hose clamps instead of specialized RV water line clamps?
It is not recommended to use regular hose clamps for RV water lines. RV water line clamps are specifically designed to ensure a secure and leak-free connection for polyethylene or PEX pipes.
Regular hose clamps may not provide the same level of reliability and can lead to leaks or other issues in the water system.
Using the appropriate RV water line clamps for optimal performance and peace of mind is crucial. The consequences of using regular hose clamps can lead to costly repairs and potential health hazards from contaminated water.
Therefore, it is always best to use specialized RV water line clamps to ensure the highest safety standards for all RV water systems.
How often should you replace RV water line clamps?
Remember that replacing your RV water line clamps every 1 to 2 years is recommended for optimal performance and to avoid any potential leaks or issues.
This timeframe may differ depending on the quality of the clamps, the type of water lines, and the overall usage and conditions of your RV’s water system.
Ensure you regularly inspect your water distribution system for any leaks, cracks, or other issues, and check the clamps for any signs of wear or damage.
What should you do if you encounter stubborn or rusted RV water line clamps that won’t loosen?
You don’t have to panic if your RV’s water line clamps are stubborn or rusted. To start, try applying a penetrating oil or rust dissolver to the clamp and let it sit for a few hours or overnight.
Then, attempt to loosen the clamp again. If that doesn’t work, use locking pliers or a clamp removal tool to increase leverage and grip.
If the clamp still won’t budge, it’s best to seek professional help from an RV expert. They have specialized tools and techniques to remove stubborn clamps without causing damage.
Replace RV Water Line Clamps for a Leak-Free Connection
Maintaining the water line clamps in your RV is a crucial step toward achieving a reliable, leak-free water distribution system. Regularly inspecting them for signs of wear and replacing them as needed can avoid costly repairs and ensure that your RV’s plumbing operates smoothly.
Remember to exercise caution when removing the clamps to prevent damage to the pipes or other components. Proper water system maintenance lets you enjoy a worry-free, hassle-free camping experience.

